Welcome to thehostreviews.com—your premier authoritative destination for cloud infrastructure reviews, developer server architecture tutorials, and performance engineering benchmarks spanning tech hubs from New York and San Francisco to Texas, California, and Washington.
Introduction: Why DigitalOcean Droplets and Ubuntu Server Dominate Modern Web Hosting
When scaling a modern website, API backend, or high-volume e-commerce storefront, outgrowing legacy shared hosting is inevitable. Developers and system administrators require predictable pricing, granular server control, and instant elasticity. This is where cloud infrastructure providers like DigitalOcean change the game.
DigitalOcean’s virtual machine instances—affectionately known as Droplets—provide instant, developer-friendly cloud computing. When paired with Ubuntu Server, the world’s most popular Linux distribution for cloud environments, you get a powerful, rock-solid, and extensively documented hosting stack. Whether your primary target audience spans data centers in New York, San Francisco, or Texas, deploying an Ubuntu-powered Droplet gives you enterprise-grade performance at an affordable, predictable flat-rate cost.
This comprehensive, expert-level guide will walk you through provisioning, configuring, securing, and optimizing an Ubuntu Server Droplet on DigitalOcean specifically for production-grade web hosting.
Part 1: Anatomy of a DigitalOcean Droplet
Before launching your instance, it helps to understand how DigitalOcean structures its cloud infrastructure:
- Shared CPU vs. Dedicated CPU Droplets:
- Basic (Shared CPU) Droplets start as low as $4 to $6 per month, making them ideal for personal sites, blogs, and low-to-medium-traffic applications. They utilize burstable performance architectures.
- General Purpose and CPU-Optimized Droplets provide dedicated threads and NVMe storage variants, built for high-traffic enterprise workloads, heavy databases, and high-concurrency SaaS platforms.
- Datacenters and Edge Proximity: DigitalOcean operates data center regions globally (including New York, San Francisco, and Toronto). Selecting a region closest to your target demographic minimizes network latency and optimizes Core Web Vitals performance.
- Per-Second Billing: DigitalOcean utilizes granular per-second billing with predictable monthly caps, ensuring you only pay for the exact active lifespan of your infrastructure.
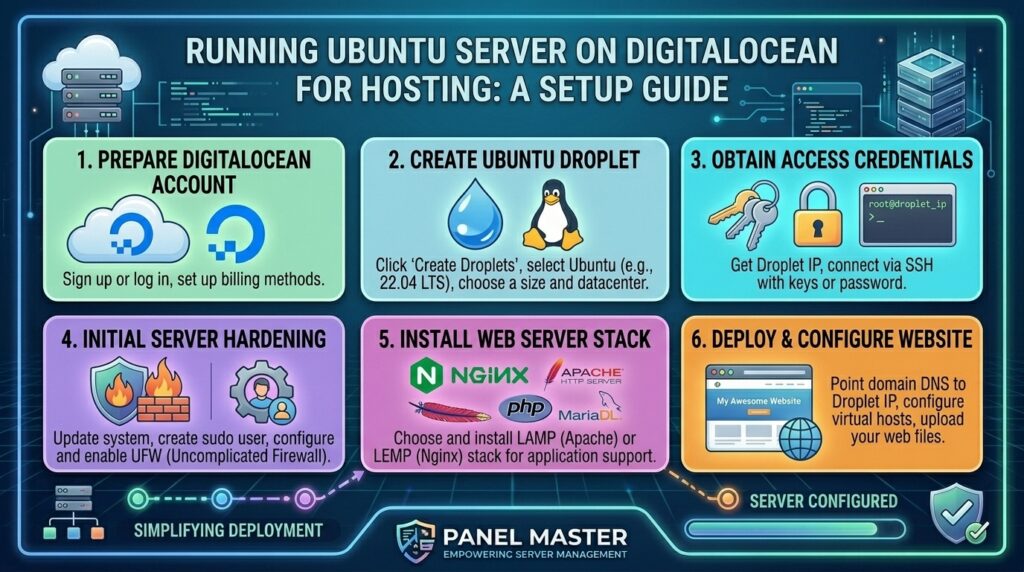
Part 2: Step 1 — Provisioning Your Ubuntu Droplet
Follow these steps to spin up your virtual machine via the DigitalOcean control panel:
- Log into your DigitalOcean account and click Create > Droplets.
- Choose an Image: Select Ubuntu, choosing the latest Long Term Support (LTS) release (e.g., Ubuntu 24.04 LTS or 22.04 LTS) for maximum stability and security support.
- Choose a Plan: Select Basic for standard web hosting, choosing a tier that fits your RAM and storage requirements (e.g., 2 GB RAM / 1 vCPU or higher for production WordPress/Node apps).
- Choose a Datacenter Region: Select the region closest to your user base (e.g., New York
NYC1or San FranciscoSFO3). - Authentication: Select SSH Keys (strongly recommended over passwords). Paste your public SSH key from your local machine.
- Finalize and Create: Name your host (e.g.,
web-production-01) and click Create Droplet. Your virtual server will deploy in under 60 seconds.
Part 3: Step 2 — Initial Connection and System Updates
Once your Droplet is running, copy its public IPv4 address from your control panel dashboard.
1. Establish Secure Connection via SSH
Open your local terminal (Mac/Linux) or PuTTY/PowerShell (Windows) and connect as the root user:
Bash
ssh root@your_droplet_ip_address
2. Update System Packages
Before deploying any web software, update your package repository lists and upgrade existing system packages to patch vulnerabilities:
Bash
apt update && apt upgrade -y
3. Create a Non-Root Sudo User
For security best practices, never run web apps or handle daily tasks as the root user:
Bash
# Create a new deployment user
adduser deployer

# Add user to the sudo group
usermod -aG sudo deployer
Copy your SSH keys over to the new user directory so you can log in seamlessly.
Part 4: Step 3 — Server Hardening and Security Configuration
A public cloud server is targeted by automated malicious scanner bots within seconds of boot. Harden your Ubuntu server immediately by executing these defensive measures:
1. Configure the UFW Firewall
Ubuntu comes pre-configured with UFW (Uncomplicated Firewall). Lock down all ports except those required for web traffic:
Bash
# Allow SSH (or a custom port if changed)
ufw allow OpenSSH

# Allow HTTP and HTTPS web traffic
ufw allow 80/tcp
ufw allow 443/tcp

# Enable the firewall
ufw enable
2. Install and Configure Fail2ban
Protect your server against brute-force attacks by installing Fail2ban to automatically ban IPs exhibiting malicious login behavior:
Bash
apt install fail2ban -y
cp /etc/fail2ban/jail.conf /etc/fail2ban/jail.local
systemctl enable --now fail2ban
3. Enable Unattended Security Upgrades
Automate minor OS security patches so your server stays protected against emerging exploits:
Bash
apt install unattended-upgrades -y
dpkg-reconfigure --priority=low unattended-upgrades
Part 5: Step 4 — Installing Your Web Hosting Stack
Depending on your technical workflow, you can deploy your web hosting stack using one of two methods:
Method A: Manual Stack Installation (LEMP / LAMP)
If you prefer raw control without software bloat, install your web server, database, and PHP runtime manually via APT:
- Install Nginx:
apt install nginx -y - Install MySQL/MariaDB:
apt install mariadb-server -y - Install PHP-FPM:
apt install php-fpm php-mysql php-xml php-mbstring -y
Method B: Control Panel Automation (CyberPanel / aaPanel / RunCloud)
If you prefer a graphical interface to manage multiple domains, databases, and SSL certificates effortlessly without managing raw configuration files, install a modern control panel like CyberPanel or aaPanel on your fresh Ubuntu Droplet.
Part 6: Best Practices for Managing Production Droplets
- Leverage DigitalOcean Backups: Enable automated weekly or daily backups (costing a fraction of your Droplet price) to protect against accidental data loss.
- Monitor Resource Utilization: Install monitoring metrics agents to track CPU spikes, memory consumption, and disk I/O bottlenecks so you know precisely when to resize your Droplet.
- Use Floating IPs for High Availability: If you run mission-critical applications that require zero-downtime failover, utilize DigitalOcean Floating IPs to instantly reroute traffic to a secondary standby server.
Part 7: Frequently Asked Questions (FAQ)
1. What is a DigitalOcean Droplet?
A Droplet is DigitalOcean’s brand name for a Linux-based virtual machine (VM) that provides scalable, isolated computing resources running on virtualized hardware.
2. Is DigitalOcean Droplet managed or unmanaged?
DigitalOcean Droplets are fundamentally unmanaged infrastructure-as-a-service (IaaS), meaning you have full root access and responsibility for OS updates, security configurations, and application deployments.
3. Why should I choose Ubuntu Server for my Droplet?
Ubuntu Server offers long-term support (LTS), unmatched community documentation, extensive software compatibility, and native optimization for cloud environments.
4. How does DigitalOcean billing work for Droplets?
DigitalOcean bills on a per-second basis with a 60-second minimum charge, capped at a predictable flat monthly rate regardless of how many seconds the server runs during the billing cycle.
5. Can I resize my Droplet later as my website traffic grows?
Yes. DigitalOcean allows you to scale your Droplet’s CPU, RAM, and disk storage vertically through the control panel as your application traffic increases.
6. Do Droplets come with dedicated IP addresses?
Yes, every Droplet is provisioned with a unique public IPv4 address and an optional IPv6 address configuration.
7. How do I prevent hackers from brute-forcing my Ubuntu server?
You can secure your server by disabling password authentication in favor of SSH keys, changing default ports, enabling UFW, and installing Fail2ban to block malicious IP addresses.
8. What is the difference between Shared CPU and Dedicated CPU Droplets?
Shared CPU Droplets allocate bursts of shared computing power cost-effectively for standard sites, whereas Dedicated CPU Droplets provide 100% reserved thread performance for heavy enterprise workloads.
9. Can I host multiple websites on a single DigitalOcean Droplet?
Yes! Using virtual hosts in Nginx/Apache or installing a control panel like CyberPanel enables you to host and isolate dozens of websites on a single Droplet.
10. Does DigitalOcean provide automated backups for Droplets?
Yes, you can opt into automated system backups (incremental weekly snapshots) for a small percentage-based add-on fee directly inside the Droplet management console.
Conclusion
Running Ubuntu Server on a DigitalOcean Droplet delivers an exceptional balance of speed, scalability, and financial predictability for modern web hosting. By pairing a robust cloud virtual machine with meticulous security hardening, proper firewall configuration, and optimized web stacks, you ensure your digital projects remain fast, secure, and ready for high-volume traffic growth.