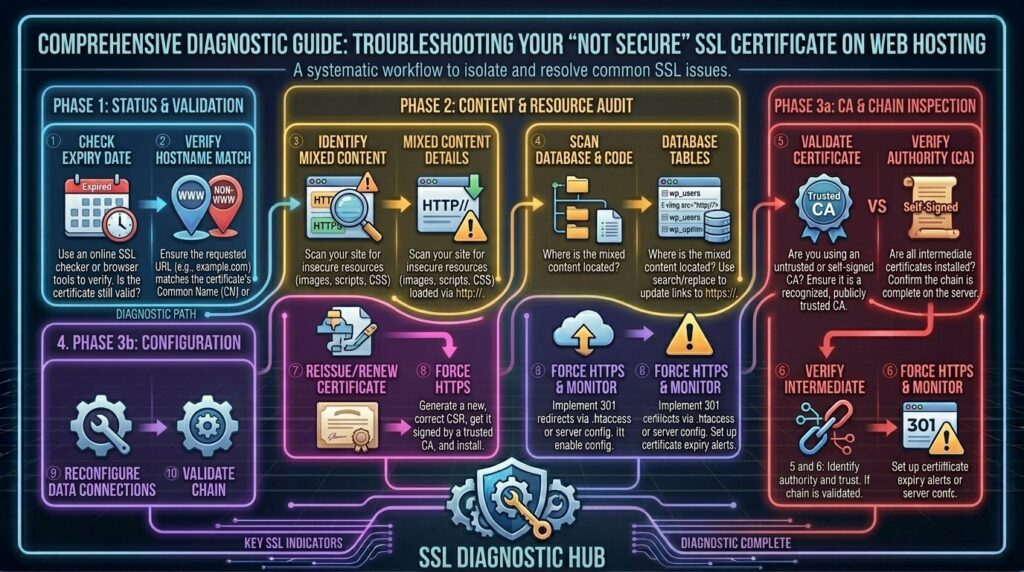
Why is my SSL certificate showing not secure on web hosting? Welcome to thehostreviews.com—your premier authoritative destination for web security evaluations, SSL configuration walkthroughs, and HTTPS troubleshooting guides spanning major technology hubs from New York and San Francisco to Texas, California, and Washington.
Introduction: The Terrifying “Not Secure” Warning
Imagine a potential customer from New York, a client from San Francisco, or a reader from Texas clicking through to your business website, only for their web browser to slam the brakes with a stark warning screen: “Your connection is not private” or a glaring red “Not Secure” label right in the address bar.
For e-commerce shops, portfolio sites, and blogs alike, an invalid or misconfigured SSL (Secure Sockets Layer) certificate is an instant trust killer. Bounce rates skyrocket, conversions plunge to zero, and potential visitors flee your domain within milliseconds.
Modern web hosting platforms make installing an SSL certificate seem like a simple one-click task—often through automated providers like Let’s Encrypt. Yet, thousands of website owners encounter persistent SSL errors right after activation, migration, or minor site updates. Why does a certificate fail to secure a domain even when it says “Active” in the control panel?
This comprehensive, step-by-step masterclass dives deep into the architecture of TLS/SSL security, breaks down the hidden root causes of browser warnings, provides an exhaustive technical troubleshooting playbook, and outlines expert configuration strategies to keep your web hosting environment fully secure.
Part 1: How SSL/TLS Security Works on Web Hosting
Before diagnosing why your certificate is throwing errors, it is vital to understand what an SSL certificate actually does when installed on your web server.
1. The Encryption Handshake
When a user connects to your website via https:// (Hypertext Transfer Protocol Secure), your web server and the user’s web browser execute a cryptographic “handshake”:
- Authentication: The server presents its SSL certificate, verifying to the browser that the server legally owns and controls the domain name.
- Encryption: Both parties agree on a secure, encrypted session key. Any data transmitted thereafter—passwords, credit card numbers, or form inputs—is scrambled so completely that even if intercepted on public Wi-Fi, it cannot be read.
2. The Role of Web Hosts in Certificate Management
On modern web hosting infrastructure, SSL certificates are managed at two primary levels:
- Server-Level Binding: The certificate files (CRT, Private Key, and Intermediate CA Bundle) must be correctly installed and bound to your domain name inside your hosting control panel (cPanel, hPanel, Plesk, or cloud node).
- Application-Level Routing: Your website’s internal configuration (such as WordPress site URLs and
.htaccessrewrite rules) must actively force all inbound HTTP traffic to redirect securely to HTTPS.
Part 2: The 6 Most Common Reasons Your SSL Shows “Not Secure”
When a browser flags your secure site as dangerous or unencrypted, it is usually driven by one of six specific architectural failures.
1. Mixed Content Errors (The Most Frequent Culprit)
Your SSL certificate is installed correctly, and your domain loads with a padlock—until you click through to an inner page or look closely at specific elements.
- The Cause: Your website is loading over HTTPS, but some embedded assets on the page (such as images, stylesheets, JavaScript files, or iframe embeds) are explicitly being called via insecure
http://links instead ofhttps://. - The Result: Modern browsers block or flag these insecure resources, throwing a “Mixed Content” warning that breaks the overall security lock.
2. Expired SSL Certificates
- The Cause: Free automated certificates (like Let’s Encrypt) typically feature a 90-day validity window. While web hosts are designed to auto-renew these certificates in the background, background cron job failures, server interruptions, or DNS changes can interrupt the renewal script.
- The Result: Once the expiration timestamp passes, the certificate becomes invalid, and browsers immediately block access.
3. Domain Name Mismatch Errors
- The Cause: Your SSL certificate was issued for a specific variation of your domain—for example,
thehostreviews.com—but your server configuration or visitor traffic is attempting to load[www.thehostreviews.com](https://www.thehostreviews.com)(or vice versa), and the certificate does not include a wildcard or alternative Subject Alternative Name (SAN) for that variation. - The Result: The browser detects a mismatch between the requested domain and the domain bound to the certificate authority, triggering a strict security warning.
4. Incorrect WordPress Site URL Configuration
- The Cause: Even if your web host has an active SSL installed, your core application settings may still point to the old insecure protocol. In WordPress, if your WordPress Address (URL) and Site Address (URL) fields under Settings > General still begin with
http://instead ofhttps://, your site will suffer from severe redirect loops and security warnings.
5. Corrupted .htaccess or Missing HTTPS Redirects
- The Cause: Your server accepts both insecure HTTP traffic and secure HTTPS traffic simultaneously without forcing a permanent 301 redirect. If a user lands on the unencrypted version, they may experience broken routing or mixed content flags.
6. Unverified or Incomplete SSL Installation Bundle
- The Cause: If you purchased a custom commercial SSL certificate (from providers like Sectigo or DigiCert) and manually pasted the certificate blocks into your host control panel, forgetting to include the Intermediate CA Bundle (Chain Certificate) will cause browsers to untrust the issuer, throwing an untrusted connection error on external networks.
Part 3: Step-by-Step Emergency Troubleshooting Protocol
If your website is displaying a “Not Secure” warning right now, follow this systematic diagnostic and repair workflow to restore full encryption:
Step 1: Diagnose the Exact Error in Your Browser
Don’t guess what’s wrong—let your browser tell you precisely what it dislikes:
- Open your website in Google Chrome or Mozilla Firefox.
- If you see a warning screen, click Advanced and then click Proceed to [Your Site] (unsafe) to force-load the page.
- Once the page loads, right-click anywhere on the background and select Inspect (or press
F12) to open the Developer Tools. - Click on the Console tab.
- Look for red warning messages stating:
Mixed Content: The page at 'https://...' was loaded over HTTPS, but requested an insecure script 'http://...'. This pinpoints every single bad file URL causing your warning.
Step 2: Force HTTPS and Update CMS Core URLs
If your application settings are pointing to HTTP, update them immediately:
- Log into your WordPress dashboard.
- Navigate to Settings > General.
- Locate the WordPress Address (URL) and Site Address (URL) fields.
- Ensure both fields are updated to include
https://(e.g.,[https://thehostreviews.com](https://thehostreviews.com)). - Scroll to the bottom and click Save Changes. (Note: This will log you out; simply log back in using your secure credentials).
Step 3: Fix Mixed Content Using Plugins or Database Searches
To clean up old database links pointing to http://:
- Install and activate a trusted plugin like Really Simple SSL or Velvet Blues Update URLs.
- If using Really Simple SSL, simply click the button to “Activate SSL”. The plugin automatically forces an internal rewrite of all insecure URLs, fixes mixed content scripts, and establishes a 301 HTTPS redirect at the server level.
- Alternatively, use Velvet Blues to scan your entire MySQL database and replace every instance of
[http://thehostreviews.com](http://thehostreviews.com)with[https://thehostreviews.com](https://thehostreviews.com).
Step 4: Force HTTPS Redirects via .htaccess (Apache Servers)
If your host runs on Apache or LiteSpeed (common across Bluehost, Hostinger, and SiteGround), ensure all traffic is forced to HTTPS by updating your root .htaccess file:
- Open your hosting control panel File Manager and navigate to your website’s root directory (
public_html/). - Open and edit your
.htaccessfile. - Paste these standard rewrite rules right at the top of the file:Apache
RewriteEngine On RewriteCond %{HTTPS} off RewriteRule ^(.*)$ https://%{HTTP_HOST}%{REQUEST_URI} [L,R=301] - Save the file and clear your browser cache.
Step 5: Verify Auto-Renewal and Force SSL Reissuance
If your free Let’s Encrypt certificate has expired or failed to renew:
- Log into your hosting control panel dashboard.
- Navigate to the SSL/TLS Status or Security manager section.
- Look for your domain name and click Run AutoSSL or Reissue Certificate.
- Confirm that the status switches to a solid green padlock indicating active protection.
Part 4: Advanced Verification Tools
Never rely solely on your own browser to check if your SSL configuration is globally sound. Use professional diagnostic utilities:
- Qualys SSL Labs (ssllabs.com/ssltest): Type your domain name into this free enterprise scanner. It performs a deep cryptographic audit of your web server, testing cipher suites, protocol supports (TLS 1.2 and TLS 1.3), and certificate chains. Aim for an A or A+ rating.
- WhyNoPadlock (whynopadlock.com): If your site has an active certificate but intermittent mixed content warnings, paste your URL here. It instantly scans every image, script, and CSS stylesheet on your homepage and outputs a clean list of any remaining insecure
http://links.
Part 5: Proactive Prevention Best Practices
- Monitor Certificate Expiration Dates: Set up calendar reminders or use uptime monitoring tools (like UptimeRobot or StatusCake) that track SSL expiration dates and alert you 14 days before a renewal is due.
- Enforce Strict Transport Security (HSTS): Once your HTTPS setup is completely stable and error-free, consider enabling HSTS (HTTP Strict Transport Security) headers on your server. HSTS instructs browsers to only connect to your domain via encrypted HTTPS connections for a designated future time period, completely eliminating downgrade attacks.
- Choose Hosting with Automated SSL Management: Ensure your web hosting provider includes native, automated Let’s Encrypt management that handles background renewals without manual intervention.
Part 6: Frequently Asked Questions (FAQ)
1. Why is my SSL certificate showing “Not Secure” even though it’s active?
This is typically caused by “Mixed Content” errors, where your site loads securely via HTTPS, but individual images, scripts, or stylesheets are being requested via insecure http:// links.
2. What is a Mixed Content error?
A Mixed Content error occurs when an HTML page is loaded over a secure HTTPS connection, but sub-resources (like images or JavaScript files) are loaded over an insecure HTTP connection.
3. How do I fix mixed content errors on WordPress?
You can fix mixed content errors by installing a trusted plugin like Really Simple SSL, which automatically updates internal links and forces secure resource loading.
4. Why did my free Let’s Encrypt SSL certificate expire?
Free certificates expire every 90 days. While web hosts usually auto-renew them, server cron job interruptions or DNS configuration changes can block the automated renewal script.
5. Do I need a paid SSL certificate or is a free one enough?
For 95% of standard websites, blogs, and e-commerce stores, free Let’s Encrypt SSL certificates provide the exact same military-grade encryption and browser trust as expensive commercial certificates.
6. How do I force all visitors to use HTTPS instead of HTTP?
You can force HTTPS by adding a 301 redirect rule to your server’s .htaccess file or by enabling the “Force HTTPS” toggle inside your hosting control panel.
7. Why does my browser say “Cert Common Name Invalid”?
This error happens when the SSL certificate installed on the server does not match the exact domain name or subdomain variant being requested by the visitor’s browser.
8. How long does it take for an SSL installation to update globally?
SSL installations and DNS/IP bindings usually reflect within 15 to 60 minutes, though full global propagation can occasionally take up to a few hours.
9. What is Qualys SSL Labs and how do I use it?
Qualys SSL Labs is a free online tool that scans your website’s SSL configuration and grades your server security from F to A+, helping you identify cryptographic weaknesses.
10. Who should I contact if my SSL certificate keeps failing?
If you have tried forcing redirects, clearing caches, and reissuing your certificate through your control panel without success, reach out to your web host’s 24/7 technical support team for server-side troubleshooting.
Conclusion
Encountering a “Not Secure” warning on your web hosting platform can feel alarming, but it is an entirely solvable technical hurdle. By systematically diagnosing mixed content errors in your browser’s developer console, updating CMS core URLs, forcing 301 HTTPS redirects via your .htaccess file, and verifying auto-renewal settings, you can eliminate browser warnings and establish absolute trust with every visitor.