How to Recover a Hacked WordPress Site on Shared Hosting: The Ultimate Emergency Restoration Masterclass
Welcome to thehostreviews.com—your premier authoritative destination for website security audits, malware removal tutorials, and shared hosting disaster recovery guides spanning major technology hubs from New York and San Francisco to Texas, California, and Washington.
Introduction: The Nightmare of a Compromised Website
You wake up, sip your morning coffee, type your business or personal website URL into your browser, and instantly feel your stomach drop. Instead of your clean blog, portfolio, or e-commerce shop, your screen displays flashing flashing neon text, foreign language spam characters, a generic hacker greeting card, or a stark Google red warning screen reading: “Deceptive site ahead” or “This site may be hacked.”
For digital entrepreneurs, bloggers, and small business owners hosted on budget shared hosting environments, a hacked WordPress site is an absolute operational emergency. Not only are you losing revenue and customer trust by the minute, but search engines like Google will rapidly blacklist your domain, destroying your organic search visibility.
Shared hosting—while cost-effective and powerful—means your website shares physical server space with hundreds of other accounts. If a weak neighbor gets compromised, or if your own WordPress installation runs an outdated plugin with an unpatched vulnerability, malicious actors can inject malicious PHP scripts, SEO spam injections, backdoors, and crypto-miners into your directory files.
This comprehensive, step-by-step masterclass provides a definitive technical playbook on how to lock down, clean, recover, and permanently harden a hacked WordPress site living on a shared hosting account.
Part 1: Initial Assessment—Diagnosing the Breach
Before you delete files or start clicking random recovery buttons, you must understand the scope of the infection. Not all hacks look the same, and identifying the symptom dictates the remediation strategy.
1. Common Types of WordPress Hacks on Shared Hosting
- SEO Spam Injections: Hackers inject hidden code that creates thousands of automated pharmaceutical, luxury goods, or casino spam pages deep inside your directory or database, siphoning your Google search traffic.
- Malicious Redirects: Visitors to your site are automatically redirected to scam websites, adult portals, or affiliate landing pages.
- Defacement: The hacker replaces your homepage with a custom image, political message, or threat.
- Admin Account Hijacking: You can no longer log into your WordPress dashboard (
/wp-admin/) because the attacker created a rogue administrator account and changed your password. - Distributed Denial of Service (DDoS) / Mail Spam Relays: Your shared hosting email utility is abused to send millions of spam emails, getting your server’s IP address blacklisted.
2. Immediate Triage: Take the Site Offline Safely
If your host hasn’t already suspended your account, you need to stop active exploitation immediately:
- Put your site into a controlled maintenance state if you still have dashboard access, or block public traffic via your control panel while you work.
- Do not panic and delete your entire database yet; you may need database records to recover user data or clean injected content tables.
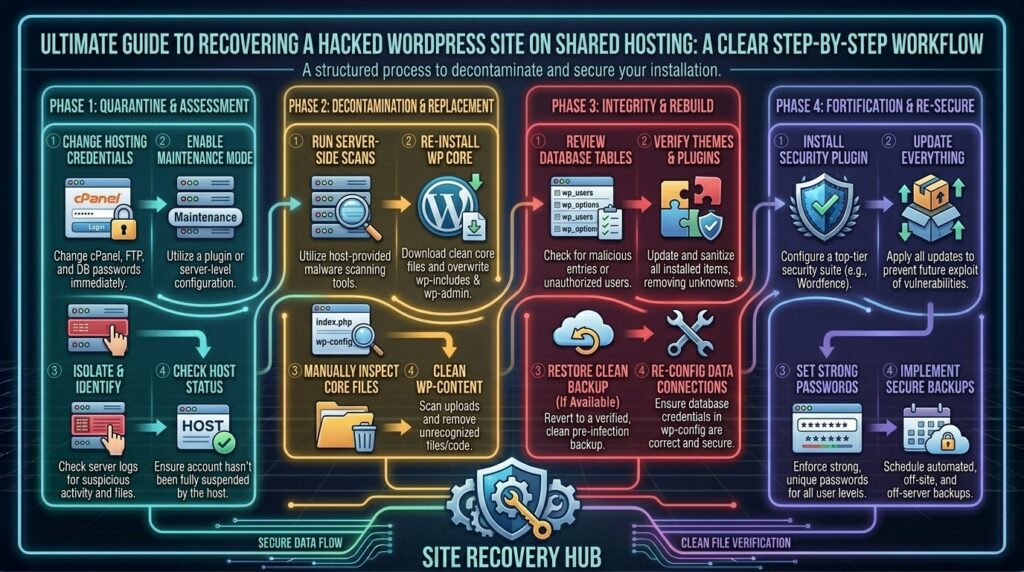
Part 2: Step-by-Step Emergency Recovery Playbook
Executing a proper cleanup requires working methodically from the server backend outward. Follow this precise restoration workflow:
Step 1: Secure Your Hosting Account and Control Panel Access
If a hacker compromised your WordPress site, they may have also stolen your shared hosting control panel (cPanel) credentials if you used identical passwords.
- Immediately log into your hosting provider dashboard (e.g., Bluehost, Hostinger, SiteGround).
- Change your main hosting account password to a complex, cryptographically secure alphanumeric passphrase.
- Enable Two-Factor Authentication (2FA) on your hosting account login if available.
- Check your hosting account’s FTP accounts, SSH keys, and email forwarders to ensure the hacker hasn’t created unauthorized backdoor access users.
Step 2: Access Files via File Manager or SFTP
Since you likely cannot log into your WordPress admin dashboard, you must manage your server files directly:
- Log into your hosting control panel and open the File Manager, or connect via an SFTP client (like FileZilla).
- Navigate to your website’s root directory (
public_html/or your domain folder). - Crucial Step – Complete Backup: Before making any deletions or file alterations, download a complete local zip archive of your entire
public_htmldirectory and export a fresh copy of your MySQL database via phpMyAdmin. If anything goes wrong during manual cleaning, you can restore this raw state.
Step 3: Perform a Total Nuclear Cleanse of WordPress Core Files
The safest, fastest, and most reliable way to remove injected malware from core WordPress files is to replace them entirely with clean, official source files.
- Inside your file manager (
public_html/), delete the following core directories and files:- The
wp-admin/folder. - The
wp-includes/folder. - All individual root files (like
index.php,wp-login.php,xmlrpc.php,wp-activate.php, etc.), except forwp-config.phpand the.htaccessfile.
- The
- Go to
wordpress.org/download/and download the latest clean ZIP archive of WordPress to your computer. - Unzip the archive locally. Delete the
wp-contentfolder from this fresh download package so you don’t accidentally overwrite your media uploads and themes. - Upload all the fresh, clean WordPress core files and folders back into your server’s root directory (
public_html/).
Step 4: Audit and Clean the wp-content/ Directory
The wp-content/ folder houses your themes, plugins, and media uploads. This is where hackers love to hide malicious PHP scripts and backdoors.
A. The Uploads Folder (wp-content/uploads/)
- Hackers frequently disguise PHP scripts inside your uploads folder (e.g.,
wp-content/uploads/2026/06/image.php.jpg). - The Fix: Open your File Manager, navigate to
wp-content/uploads/, and use the search bar or sort by file type to check for any.php,.js, or.icofiles hiding inside image directories. No legitimate WordPress upload folder should ever contain executable PHP files. Delete every single.phpfile found in the uploads directory immediately.
B. Themes and Plugins Audit
- Review every theme and plugin folder inside
wp-content/themes/andwp-content/plugins/. - If you see any strange, unfamiliar plugins or themes you didn’t install, delete them completely.
- For active plugins and themes, the safest approach is to delete their folders and reinstall fresh copies downloaded directly from the official repository or vendor site to ensure no malicious code was injected into their template files.
Step 5: Sanitize the wp-config.php and .htaccess Files
wp-config.php: Open and inspect your configuration file. Look for rogueeval(),base64_decode(), or strange external URL calls injected at the top or bottom of the file. Ensure your database credentials and secret security keys (AUTH_KEY,SECURE_AUTH_KEY, etc.) are intact. Regenerate new secret keys via the official WordPress Secret Key generator..htaccess: Check your root.htaccessfile for unauthorized rewrite rules or redirection hacks pointing traffic to external malicious domains. Replace it with default clean WordPress rewrite rules.
Step 6: Deep Database Cleaning via phpMyAdmin
Malicious actors often inject spam links, hidden administrator accounts, or malicious JavaScript payloads directly into your MySQL database tables (wp_posts, wp_options, wp_users).
- Log into phpMyAdmin via your hosting control panel.
- Select your website’s database.
- Audit Users: Click on the
wp_usersandwp_usermetatables. Look for administrator accounts you do not recognize. If you find a rogue admin user, delete them immediately. - Audit Options Table: Check
wp_optionsfor injected base64 strings or unauthorized JavaScript scripts stored inside site settings or options values. - Scan Posts: Check
wp_postsfor spam link injections embedded within post content or comments.
Part 3: Regaining Administrative Access (The Emergency Database Override)
If the hacker locked you out of your admin dashboard and deleted your administrator privileges, you can manually create a new administrator account directly through the database:
- Open phpMyAdmin and select your database.
- Click on the
wp_userstable and click Insert. - Fill out the fields carefully:
ID: Enter a unique number (e.g.,99).user_login: Enter your new username (e.g.,secureadmin).user_pass: Enter a strong password, and crucially, from the Function dropdown menu next to it, selectMD5(WordPress will automatically hash it upon login).user_nicename,user_email,user_registered: Fill in your display name, email, and current timestamp.user_status: Set to0.
- Click Go to save the new user.
- Next, click on the
wp_usermetatable and click Insert twice to assign administrative privileges to this new user ID:- Row 1:
umeta_id(auto),user_id(99),meta_key(wp_capabilities),meta_value(a:1:{s:13:"administrator";b:1;}) - Row 2:
umeta_id(auto),user_id(99),meta_key(wp_user_level),meta_value(10)
- Row 1:
- Click Go. You can now log into
/wp-admin/using your newly created credentials.
Part 4: Post-Cleanup Hardening and Securing Your Shared Hosting Site
Cleaning a hack once is not enough; if you do not patch the vulnerability that allowed entry, you will likely get re-infected within 48 hours. Implement these essential security hardening measures immediately:
- Install a Robust Security Scanner: Install and run a deep malware scanner like Wordfence Security, Sucuri Security, or Solid Security to scan your entire directory structure for lingering backdoors.
- Update Everything Religiously: Outdated plugins, themes, and core files account for over 90% of WordPress hacks. Enable auto-updates for minor releases and patch major updates promptly.
- Strengthen Authentication Protocols: Enforce strong passwords for all users, implement Two-Factor Authentication (2FA) for every administrator account, and limit login retry attempts to block brute-force botnets.
- Harden File Permissions: On shared hosting, ensure your directory file permissions are set correctly:
- Files should be set to 644 or 600.
- Folders and directories should be set to 755 or 710.
wp-config.phpshould be locked down to 440 or 400.
- Disable File Editing in Dashboard: Add this line to your
wp-config.phpfile to prevent hackers from editing PHP files directly through the WordPress theme/plugin editor even if they breach an admin account:PHPdefine('DISALLOW_FILE_EDIT', true);
Part 5: Requesting Google Safe Browsing Malware Review
If Google blacklisted your domain during the hack, cleaning your site is only half the battle; you must formally request a review to restore search visibility.
- Set up a free account on Google Search Console if you haven’t already.
- Navigate to the Security & Manual Actions tab on the left sidebar and click on Security Issues.
- Review the specific malicious warnings detected by Google crawlers.
- Once your site is thoroughly cleaned, malware scanners report zero threats, and your home page loads safely, click the button reading “Request Review”.
- Write a concise explanation stating what security steps you took (e.g., “Replaced compromised core files, deleted injected malware scripts, updated all plugins, and fortified authentication credentials”). Google typically processes review requests and removes security warnings within 24 to 72 hours.
Part 6: Frequently Asked Questions (FAQ)
1. How did my WordPress site get hacked on shared hosting?
The most common entry points are outdated plugins, weak administrator passwords, vulnerable themes, or cross-contamination from an unsecure neighbor account on the same shared physical server.
2. Can I clean a hacked WordPress site without deleting my files?
While automated plugins can clean minor malware, a severe compromise requires manually deleting core files and replacing them with clean source files to ensure hidden backdoors are completely eradicated.
3. Will deleting my WordPress files erase my content and blog posts?
No. Your posts, pages, and dynamic content are stored safely inside your MySQL database (wp_posts table), not inside core PHP files. As long as you don’t drop your database tables, your content remains intact.
4. How do I remove a rogue administrator account created by a hacker?
You can log into phpMyAdmin via your hosting control panel, navigate to the wp_users table, identify the unauthorized username, and delete that specific row.
5. What is a WordPress backdoor?
A backdoor is a hidden, malicious script disguised as a normal system file that allows the hacker to regain administrative access to your website even after you change your passwords or update plugins.
6. How do I clear the Google “Deceptive site ahead” warning?
You must clean all malware from your site files and database, ensure your security scanner reports zero threats, and then submit a formal review request via Google Search Console.
7. Should I use free or premium security plugins?
Both offer value, but popular plugins like Wordfence and Sucuri provide robust firewall protection, live malware signature scanning, and login security features essential for shared hosting environments.
8. Are shared hosting providers responsible for cleaning hacked sites?
Most shared hosting terms of service state that website security and file integrity are the user’s responsibility. While hosts may suspend a hacked site to protect server stability, manual file cleaning typically falls on the site owner.
9. How do I stop malicious PHP scripts from running inside my uploads folder?
You can create a custom .htaccess file inside the wp-content/uploads/ directory that explicitly blocks the execution of all PHP scripts.
10. How often should I back up my WordPress site to prevent data loss?
You should maintain automated, off-site daily or weekly backups managed by your hosting provider or a reliable backup plugin so you can restore a clean version instantly if a breach occurs.
Conclusion
Recovering a hacked WordPress site on shared hosting is an intensive, high-stakes technical challenge, but following a structured, methodical recovery protocol ensures your platform returns to peak health. By securing your hosting dashboard, performing a nuclear cleanse of core files, auditing plugins and database tables, and implementing robust long-term hardening rules, you transform a devastating security breach into a fortress for future growth.