Troubleshooting Namecheap Domain Pointing to Hosting Issues: The Ultimate DNS and Propagation Masterclass
Welcome to thehostreviews.com—your premier authoritative destination for domain name architecture, DNS troubleshooting tutorials, and web hosting configuration guides spanning major technology hubs from New York and San Francisco to Texas, California, and Washington.
Introduction: The Domain Connection Puzzle
You have purchased a brand-new domain name on Namecheap, set up a high-performance web hosting account, deployed your website files, and typed your domain into your browser address bar with eager anticipation.
Instead of your stunning new homepage, you are greeted by one of three frustrating roadblocks:
- A stark browser error reading “DNS_PROBE_FINISHED_NXDOMAIN”
- A generic registrar parking page proclaiming “This domain is parked free courtesy of Namecheap”
- An unexpected connection timeout or 403 Forbidden screen
You checked your settings, clicked save, and assumed everything would magically connect in a few minutes. Hours later, nothing has changed. Why won’t your Namecheap domain point correctly to your web hosting server?
Domain pointing—linking a domain registrar like Namecheap to an independent hosting provider—is one of the most common hurdles faced by web developers, business owners, and digital entrepreneurs. Because DNS (Domain Name System) management involves decentralized global networks, caching layers, and precise record syntax, a single missing period, typo, or misconfigured record can stall your launch entirely.
This comprehensive, expert-level masterclass will walk you through the inner mechanics of domain pointing, explain why connectivity failures occur, provide step-by-step troubleshooting procedures, and detail advanced configuration tactics to get your site online seamlessly.
Part 1: How Domain Pointing Works (The DNS Foundation)
Before fixing a broken connection, you must understand what happens behind the scenes when a user types thehostreviews.com into their browser.
The internet does not understand human-readable domain names; it relies strictly on numeric IP addresses (such as 192.0.2.1 or IPv6 equivalents). The Domain Name System (DNS) acts as the global phonebook of the internet, translating text domains into server IP addresses.
When pointing a Namecheap domain to a web host, you have two primary methods of establishing this connection:
1. Changing Custom Nameservers (The All-In-One Method)
By pointing your Namecheap domain to your host’s custom nameservers (e.g., ns1.bluehost.com and ns2.bluehost.com, or equivalent cloud hosting nameservers), you transfer total DNS management authority away from Namecheap over to your web hosting provider.
- Pros: Simple, automated, and ideal if your host manages your email routing (MX records) and subdomains automatically.
- Cons: If you ever migrate away from that host, you must update your nameservers again and rebuild your DNS records.
2. Updating A Records and CNAME Records (The Granular Method)
Instead of changing nameservers, you keep your domain managed under Namecheap’s default BasicDNS or AdvancedDNS panels, and you manually create pointing records that direct traffic to your host:
- A Record (Address Record): Points your root domain (
thehostreviews.com) directly to your hosting server’s IPv4 address (e.g.,192.0.2.45). - CNAME Record (Canonical Name): Points your
wwwsubdomain (e.g.,[www.thehostreviews.com](https://www.thehostreviews.com)) to your root domain or host routing address. - Pros: Gives you absolute granular control over your DNS zone, allowing you to split services (e.g., hosting at Host A, email via Google Workspace, and CDN routing via Cloudflare).
- Cons: Requires precise manual entry; a single typo breaks connectivity.
Part 2: Step-by-Step Guide—How to Point a Namecheap Domain Correctly
If your domain is failing to resolve or pointing to the wrong location, verify your configuration by following these precise setup workflows.
Method A: Pointing via Custom Nameservers
- Log into your Namecheap Account Dashboard.
- Navigate to the Domain List tab on the left sidebar and click Manage next to your target domain name.
- Locate the Domain Summary / Nameservers section on the basic tab.
- From the dropdown menu currently set to Namecheap BasicDNS, change it to Custom DNS.
- Input the two or four custom nameservers provided in your web hosting welcome email (e.g.,
ns1.yourhostingprovider.comandns2.yourhostingprovider.com). - Click the green checkmark icon to save your changes.
Method B: Pointing via A Records and CNAME Records
If you prefer keeping Namecheap as your active DNS manager:
- In your Namecheap Domain List, click Manage next to your domain, then click the Advanced DNS tab at the top.
- Locate your existing host records. Delete any old parked records or conflicting entries.
- Add or update your Root A Record:
- Type:
A Record - Host:
@(represents your root domain) - Value: Enter the IPv4 address of your web hosting server (obtained from your host dashboard).
- TTL: Automatic (or 30 mins)
- Type:
- Add or update your WWW CNAME Record:
- Type:
CNAME Record - Host:
www - Value: Enter your root domain name (e.g.,
thehostreviews.com) or your host target alias.
- Type:
- Click Save All Changes.
Part 3: The 7 Most Common Reasons Domain Pointing Fails
If you configured your nameservers or A records correctly but your site still fails to load, the issue is typically driven by one of these seven common culprits:
1. DNS Propagation Delays (The Most Common Misunderstanding)
When you modify nameservers or IP addresses, the change does not happen instantly across the entire globe.
- The Cause: Internet Service Providers (ISPs), mobile carriers, and recursive public resolvers (like Google
8.8.8.8or Cloudflare1.1.1.1) cache DNS records to speed up web browsing. - The Reality: Global DNS propagation can take anywhere from 2 to 24 hours (and occasionally up to 48 hours) to fully update across every corner of the planet. Just because your local browser cannot reach the site yet does not mean your setup is broken; it may simply be propagating.
2. Typos in IP Addresses or Nameserver Strings
It sounds elementary, but a single misplaced digit in an IP address (192.0.2.x) or a typo in a nameserver URL (ns1.hosthosting.com instead of ns1.hosthosting.com) will completely sever the connection between Namecheap and your server. Always double-check source credentials from your hosting welcome email.
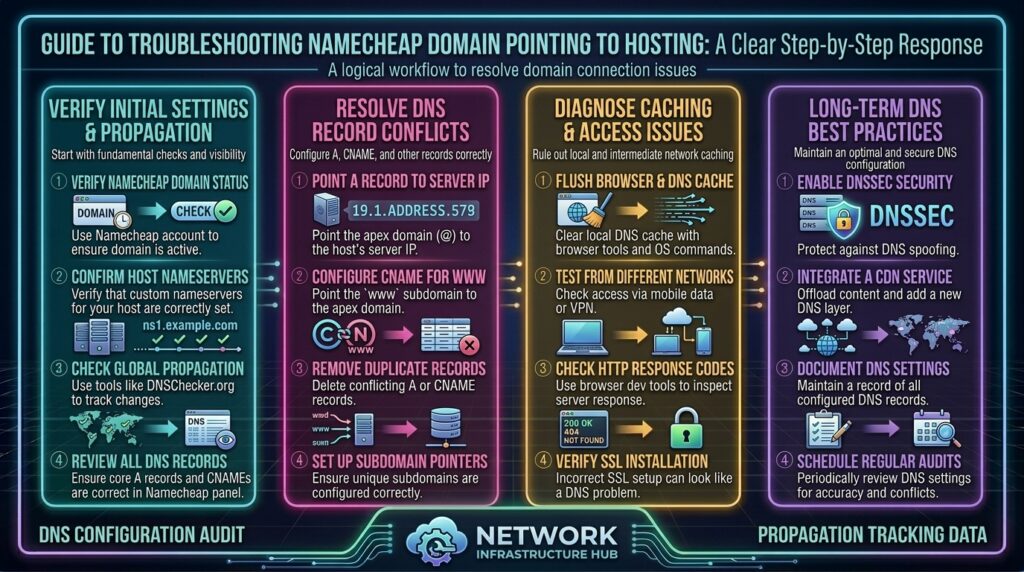
3. Missing or Misconfigured Root (@) vs. WWW Records
A frequent oversight is pointing the root domain (thehostreviews.com) via an A record while forgetting to configure the www subdomain record. If a user types [https://www.thehostreviews.com](https://www.thehostreviews.com) into their browser and no matching CNAME record exists in Namecheap’s DNS manager, they will encounter an NXDOMAIN resolution error.
4. Browser and Local OS DNS Caching
Your local computer and web browser aggressively cache DNS lookups so they don’t have to query global servers every time you visit a favorite site.
- The Problem: Even after DNS propagation completes globally, your personal laptop may still be holding onto old, cached pointing records, making your site look offline only to you.
5. Conflicting Records Leftover in Namecheap DNS
If you previously had Namecheap Email Forwarding, URL Redirects, or old A records active in your Advanced DNS panel, those legacy records can conflict with your new custom nameservers or new A records, creating routing loops or error screens.
6. Hosting Server-Side Configuration Errors (Domain Not Added to cPanel)
Sometimes your domain points to Namecheap correctly, and DNS propagation is 100% complete, but your web host rejects the incoming traffic.
- The Cause: You forgot to add the domain name as an “Addon Domain” or primary domain inside your hosting control panel (cPanel, Plesk, or CyberPanel).
- The Result: The server receives the packet on its IP address, but because it doesn’t recognize the domain name in its virtual host configuration, it throws a default 403 Forbidden or “Server Default Page” error.
7. SSL Certificate Mismatch (HTTPS Connection Refusal)
If your DNS points correctly, but your browser throws a terrifying red warning screen stating “Your connection is not private” or NET::ERR_CERT_COMMON_NAME_INVALID, it is not a DNS pointing failure—it is an SSL installation failure. Your host needs an active Let’s Encrypt SSL certificate bound to the newly pointed domain.
Part 4: Step-by-Step Advanced Troubleshooting Protocol
When a domain refuses to point or propagate after 24 hours, execute this rigorous diagnostic protocol:
Step 1: Verify Live Propagation Globally
Do not rely on your own browser. Use independent, global DNS lookup tools to check how the rest of the world sees your domain:
- Visit dnschecker.org or whatsmydns.net.
- Type in your domain name (
thehostreviews.com) and select A or NS record from the dropdown. - Click Search. The tool will query DNS servers in New York, London, San Francisco, Tokyo, and dozens of other cities simultaneously.
- If green checkmarks appear across 80% to 90% of global nodes showing your correct hosting IP address, your DNS is propagated. If you see mixed or red crosses, propagation is still ongoing.
Step 2: Flush Your Local DNS Resolver Cache
To clear out stubborn local caching on your machine, open your terminal or command prompt and execute the appropriate command:
- For Windows (Command Prompt as Administrator):DOS
ipconfig /flushdns - For macOS (Terminal):Bash
sudo dscacheutil -flushcache; sudo killall -HUP mDNSResponder - For Linux:Bash
sudo systemd-resolve --flush-caches
After flushing your local cache, restart your web browser in Incognito/Private mode and attempt to load your site again.
Step 3: Test DNS Lookup via Command Line (Dig / Nslookup)
Advanced engineers can query DNS resolvers directly from the terminal to inspect exact return values:
Bash
nslookup -type=A thehostreviews.com 8.8.8.8
- Explanation: This command bypasses your local network cache and asks Google’s public DNS resolver (
8.8.8.8) what IP address it currently associates with your domain. If it returns your server’s correct IPv4 address, your DNS pointing is successful.
Step 4: Verify Hosting Account Domain Binding
- Log into your hosting control panel (e.g., Bluehost, SiteGround, or your cloud VPS dashboard).
- Navigate to Domains > Addon Domains or check your primary domain settings.
- Confirm that your exact domain name (
thehostreviews.com) is actively added and associated with your website’s root directory (public_html/). If it is missing, add it immediately.
Part 5: Proactive Best Practices for Seamless Domain Management
- Lower Your TTL Before Migrating: If you plan to change DNS records or point a domain to a new host in the future, lower your Time-to-Live (TTL) value in Namecheap down to 60 seconds or 300 seconds at least 24 hours in advance. This ensures old caching expires rapidly, reducing propagation downtime to minutes.
- Keep Registrar and Hosting Logins Organized: Maintain an encrypted password manager containing your Namecheap login credentials and your hosting server access info so you can execute emergency DNS updates without delay.
- Consider Cloudflare for DNS Management: For advanced reliability, route your Namecheap domain through free Cloudflare nameservers. Cloudflare provides lightning-fast global DNS resolution, robust DDoS protection, and instant SSL provisioning.
Part 6: Frequently Asked Questions (FAQ)
1. How long does it take for a Namecheap domain to point to hosting?
Global DNS propagation typically takes anywhere from 2 to 24 hours, though updates can occasionally reflect in as little as 15 to 30 minutes depending on your ISP and TTL settings.
2. Should I use custom nameservers or A records to point my domain?
Using custom nameservers is the easiest “set-and-forget” method, while updating A and CNAME records gives you granular control over your DNS zone, allowing you to split email and web hosting services.
3. What does “DNS_PROBE_FINISHED_NXDOMAIN” mean?
This browser error indicates that the domain name could not be resolved to an IP address, meaning either your DNS records are missing, incorrect, or still propagating globally.
4. Why is my domain still showing a Namecheap parking page?
This happens when your domain is still using Namecheap’s default parking nameservers or when conflicting URL redirect records are overriding your custom hosting A records.
5. Can I point my domain to different hosts for email and web?
Yes! By using A records for your website hosting and MX records for your email provider (like Google Workspace or Microsoft 365), you can run web and mail services on completely separate servers.
6. Do I need to unlock my Namecheap domain to point it?
No. Domain locking (Registrar Lock) only protects your domain against unauthorized transfers to another registrar. It has no effect on modifying nameservers or internal DNS records.
7. How do I clear my local computer’s DNS cache?
You can flush your local DNS cache by running ipconfig /flushdns on Windows or sudo dscacheutil -flushcache on macOS terminal.
8. What is a CNAME record and why do I need one for www?
A CNAME (Canonical Name) record creates an alias pointing your www subdomain to your root domain, ensuring visitors reaching [www.thehostreviews.com](https://www.thehostreviews.com) land on your active website.
9. Why does my site load on mobile data but not on my home Wi-Fi?
This is caused by aggressive local DNS caching on your home internet router or ISP. Restarting your home router or switching your device DNS to Cloudflare (1.1.1.1) usually resolves it instantly.
10. Who should I contact if my domain still won’t point after 48 hours?
If 48 hours have passed and global lookup tools still show incorrect records, open a support ticket with both Namecheap support and your web hosting provider to verify that server-side routing and registrar configurations match.
Conclusion
Troubleshooting a Namecheap domain pointing to hosting issues requires patience, precision, and a systematic understanding of how DNS infrastructure operates. By verifying your custom nameservers or A records, auditing Namecheap’s advanced DNS panel, clearing local resolver caches, checking global propagation tools, and ensuring your domain is properly bound on your server, you can eliminate configuration bottlenecks and launch your website with confidence.