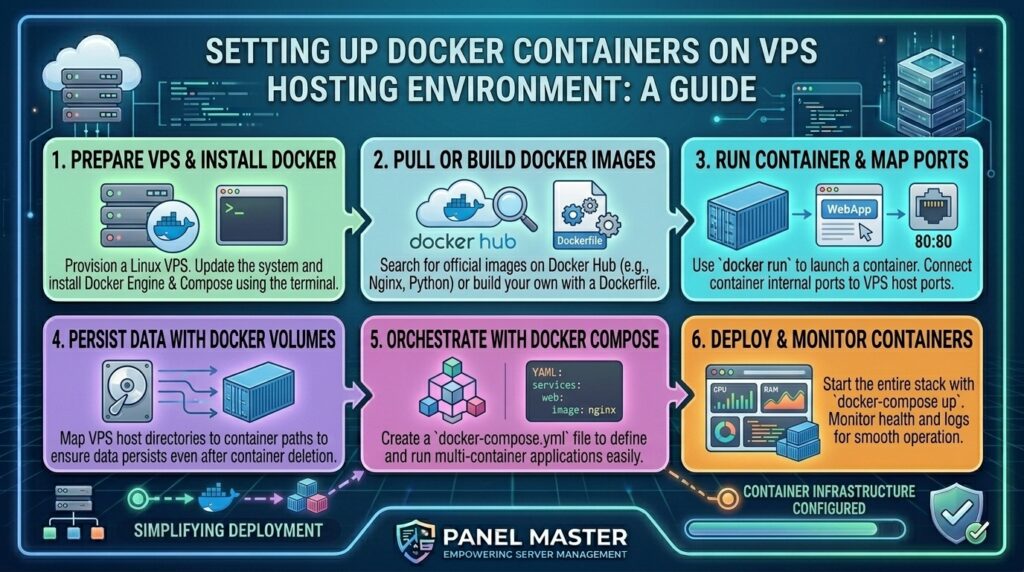
Setting Up Docker Containers on a VPS Hosting Environment: The Definitive Production Guide
Welcome to thehostreviews.com—your premier authoritative destination for cloud infrastructure reviews, developer deployment strategies, and enterprise server architecture guides spanning tech hubs from New York and San Francisco to Texas, California, and Washington.
Introduction: The Evolution of Modern Application Deployment
For decades, deploying web applications to a Virtual Private Server (VPS) meant configuring a monolithic hosting environment directly on the host operating system. Developers wrestled with “dependency hell”—conflicting PHP versions, mismatched Node.js runtimes, broken Python packages, and brittle server configurations that worked seamlessly on a local development laptop but crashed instantly in production.
Enter Docker.
By packaging your application code, runtime environment, system libraries, and dependencies into lightweight, isolated containers, Docker eliminates environment drift entirely. When you combine Docker with the raw performance and predictable pricing of an unmanaged VPS, you unlock an enterprise-grade deployment pipeline on a lean budget.
Whether you are scaling a SaaS application from San Francisco, managing microservices in New York, or hosting high-traffic databases out of Texas data centers, this comprehensive, step-by-step masterclass will teach you how to architect, secure, and scale Docker containers on a production VPS hosting environment.
Part 1: Why Docker on a VPS Beats Traditional Hosting
Before diving into configurations, it is critical to understand why modern system administrators and engineering teams prefer containerized VPS deployments over legacy hosting stacks:
- Absolute Isolation: If a bug in one web application causes a container to crash or leak memory, neighboring containers and the core host operating system remain completely unaffected.
- Reproducibility: A Docker container built on your local workstation runs with identical behavior on your staging server and your production VPS.
- Resource Efficiency: Unlike heavy Virtual Machines that emulate an entire hardware stack with separate guest OS kernels, Docker containers share the host Linux kernel, consuming minimal overhead and maximizing RAM availability.
- Simplified Multi-App Hosting: You can run multiple distinct applications—such as a Ghost blog, a Node.js API, a Python backend, and a PostgreSQL database—simultaneously on a single VPS without port conflicts or dependency collisions.
Part 2: Phase 1 — Provisioning and Preparing Your VPS
To ensure optimal performance and stability for container workloads, follow these initial server preparation guidelines.
Step 1: Choose the Right VPS Specs
Running multiple Docker containers demands adequate RAM and CPU resources. For a standard production environment, we recommend provisioning a VPS with:
- Minimum Specifications: 2 vCPU Cores, 4 GB RAM, and 50 GB NVMe SSD storage.
- Operating System: A clean installation of Ubuntu 24.04 LTS or AlmaLinux 9.
Step 2: Establish Secure SSH Access
Log into your freshly provisioned VPS via SSH as root, update your package repository lists, and create a secure non-root administrative user:
Bash
# Update system repositories
apt update && apt upgrade -y

# Create a deployment user and assign sudo privileges
adduser dockeradmin
usermod -aG sudo dockeradmin
Part 3: Phase 2 — Installing Docker and Docker Compose
Installing the official Docker Engine ensures you receive stable updates, security patches, and full compatibility with modern container standards.
Step 1: Install Dependencies and GPG Keys
Run the following commands on your Ubuntu VPS to set up the official Docker repository:
Bash
# Install prerequisite packages
apt install apt-transport-https ca-certificates curl gnupg lsb-release -y

# Add Docker’s official GPG key
mkdir -p /etc/apt/keyrings
curl -fsSL https://download.docker.com/linux/ubuntu/gpg | gpg --dearmor -o /etc/apt/keyrings/docker.gpg

# Set up the stable repository
echo \
  "deb [arch=$(dpkg --print-architecture) signed-by=/etc/apt/keyrings/docker.gpg] https://download.docker.com/linux/ubuntu \
  $(lsb_release -cs) stable" | tee /etc/apt/sources.list.d/docker.list > /dev/null
Step 2: Install Docker Engine and Compose Plugin
Update your package index again and install the core Docker components:
Bash
apt update
apt install docker-ce docker-ce-cli containerd.io docker-compose-plugin -y
Step 3: Verify the Installation
Confirm that the Docker daemon is running correctly and test your installation with the official hello-world container:
Bash
docker --version
docker compose version
docker run hello-world
Step 4: Run Docker Without Sudo (Optional)
To execute Docker commands without prefixing them with sudo, add your deployment user to the docker security group:
Bash
usermod -aG docker dockeradmin
(Note: Log out and log back into your SSH session for this group change to take effect).
Part 4: Phase 3 — Architecting a Multi-Container Production Stack
The true power of Docker on a VPS shines when utilizing Docker Compose, a declarative YAML tool used to define and run multi-container applications.
Let us build a standard, high-performance production stack consisting of:
- Nginx Proxy Manager / Reverse Proxy: Handles incoming web requests and SSL certificates.
- Node.js Application Container: Runs the core web app.
- PostgreSQL Database Container: Stores relational application data securely in a persistent volume.
Step 1: Create a Project Directory Structure
Create a dedicated folder structure for your application infrastructure on the VPS:
Bash
mkdir -p /opt/myapp/data/postgres
mkdir /opt/myapp/app
cd /opt/myapp
Step 2: Write the docker-compose.yml File
Create and open your configuration file using a text editor:
Bash
nano docker-compose.yml
Paste the following production-optimized configuration into the file:
YAML
version: '3.8'

services:
  app:
    build: ./app
    container_name: web_app_prod
    restart: always
    environment:
      - NODE_ENV=production
      - DB_HOST=database
      - DB_USER=myuser
      - DB_PASSWORD=secure_database_password
      - DB_NAME=mydb
    depends_on:
      - database
    networks:
      - app-net
    deploy:
      resources:
        limits:
          memory: 512M
          cpus: '0.50'

  database:
    image: postgres:16-alpine
    container_name: postgres_prod
    restart: always
    environment:
      - POSTGRES_USER=myuser
      - POSTGRES_PASSWORD=secure_database_password
      - POSTGRES_DB=mydb
    volumes:
      - /opt/myapp/data/postgres:/var/lib/postgresql/data
    networks:
      - app-net
    deploy:
      resources:
        limits:
          memory: 512M
          cpus: '0.50'

networks:
  app-net:
    driver: bridge
Step 3: Launch Your Container Stack
Spin up your containers in detached mode using Docker Compose:
Bash
docker compose up -d
Docker will automatically pull required images, build your application context, create bridge networks, attach persistent storage volumes, and start your container cluster in the background.
Part 5: Phase 4 — Essential Security Hardening for Docker VPS
Running containers exposes your server to unique attack vectors if misconfigured. Enforce these security measures immediately:
- Restrict Container Port Exposure: Never expose internal databases (like PostgreSQL on port 5432 or Redis on port 6379) directly to the public internet. Bind them strictly to internal Docker networks or localhost (
127.0.0.1:5432:5432). Only expose web ports (80and443) publicly via a reverse proxy. - Enforce Resource Limits: Always define memory and CPU resource caps inside your
docker-compose.ymlfile to prevent a rogue container from consuming 100% of your VPS RAM and causing an out-of-memory kernel panic. - Keep Base Images Updated: Regularly rebuild your containers with updated base images (e.g., transitioning from older Node runtimes to security-patched releases) to mitigate Common Vulnerabilities and Exposures (CVEs).
- Configure Log Rotation: Docker logs can expand rapidly and fill up your VPS hard drive. Set up JSON file log rotation globally inside
/etc/docker/daemon.json:JSON{ "log-driver": "json-file", "log-opts": { "max-size": "10m", "max-file": "3" } }Restart the Docker service to apply changes:sudo systemctl restart docker.
Part 6: Best Practices for Ongoing Maintenance
- Automate Backups of Persistent Volumes: While container code is ephemeral, database volumes and user uploads stored in host bind-mounts (
/opt/myapp/data/postgres) are critical. Schedule automated cron jobs to archive these directories to off-site cloud storage. - Monitor Container Metrics: Use commands like
docker statsto inspect real-time CPU, network I/O, and memory consumption across your running containers. - Utilize Watchtower for Automated Updates (Optional): You can deploy a companion container utility called Watchtower that monitors your running container images and automatically updates them when a fresh image version is pushed to your private or public container registry.
Part 7: Frequently Asked Questions (FAQ)
1. What is Docker VPS hosting?
Docker VPS hosting combines the raw administrative power, dedicated resources, and affordability of a Virtual Private Server with containerization technology, allowing you to run multiple isolated applications securely on a single server.
2. Can I run multiple websites on a single Docker VPS?
Yes! By deploying a reverse proxy container (like Nginx Proxy Manager, Traefik, or Caddy) in front of your application containers, you can route multiple distinct domain names to different containers seamlessly.
3. Do I need root access to run Docker on a VPS?
Yes, installing Docker engine requires root or sudo privileges because containers interact directly with low-level Linux kernel features like cgroups and namespaces.
4. How do I persist data if Docker containers are ephemeral?
To prevent data loss when a container stops or is deleted, you must use Docker Volumes or Bind Mounts to store database records and user files directly on the host machine’s persistent disk storage.
5. What is the difference between docker run and docker compose?
docker run launches single containers manually via command line arguments, whereas docker compose utilizes declarative YAML files to configure, network, and orchestrate multi-container application stacks simultaneously.
6. Will running Docker slow down my VPS performance?
No. Unlike traditional virtual machines that virtualize complete hardware layers, Docker containers run natively on the host Linux kernel with virtually zero performance overhead.
7. How do I check resource usage of my running containers?
You can execute the docker stats command in your VPS terminal to view live metrics on CPU usage, memory limits, and network traffic for every active container.
8. How do I secure internal databases running in Docker?
Never publish database ports to public network interfaces. Ensure databases communicate strictly through private Docker bridge networks and are only accessible by authorized application containers.
9. Can I migrate a Docker container easily from my local PC to a VPS?
Yes! Because Docker packages code and dependencies into a self-contained image, you can build an image locally, push it to Docker Hub or a private registry, and pull/run it on your production VPS with zero code modifications.
10. What happens to my containers if the VPS reboots?
If you configure your containers with restart: always or restart: unless-stopped inside your Docker Compose file, Docker will automatically restart all containers whenever the VPS reboots or recovers from maintenance.
Conclusion
Setting up Docker containers on an unmanaged VPS hosting environment transforms how you build, ship, and scale web applications. By mastering container architecture, implementing strict resource limits, enforcing network isolation, and using Docker Compose, you gain total command over your server infrastructure.