Setting Up an Nginx Reverse Proxy in Front of Apache Hosting: The Ultimate Performance Architecture
Welcome to thehostreviews.com—your premier authoritative destination for server infrastructure optimization, web architecture tutorials, and high-performance hosting reviews spanning major tech epicenters from New York and San Francisco to Texas, California, and Washington.
Introduction: The Best of Both Worlds
When running a dynamic website or content management system like WordPress, Magento, or Drupal, administrators often face a tough architectural dilemma. For decades, Apache has been the gold standard of web servers—revered for its robust .htaccess rewrite rule support, unmatched module compatibility, and seamless integration with traditional control panels like cPanel.
However, under heavy concurrent traffic loads or slow network conditions, Apache’s traditional process- or thread-based request handling can consume massive amounts of server RAM, resulting in sluggish response times or memory exhaustion crashes.
Conversely, Nginx is a master of high-performance connection handling. Utilizing an asynchronous, event-driven architecture, Nginx excels at lightning-fast static file delivery and buffering slow client connections.
What if you didn’t have to choose between them? By deploying Nginx as a reverse proxy in front of Apache, you combine Nginx’s blistering static asset delivery and connection management with Apache’s robust application execution and .htaccess flexibility.
This comprehensive, expert-level guide will walk you through the architectural benefits, precise configuration steps, security hardening practices, and performance tuning strategies required to deploy an Nginx-over-Apache stack on a production VPS.
Part 1: Architecture Breakdown — How Nginx and Apache Coexist
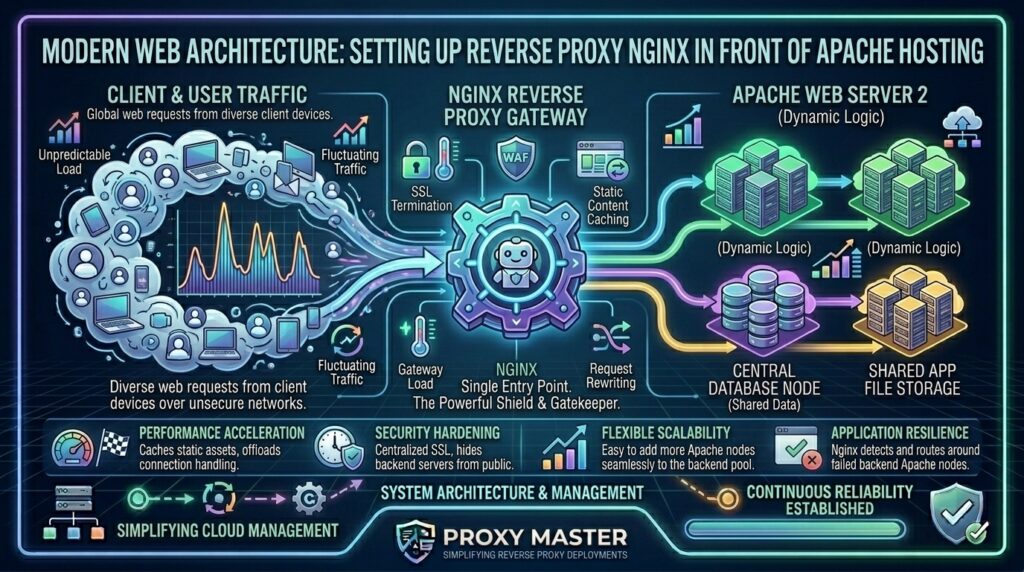
Understanding how request flow works in a hybrid Nginx/Apache stack is critical for proper tuning and troubleshooting.
The Request Lifecycle:
- The Client Request: A user from New York, San Francisco, or anywhere globally hits your domain. The request arrives first at your server’s public ports (
80and443). - Nginx as the Reverse Proxy: Nginx intercepts the incoming traffic. It immediately handles SSL termination, serves static files (images, CSS, JavaScript) straight from memory or disk, and buffers incoming slow requests.
- The Apache Backend: If the incoming request requires dynamic processing (e.g., PHP execution, database queries), Nginx transparently proxies the request over to Apache running on a local, non-public port (such as port
8080). - The Response Loop: Apache processes the PHP application, generates the HTML markup, and sends the response back to Nginx. Nginx then delivers the compressed response back to the client.
Key Performance Advantages:
- Massive Concurrency: Nginx can handle tens of thousands of simultaneous idle or slow connections with negligible memory overhead, shielding Apache from traffic spikes.
- Instant Static Offloading: Images and stylesheets bypass Apache entirely, freeing up backend PHP-Apache worker threads exclusively for dynamic page rendering.
Part 2: Step-by-Step Installation & Port Configuration
Before configuring Nginx as a reverse proxy, you must reconfigure your server so that Apache and Nginx do not fight for ports 80 and 443.
Step 1: Install Nginx and Apache
Log into your Linux VPS via SSH as root and install both web servers:
Bash
# Update repositories
apt update

# Install Nginx and Apache2 (or httpd on AlmaLinux)
apt install nginx apache2 -y
Step 2: Move Apache to a Backend Port
By default, Apache listens on ports 80 and 443. We must reconfigure Apache to listen internally on port 8080.
- Open Apache’s primary ports configuration file:Bash
nano /etc/apache2/ports.conf - Modify the listening directives to reflect port
8080:ApacheListen 8080 - Open your default virtual host configuration file:Bash
nano /etc/apache2/sites-available/000-default.conf - Update the VirtualHost declaration tag:Apache
<VirtualHost 127.0.0.1:8080> - Save the files and restart Apache to apply changes:Bash
systemctl restart apache2
Verify that Apache is successfully listening on port 8080:
Bash
ss -tulpn | grep 8080
Part 3: Configuring Nginx as the Reverse Proxy
Now that Apache is safely tucked away on port 8080, we will configure Nginx to accept public traffic on ports 80 and 443 and proxy dynamic requests back to Apache.
Step 1: Create an Nginx Virtual Host Configuration
Create a new configuration file for your domain inside Nginx’s sites directory:
Bash
nano /etc/nginx/sites-available/thehostreviews.conf
Step 2: Paste the Production-Optimized Proxy Configuration
Add the following configuration block, replacing thehostreviews.com with your actual domain name:
Nginx
server {
    listen 80;
    server_name thehostreviews.com www.thehostreviews.com;

    # Root directory for static file direct serving
    root /var/www/html;
    index index.php index.html index.htm;

    # Logging
    access_log /var/log/nginx/thehostreviews_access.log;
    error_log /var/log/nginx/thehostreviews_error.log;

    # Serve static assets directly via Nginx with aggressive caching
    location ~* \.(jpg|jpeg|png|gif|ico|css|js|svg|woff|woff2|ttf|eot)$ {
        try_files $uri @apache;
        expires 30d;
        add_header Cache-Control "public, no-transform";
    }

    # Main request routing
    location / {
        try_files $uri $uri/ @apache;
    }

    # Proxy dynamic requests to Apache backend
    location @apache {
        proxy_pass http://127.0.0.1:8080;
        proxy_set_header Host $host;
        proxy_set_header X-Real-IP $remote_addr;
        proxy_set_header X-Forwarded-For $proxy_add_x_forwarded_for;
        proxy_set_header X-Forwarded-Proto $scheme;
        proxy_set_header X-Forwarded-Port $server_port;

        # Proxy timeouts
        proxy_connect_timeout 60s;
        proxy_send_timeout 60s;
        proxy_read_timeout 60s;
    }

    # Deny access to hidden sensitive files (.htaccess, .git, etc.)
    location ~ /\. {
        deny all;
    }
}
Step 3: Enable the Site and Restart Nginx
Enable your configuration by creating a symbolic link to sites-enabled, test for syntax errors, and restart Nginx:
Bash
ln -s /etc/nginx/sites-available/thehostreviews.conf /etc/nginx/sites-enabled/
rm /etc/nginx/sites-enabled/default
nginx -t
systemctl restart nginx
Part 4: Crucial Post-Configuration Step — Restoring Real Visitor IPs in Apache
Because Nginx acts as the intermediary proxy, all incoming requests to Apache will appear to originate from 127.0.0.1 (localhost). This breaks visitor IP logging, analytics platforms, and security plugins (like Wordfence or Fail2ban) running on your application.
To solve this, you must install and configure Apache RemoteIP Module (mod_remoteip).
Step 1: Enable mod_remoteip in Apache
Run the following commands in your terminal:
Bash
a2enmod remoteip
systemctl restart apache2
Step 2: Configure Apache to Trust Nginx Header Proxies
Create or edit your remoteip configuration file:
Bash
nano /etc/apache2/conf-available/remoteip.conf
Paste the following directives into the file:
Apache
RemoteIPHeader X-Forwarded-For
RemoteIPTrustedProxy 127.0.0.1
Enable the configuration and restart Apache:
Bash
a2enconf remoteip
systemctl restart apache2
Now, Apache will accurately log the real visitor IP addresses passed down through Nginx’s proxy headers.
Part 5: Advanced Performance Optimization Tips
- Enable Gzip/Brotli Compression: Compress text-based responses (HTML, CSS, JS) at the Nginx layer before sending them over the network to dramatically lower page load times.
- Tune Nginx Worker Processes: Adjust worker processes and worker connections in
/etc/nginx/nginx.confto match your server’s available vCPU cores for maximum throughput. - Implement FastCGI/Proxy Caching: For high-traffic sites, configure Nginx micro-caching to cache fully rendered HTML responses from Apache for 1–2 seconds, eliminating database hits during traffic bursts.
Part 6: Frequently Asked Questions (FAQ)
1. Why use Nginx in front of Apache instead of running Nginx alone?
Running Nginx in front of Apache gives you the lightning-fast static file performance and connection management of Nginx while preserving Apache’s .htaccess compatibility and extensive module support.
2. Does an Nginx reverse proxy improve website speed?
Yes! Nginx serves static assets (images, stylesheets, scripts) instantly from memory/disk and terminates slow client connections, reducing resource contention on Apache.
3. How do SSL certificates work in a proxy setup?
SSL certificates should be installed and terminated at the Nginx layer. Nginx handles the secure HTTPS connection with the user and forwards decrypted HTTP traffic internally to Apache on port 8080.
4. Why are all my visitor IP addresses showing as 127.0.0.1 in Apache logs?
This occurs because Nginx acts as the proxy. You can fix this by enabling Apache’s mod_remoteip module and configuring it to read the X-Forwarded-For header sent by Nginx.
5. Will my .htaccess rules still work with Nginx in front?
Yes. Because dynamic requests are proxied back to Apache, any .htaccess rewrite rules, security restrictions, or authorization directives handled by Apache will continue to function normally.
6. Can I host multiple different domains under this hybrid setup?
Yes! You can configure multiple Nginx server blocks and corresponding Apache virtual hosts, routing each domain through the reverse proxy architecture independently.
7. Does this setup require more server RAM?
Actually, it often reduces overall memory consumption under high load because Nginx handles idle and slow connections with minimal RAM overhead compared to spawning Apache worker threads.
8. How do I troubleshoot a 502 Bad Gateway error?
A 502 Bad Gateway error typically means Nginx cannot reach Apache on port 8080. Ensure Apache is running and listening on 127.0.0.1:8080 using ss -tulpn.
9. Is this setup recommended for WordPress websites?
Yes. Many high-performance WordPress hosts utilize an Nginx reverse proxy architecture combined with Apache and caching plugins to achieve elite Core Web Vitals scores.
10. How do I renew Let’s Encrypt SSL certificates with Nginx proxying?
You should use the Certbot Nginx plugin (certbot --nginx) to issue and auto-renew certificates directly on the Nginx web server layer.
Conclusion
Setting up an Nginx reverse proxy in front of Apache hosting transforms a standard Linux server into an optimized, high-performance powerhouse. By letting Nginx handle static assets and connection buffering while Apache manages dynamic application logic and .htaccess rules, your infrastructure gains the scalability required for high-traffic environments.