How to Scale Shared Hosting to VPS Without Losing Data: The Ultimate Migration Guide
Welcome to thehostreviews.com—your premier authoritative source for web hosting evaluations, infrastructure scaling strategies, and server migration tutorials spanning tech hubs from New York and San Francisco to Texas, California, and Washington.
Introduction: Recognizing When Shared Hosting Is No Longer Enough
When launching a new website, blog, or digital storefront, starting on a budget-friendly shared hosting plan is a smart business move. Shared hosting keeps operational overhead low while providing all the basic tools needed to get your content online. Whether your servers are routed through data centers in Texas or New York, shared hosting serves millions of websites efficiently.
However, success brings traffic. As your visitor numbers climb, your digital marketing campaigns gain traction, and your database grows larger, you will eventually hit the rigid resource ceilings of shared hosting.
How do you know it is time to upgrade? Look for these warning signs:
- The 500 Internal Server Error / Resource Limit Reached: Your site crashes during traffic spikes because you exhausted your allocated CPU cores or RAM limits.
- Sluggish Page Loading Speeds: Your Time to First Byte (TTFB) crawls as your site battles with hundreds of other noisy neighbor websites sharing the same server hardware.
- Frequent Account Suspensions: Your host flags your account for consuming too many server resources during automated cron tasks or traffic surges.
When shared hosting bottlenecks your growth, transitioning to a Virtual Private Server (VPS) is the natural next step. A VPS gives you dedicated resources, root access, root-level security, and unmatched scalability. But the biggest fear holding website owners back is data loss.
This comprehensive, expert-level guide will walk you through the exact, zero-data-loss framework required to scale your website from shared hosting to a VPS smoothly and securely.
Part 1: Understanding Shared Hosting vs. VPS Architecture
Before initiating a migration, it helps to understand what changes structurally when you move from shared hosting to a VPS.
Shared Hosting (The Apartment Building Model)
- How it works: Hundreds of user accounts share a single physical server’s CPU, RAM, and disk storage.
- The drawback: If a neighboring website experiences a heavy traffic surge or a DDoS attack, your website’s performance suffers because resources are pooled. You also have zero root control over PHP versions, Apache modules, or server security configurations.
Virtual Private Server (The Condominium Model)
- How it works: A powerful physical server is partitioned using hypervisor virtualization (like KVM or OpenVZ) into isolated virtual instances.
- The advantage: Your VPS is allocated guaranteed dedicated CPU cores, RAM, and SSD disk storage that no other user can touch. You also gain full root access (or access via a control panel like cPanel/WHM or CyberPanel), giving you total freedom to tune your server environment for peak performance.
Part 2: Step-by-Step Framework for a Zero-Data-Loss Migration
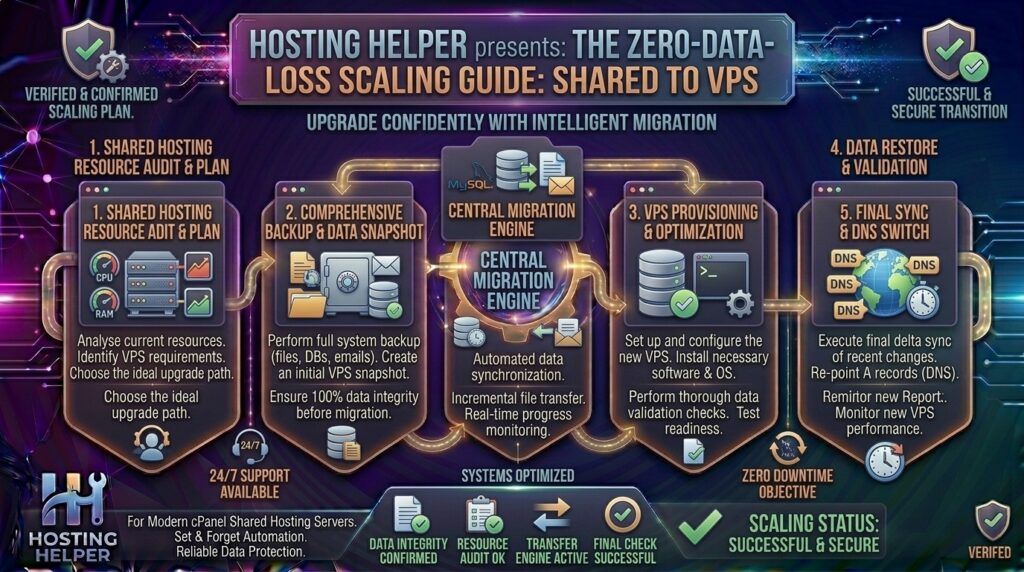
Migrating from shared hosting to a VPS requires meticulous planning to ensure that zero files, user registrations, e-commerce orders, or emails are lost in transit. Follow this professional 6-step roadmap.
Step 1: Choose the Right VPS Provider and Control Panel
Your first step is selecting a high-performance VPS provider and deciding how you want to manage your server environment.
- Managed vs. Unmanaged VPS: If you are comfortable using the command line and Linux administration, an unmanaged VPS is cost-effective. If you prefer a graphical interface similar to your shared hosting cPanel, choose a Managed VPS or install a control panel like cPanel/WHM, CyberPanel, or Plesk.
- Ensure Adequate Resources: Make sure your new VPS plan features at least double the RAM and CPU allocation of your current shared hosting resource peak to allow comfortable headroom for growth.
Step 2: Perform a Complete Manual Backup of Your Shared Hosting Account
Never rely on automated migration tools without having a safety net. Before touching any server settings, take a complete manual backup:
- Download All Website Files: Connect to your shared hosting account via FTP/SFTP (FileZilla) and download all files inside your
public_htmldirectory to a local folder on your computer. - Export Your Database: Log into cPanel, open phpMyAdmin, select your website database, click the Export tab, choose Custom settings, compress the output as
.sql.gz, and save it locally. - Generate a Full cPanel Backup: In your shared hosting cPanel, run a Full Account Backup to ensure you have a complete
.tar.gzarchive capturing email accounts, SSL certificates, and DNS zone configurations.
Step 3: Provision and Configure Your New VPS Environment
Before pointing your domain to the new server, prepare your VPS so that it mirrors or exceeds your shared hosting software stack.
- Install your preferred operating system (typically AlmaLinux 9, Ubuntu LTS, or Rocky Linux).
- Install your web server stack (e.g., Apache/Nginx, PHP 8.x matching your site requirements, and MySQL/MariaDB).
- If you use a control panel like WHM/cPanel on your VPS, create a hosting account package matching your domain name.
Step 4: Transfer Website Files and Databases to the VPS
You have two primary ways to move your data over to the new server:
Method A: Using Control Panel Migration Tools (Recommended)
If both your old shared hosting account and your new VPS run on cPanel/WHM:
- Log into your new VPS WHM dashboard.
- Navigate to Transfers > Transfer Tool.
- Enter your old shared hosting server’s remote IP address, root/cPanel username, and password.
- Select your account to transfer. WHM will automatically copy all files, databases, email accounts, and SSL certificates across servers with zero downtime.
Method B: Manual File and Database Transfer
If you are moving from shared cPanel hosting to an unmanaged VPS or custom stack:
- Upload your backed-up website files (
public_html) to your new VPS web root directory using SFTP orrsync. - Create a brand-new database and database user on your VPS via phpMyAdmin or the MySQL command line.
- Import your
.sqldatabase backup file into your new database. - Update your website’s configuration file (e.g.,
wp-config.phpfor WordPress) with your new VPS database name, username, and password.
Step 5: Test Your Website Locally Before Changing DNS
Before updating your public domain nameservers, you must verify that your site functions correctly on the new VPS. You can do this by modifying your local computer’s Hosts file:
- Find your computer’s hosts file (
C:\Windows\System32\drivers\etc\hostson Windows or/etc/hostson Mac/Linux). - Add a mapping line containing your new VPS IP address followed by your domain name:Plaintext
192.0.2.123 yourdomain.com www.yourdomain.com - Save the file and open
yourdomain.comin your browser. Your computer will bypass global DNS and load the site directly from your new VPS. Test login pages, checkout flows, and media uploads to ensure everything is operating flawlessly. - Once verified, delete the entry from your local hosts file.
Step 6: Update DNS Records and Point to Your New VPS IP
Once testing is complete, it is time to go live.
- Log into your domain registrar (or DNS manager).
- Update your A Records (and AAAA records if using IPv6) to point your root domain and
wwwsubdomain to your new VPS public IP address. - If you changed your nameservers entirely to your new VPS provider, update your name server records accordingly.
- Important Note on DNS Propagation: Global DNS propagation takes anywhere from 15 minutes to 4 hours (rarely up to 24 hours). During this window, some visitors may load your old shared hosting site while others load your new VPS. Do not cancel your old shared hosting account immediately! Keep it active for at least 48 to 72 hours to catch lingering traffic during propagation.
Part 3: Essential Post-Migration Checklist on Your VPS
Once your traffic has fully shifted to your new VPS, complete these critical post-migration tasks:
- Install and Configure SSL Certificates: Ensure your Let’s Encrypt or commercial SSL certificates are active on your new server to maintain secure HTTPS browsing.
- Harden VPS Security: Change your default SSH port, disable root password login in favor of SSH keys, and install a firewall (like
CSForUFW) along with Fail2ban to block brute-force attacks. - Configure Server-Level Caching: Take advantage of your VPS resources by installing Redis or Memcached object caching and configuring OPcache for maximum execution speed.
- Cancel Shared Hosting Only After Verification: Once a full week has passed and you confirm that all database transactions, contact forms, and emails are functioning smoothly on your VPS, you can safely cancel your old shared hosting plan.
Part 4: Frequently Asked Questions (FAQ)
1. Will I experience any website downtime when moving from shared hosting to a VPS?
If you perform the migration carefully—transferring files and databases beforehand, testing via your local hosts file, and keeping your old shared hosting account active during DNS propagation—you can achieve a seamless, zero-downtime transition.
2. Do I need technical programming skills to manage a VPS?
It depends. If you choose an unmanaged VPS, you will need basic Linux command-line skills. However, if you choose a managed VPS or install a control panel like cPanel/WHM or CyberPanel, the interface will look and feel just like standard shared hosting.
3. What happens to my professional email accounts during a VPS migration?
If your emails were hosted on shared cPanel webmail, you must either migrate your mail folders over to your new server or switch your MX records to an external mail provider (like Google Workspace or Microsoft 365) to prevent message delivery disruptions.
4. How long does a shared hosting to VPS migration take?
The actual file transfer and database import typically take between 15 minutes and 2 hours depending on the size of your media library and database. However, accounting for DNS propagation and pre-testing, allow 24 to 48 hours for the entire process.
5. Can I use automated migration plugins for the move?
Yes! If you are running WordPress, plugins like All-in-One WP Migration, Duplicator, or UpdraftPlus can package your entire site into an archive and restore it effortlessly onto your new VPS server.
6. Why is my website loading slowly immediately after moving to a VPS?
If your site feels sluggish right after migration, check whether your database cache needs optimization, verify that your web server (Apache/Nginx) is properly configured, or wait for global DNS caching to fully clear out.
7. Should I cancel my shared hosting account immediately after updating my DNS?
No! Always keep your old shared hosting account active for at least 3 to 7 days after pointing your DNS to the VPS. This ensures you do not lose incoming data or visitor requests while global DNS records propagate.
8. Is a VPS more secure than shared hosting?
Yes. On shared hosting, a security breach on a neighboring website can potentially expose vulnerabilities on the server. On a VPS, your virtual environment is completely isolated, and you have full control over implementing advanced firewall security rules.
9. How do I know what size VPS plan to purchase?
Look at your current shared hosting resource warnings. If your site frequently consumes 2GB of RAM or spikes CPU utilization during traffic surges, select a VPS tier offering at least 4GB of RAM and 2 dedicated vCPUs as a starting baseline.
10. Can I host multiple websites on a single VPS?
Yes! Unlike shared hosting plans that often restrict you to a single domain name or a limited number of subdomains, a VPS allows you to host dozens or even hundreds of independent websites and client domains, limited only by your server’s RAM and disk storage capacity.
Conclusion
Scaling from shared hosting to a virtual private server (VPS) is an exciting milestone that unlocks superior speed, dedicated resources, and uncompromised control for your growing website. By following this meticulous, zero-data-loss migration framework—backing up your assets, provisioning your server, testing locally, and managing DNS propagation carefully—you ensure a seamless transition without missing a beat.