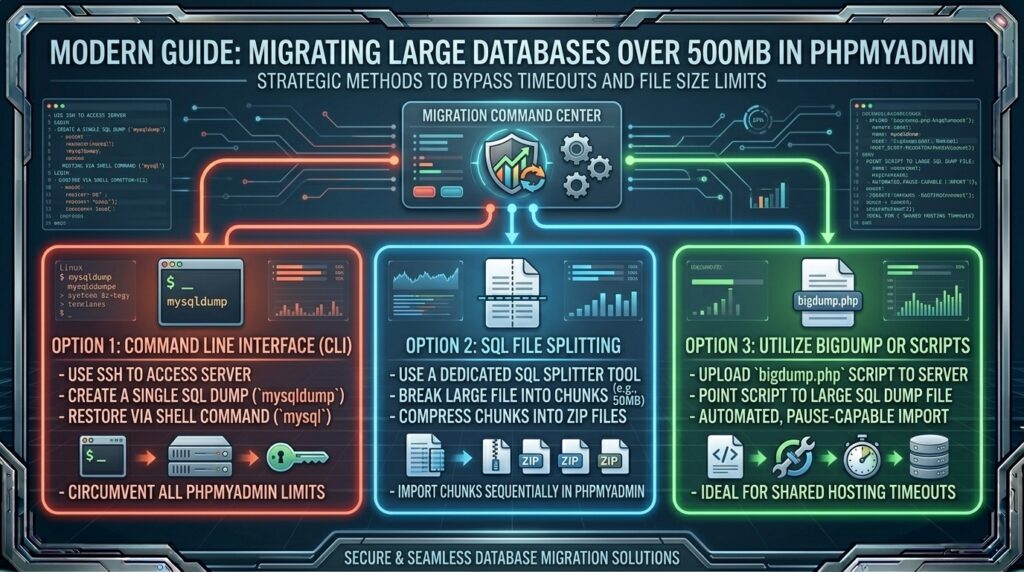
How to Migrate a Large Database (Over 500MB) in phpMyAdmin: The Ultimate Enterprise Masterclass
Welcome to thehostreviews.com—your premier authoritative destination for advanced database administration tutorials, SQL optimization walkthroughs, and high-performance web hosting evaluations spanning major technology hubs from New York and San Francisco to Texas, California, and Washington.
Introduction: The Dreaded “Maximum Execution Time Exceeded” Wall
You are in the final stages of migrating a massive e-commerce store, a heavy membership portal, or a sprawling enterprise blog to a new web hosting environment. You have successfully transferred your website files via cPanel File Manager or SFTP, and now comes the final, critical step: importing your MySQL database.
You log into cPanel, open phpMyAdmin, click on your target database, navigate to the Import tab, select your .sql or .sql.gz export file, and click Go.
Minutes pass by in agonizing silence. The progress bar freezes. Then, the screen flashes red or displays a crushing error message: “Maximum execution time of 300 seconds exceeded”, “The file is too large”, or “Error 504 Gateway Time-out”.
If your database file is over 500MB (or even several gigabytes in size), trying to import it through the standard web-based phpMyAdmin browser interface is almost guaranteed to fail. Web servers, PHP configurations, and browser HTTP connections have strict built-in limitations designed to prevent script timeouts and memory exhaustion.
This comprehensive, step-by-step masterclass breaks down why large database imports fail in web browsers, explores enterprise-grade migration strategies, and provides an actionable, foolproof engineering playbook to import multi-gigabyte SQL files smoothly and securely.
Part 1: Why phpMyAdmin Fails with Large Database Files
Before diving into the solutions, it is crucial to understand the technical barriers that prevent standard browser-based phpMyAdmin imports from handling large files:
- PHP Execution Time Limits (
max_execution_time): By default, PHP scripts are configured to time out after 30 or 300 seconds. A 500MB+ SQL file contains millions of lines of text queries that take far longer than a few minutes to parse and write to disk. - Memory Allocation Caps (
memory_limit): When phpMyAdmin reads a massive.sqlfile into memory to process it, it quickly exhausts the assigned PHP memory pool, triggering fatal out-of-memory crashes. - HTTP Post Size and Upload Limits (
post_max_sizeandupload_max_filesize): Shared hosting environments usually restrict single-file browser uploads to 50MB or 256MB. Trying to upload a 1GB file straight through the browser form results in an immediate rejection. - Web Server Timeouts (Apache/Nginx/LiteSpeed): Reverse proxies and web servers enforce gateway timeout limits (e.g., 60 seconds). If the database server takes too long to acknowledge a batch of inserts, the proxy drops the connection abruptly.
Part 2: Preparation—Optimizing and Compressing Your SQL Export
Before attempting any large migration, proper preparation of your source SQL file will save you hours of troubleshooting.
Step 1: Compress Your Export File (.sql.gz or .zip)
Never attempt to import an uncompressed plain text .sql file if you can avoid it.
- Uncompressed SQL files are remarkably bloated and full of repetitive text strings.
- Export your database using compression formats like GZIP (
.sql.gz) or ZIP. Compression reduces file sizes by up to 80%, transforming a massive 800MB file into a nimble 150MB archive that uploads and parses significantly faster.
Step 2: Clean and Optimize Database Tables Before Exporting
Large databases accumulate massive amounts of transient data, spam comments, old post revisions, and orphaned metadata tables that inflate file size unnecessarily.
- Run database cleanup queries on your source server to drop transient entries, expired user sessions, and spam logs.
- Optimize your core tables (
OPTIMIZE TABLE wp_posts, wp_postmeta;) to defragment storage overhead before generating your final export archive.
Part 3: Method 1—Bypassing phpMyAdmin Limits via Command-Line SSH (The Gold Standard)
If your web host provides SSH (Secure Shell) access (standard on quality VPS, Cloud, and Developer-tier hosting packages across New York, San Francisco, and Texas), using the command line is by far the fastest, most reliable, and robust way to import a multi-gigabyte database. Command-line MySQL bypasses PHP and web browser limits entirely.
Step 1: Upload Your SQL File to the Server
- Log into your cPanel account and open File Manager, or use an SFTP client (like FileZilla).
- Upload your compressed or uncompressed database archive directly into your main cPanel home directory (or a secure folder inside
public_html/).
Step 2: Access Your Server via SSH
- Open your cPanel dashboard and click on Terminal (or open your local terminal application if connecting via SFTP/SSH credentials).
- Navigate to the directory where your SQL file is stored:Bash
cd /home/yourusername/
Step 3: Extract the Archive (If Compressed)
If you uploaded a GZIP compressed file, extract it directly on the server command line:
Bash
gunzip database_backup.sql.gz
This unpacks your plain text database_backup.sql file instantly on the server filesystem.
Step 4: Import the Database Using the MySQL Command Line
Run the standard MySQL import command, replacing the placeholders with your actual database name, username, and SQL filename:
Bash
mysql -u your_dbuser -p your_dbname < database_backup.sql
- What happens next: Press Enter, and you will be prompted to enter your database user password. Once entered, MySQL executes the import directly at the system kernel level. Even a 2GB file will import cleanly in minutes with a live progress indicator or seamless completion prompt, completely bypassing all browser timeouts.
Part 2: Method 2—Using Specialized Large File Importers (BigDump)
If you are on a budget shared hosting plan that does not provide SSH terminal access, importing a 500MB+ file via phpMyAdmin is impossible unless you use a specialized third-party PHP script designed specifically to break through web timeouts. The industry standard for this is BigDump: Staggered MySQL Dump Importer.
BigDump works by reading a large SQL file in small, manageable chunks (e.g., 50 lines or 300KB per batch) and executing them sequentially via separate HTTP requests, avoiding PHP execution time limits entirely.
Step 1: Download and Configure BigDump
- Download the free
bigdump.phpscript from its official repository. - Open
bigdump.phpin a text editor (like Notepad++ or VS Code) and enter your database connection credentials:PHP$db_server = 'localhost'; $db_name = 'your_dbname'; $db_username = 'your_dbuser'; $db_password = 'your_dbpassword'; - Save the file.
Step 2: Upload Files to Your Hosting Account
- Using cPanel File Manager, create a temporary folder inside your website root (e.g.,
public_html/temp_migration/). - Upload your large
.sqldatabase file and your configuredbigdump.phpscript into this folder.
Step 3: Run the Import via Browser
- Open your web browser and navigate to your script URL:
[https://thehostreviews.com/temp_migration/bigdump.php](https://thehostreviews.com/temp_migration/bigdump.php). - BigDump will scan the folder and display your uploaded SQL file.
- Click the Start Import link.
- The script will automatically pause, refresh, and resume execution batch-by-batch until the entire multi-gigabyte database is fully imported.
- CRITICAL SECURITY WARNING: Once the import is complete, immediately delete the
temp_migrationfolder andbigdump.phpscript from your server so that unauthorized users cannot access your database configuration.
Part 5: Method 3—Modifying phpMyAdmin and Server Configuration Limits
If you prefer using the native phpMyAdmin interface and your hosting provider allows you to modify PHP configuration parameters (via cPanel’s MultiPHP INI Editor), you can temporarily raise your server limits to accommodate a larger import.
Step 1: Adjust PHP Limits in cPanel
- Log into cPanel and navigate to the Software section. Click on MultiPHP INI Editor.
- Select your website domain from the dropdown menu.
- Adjust the following key parameters to high values suitable for your file size:
max_execution_time: Change from300to3600(1 hour).max_input_time: Change from300to3600.memory_limit: Change from512Mto2048M(2GB).post_max_size: Change from256Mto2048M.upload_max_filesize: Change from256Mto2048M.
- Click Apply / Save.
Step 2: Split the SQL File Into Smaller Chunks (Alternative)
If your host restricts PHP limit modifications and you cannot use SSH or BigDump, you can split your massive .sql file into smaller, 50MB text chunks using desktop split utility software (like HJSplit or G切割器 for Windows/Mac) or command-line split tools (split -b 50m large_database.sql chunk_), allowing you to import them sequentially through phpMyAdmin without hitting size limits.
Part 6: Frequently Asked Questions (FAQ)
1. Why does phpMyAdmin fail when importing a database over 500MB?
phpMyAdmin fails because web browsers, PHP execution time limits (max_execution_time), and server upload caps (upload_max_filesize) are designed to block long-running scripts and massive HTTP payloads.
2. Can I import a large SQL file directly through standard phpMyAdmin?
You cannot import large files through standard default settings unless your hosting provider has unusually high PHP limits or you compress your file and raise your max_execution_time.
3. What is the absolute best way to import a multi-gigabyte database?
The absolute best and fastest method is using the command-line SSH mysql utility, which bypasses web browsers and PHP limits entirely.
4. How do I compress my SQL export to make it smaller?
You can compress your database export using GZIP format (.sql.gz), which reduces file size by up to 80% and accelerates upload and import speeds.
5. What is BigDump and how does it work?
BigDump is a free PHP-based utility script that reads massive SQL dump files in small, staggered batches over sequential HTTP requests, bypassing PHP timeout restrictions.
6. Is BigDump safe to leave on my server after migration?
No! Leaving BigDump on your server is a massive security vulnerability because anyone who discovers the script URL can view or manipulate your database credentials. Delete it immediately after import.
7. How do I change PHP upload limits in cPanel?
You can raise your server limits by opening cPanel, navigating to MultiPHP INI Editor, selecting your domain, and increasing upload_max_filesize, post_max_size, and max_execution_time.
8. What should I do if my import throws a “Max Packet Size Exceeded” error?
This error occurs when a single SQL query row exceeds your MySQL server’s max_allowed_packet limit. You can fix it by running SET GLOBAL max_allowed_packet=1073741824; in your MySQL console before importing.
9. Will splitting my SQL file into chunks allow phpMyAdmin import?
Yes. Splitting a massive database file into smaller, 50MB text chunks allows you to import them one by one through standard phpMyAdmin limits without timing out.
10. Who should I contact if my database import continually times out?
If command-line tools, BigDump, and configuration adjustments all fail due to strict shared server constraints, open a support ticket with your web hosting provider and ask their sysadmin team to import the file via root backend access.
Conclusion
Migrating a large database over 500MB no longer has to be an exercise in frustration. By understanding the limitations of browser-based phpMyAdmin imports and mastering enterprise-grade alternatives—such as command-line SSH execution, BigDump chunking, and MultiPHP INI adjustments—you can handle multi-gigabyte migrations swiftly and securely.