Recovering deleted files from cpanel trash or backup: Welcome to thehostreviews.com—your premier authoritative destination for server administration tutorials, data recovery walkthroughs, and cPanel backup management reviews spanning major technology hubs from New York and San Francisco to Texas, California, and Washington.
Introduction: The Heart-Stopping Moment of Accidental Deletion
You are deep into a late-night website maintenance session. You open your hosting control panel, navigate to your file manager to clean up some outdated code directories, highlight what you believe is an obsolete folder, and hit the delete button. A second later, reality sets in: You just deleted the core asset folder, a critical PHP configuration file, or an entire months-old media upload directory.
For website owners, developers, and digital entrepreneurs operating web infrastructure across competitive tech markets like New York, San Francisco, and Austin, accidentally deleting live production files is an absolute nightmare scenario. Your website goes dark instantly, throwing 404 Not Found errors or crashing entirely.
Fortunately, if your website is hosted on a modern cPanel-powered hosting environment, you are not necessarily doomed. Unlike legacy FTP systems that wipe files into the digital ether permanently upon deletion, modern cPanel includes a built-in Trash / File Restoration utility alongside comprehensive backup generation tools.
This comprehensive, step-by-step masterclass dives deep into cPanel’s data recovery architecture, outlines multiple recovery strategies ranging from the trash bin to automated backup archives, and provides a foolproof disaster recovery playbook to get your website back online in minutes.
Part 1: Understanding cPanel’s Built-In Data Protection Layers
Before jumping into panic mode, it is vital to understand how cPanel handles file deletion behind the scenes. cPanel features a multi-tiered safety net designed to catch human error.
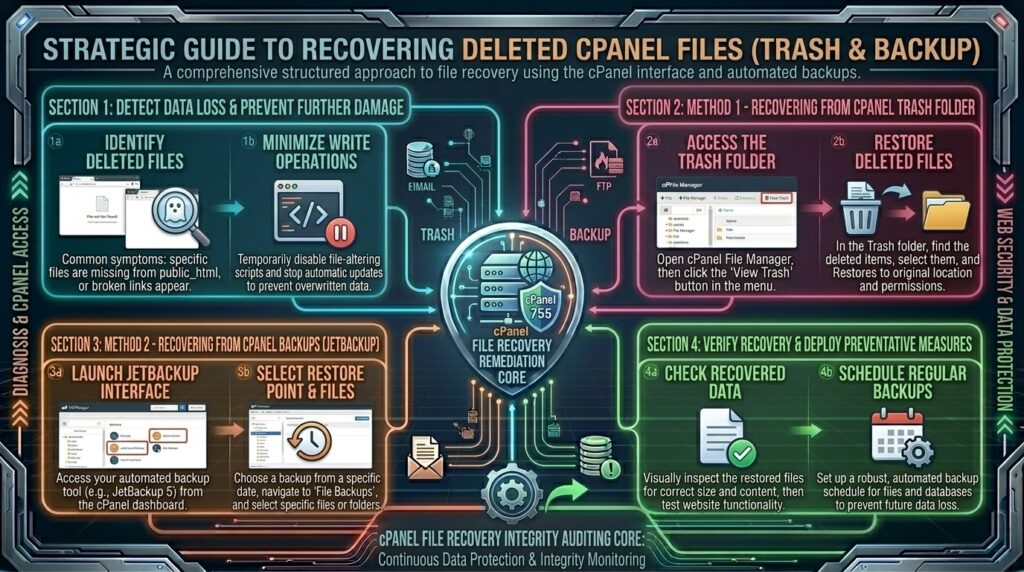
1. The cPanel Trash Bin (Recycle Bin) Mechanism
When you delete a file or directory using the standard cPanel File Manager, cPanel does not automatically wipe the data from your disk blocks. Instead:
- By default, a prompt asks if you want to skip the trash bin and delete permanently. If you leave that box unchecked, cPanel safely relocates your deleted items into a hidden virtual directory named
.trashwithin your account root. - Files sitting in the trash bin can be restored back to their original file paths with a single click, preserving your directory structure and file permissions.
2. Automated Server-Level Backups (JetBackup, cPanel Backup, or Acronis)
If you bypassed the trash bin and permanently deleted your files, or if data was corrupted by a faulty script, your web hosting provider’s automated backup infrastructure acts as your ultimate safety net. Depending on your host, servers typically run daily, weekly, or bi-weekly incremental backups using systems like JetBackup 5, Acronis Cyber Protect, or the native cPanel Backup Wizard.
Part 2: Method 1—Recovering Files from the cPanel Trash Bin
If you deleted your files recently through the File Manager and did not force permanent deletion, you can retrieve them in seconds.
Step 1: Reveal Hidden Files in cPanel File Manager
Deleted files routed to the trash are stored inside a dotfile directory (.trash), which is hidden by default in Linux file systems.
- Log into your cPanel Account Dashboard.
- Navigate to the Files section and click on File Manager.
- In the top-right corner of the File Manager dashboard, click on the Settings button.
- In the preferences popup, ensure the checkbox for Show Hidden Files (dotfiles) is ticked.
- Click Save.
Step 2: Locate and Restore the Deleted Files
- In the left-hand directory tree sidebar, click on your main account home directory (usually labeled with your cPanel username, sitting right above
public_html). - Look through the file list for a folder named
.trash. Double-click to open it. - Inside the trash folder, you will see a collection of your recently deleted directories and files, often tagged with timestamps.
- Locate the specific file or folder you wish to recover.
- Right-click the item and select Restore (or click the Restore button on the top menu bar).
- cPanel will automatically move the files right back to their original production directories in
public_html/, fully restoring your site’s operational status.
Part 3: Method 2—Restoring Files Using Host Backup Systems (JetBackup / Acronis)
If the trash bin is empty or you permanently purged the files, your next line of defense is your hosting provider’s automated backup suite. Most professional cPanel hosts in Texas, California, and New York provide tools like JetBackup 5.
Step 1: Access JetBackup / Backup Tools in cPanel
- Log into your cPanel dashboard.
- Scroll down to the Files or JetBackup section (the exact icon depends on your host, commonly labeled JetBackup 5 or Backup Wizard).
- Click on JetBackup 5 (or your host’s corresponding backup manager).
Step 2: Select Home Directory or File Backups
- On the JetBackup dashboard, look for the Backups section.
- Click on File Backups (or Home Dir Backups, depending on whether you want to restore individual website directories or your entire account).
- You will see a chronological list of historical backup snapshots generated by your server (e.g., yesterday, 3 days ago, last week).
Step 3: Choose Restore or Download Options
- Select the most recent clean backup snapshot taken before the files were deleted.
- Click Change Files Selection or browse inside the snapshot to locate the specific missing directory (e.g.,
public_html/wp-content/uploads/). - Check the boxes next to the missing files or folders.
- Click the Restore Selected Files button at the bottom of the screen.
- Confirm the action. The backup manager will extract the historical files and overwrite or merge them back into your live directory structure.
Part 4: Method 3—Restoring via Native cPanel “Backup Wizard”
If your host uses native cPanel backup snapshots rather than third-party tools like JetBackup, you can restore a compressed archive manually:
- In cPanel, click on Backup Wizard.
- Click Restore.
- Choose the type of restore you want to perform (e.g., Home Directory Restore or MySQL Databases Restore).
- Upload your local backup archive
.tar.gzfile that you previously downloaded, or select a server-generated snapshot archive. - Click Generate Restore to unpack and restore the data structure.
Part 5: Advanced Disaster Recovery: What to Do If Backups Fail
What happens if your trash bin is empty, and your hosting provider’s automated backups failed or only retain a 24-hour window that already captured the deletion? Execute these advanced recovery options:
- Check Local Development Copies: Do you or your development team maintain a local staging copy of the website on your local machine (using LocalWP, XAMPP, or MAMP)? If so, you can manually extract the missing files and upload them via SFTP or cPanel File Manager.
- Leverage Browser Caching and Static Archives: If static HTML files or CSS assets were deleted, tools like the Internet Archive Wayback Machine (
archive.org) can allow you to view historical text and layout code, enabling you to copy and paste code blocks back into new server files. - Contact Hosting Support Immediately: If your data loss was catastrophic and involved database corruption alongside file deletion, open an emergency support ticket with your web host. High-end hosting providers often maintain off-site Disaster Recovery (DR) backups that engineers can restore manually upon explicit request.
Part 6: Proactive Data Protection Best Practices
Recovering files is stressful; preventing data loss altogether is much easier. Implement these bulletproof backup habits today:
- Maintain Off-Site Cloud Backups: Never rely solely on your web host’s internal backups. Use automated plugins (such as UpdraftPlus, BlogVault, or All-in-One WP Migration) to schedule daily backups sent directly to Amazon S3, Google Drive, or Dropbox.
- Download Local Archives Before Major Updates: Before running major core, theme, or plugin updates, always generate a manual full backup archive in cPanel and download a copy to your local workstation.
- Test Your Restores Periodically: A backup is not a backup until it has been successfully restored. Test your backup archives on a staging server every few months to ensure your disaster recovery pipeline functions smoothly.
Part 7: Frequently Asked Questions (FAQ)
1. Where do deleted files go in cPanel?
When deleted through the cPanel File Manager without forcing permanent deletion, files are moved into a hidden virtual directory named .trash located in your main account home directory.
2. How do I view hidden files in cPanel File Manager?
You can view hidden dotfiles by opening cPanel File Manager, clicking the “Settings” button in the top-right corner, checking “Show Hidden Files (dotfiles),” and clicking save.
3. What should I do if my cPanel Trash bin is completely empty?
If the trash bin is empty, your files were either permanently deleted or skipped the trash. You must check your hosting provider’s automated backup systems (like JetBackup) to restore them.
4. How far back do cPanel automated backups go?
Backup retention depends entirely on your web hosting provider’s configuration policies, which typically range from 7 to 30 days of historical snapshots.
5. Can I restore just a single deleted file using JetBackup?
Yes. JetBackup allows you to browse specific historical snapshots, select individual files or folders, and restore only those items without overwriting your entire website.
6. Will restoring a file from a backup overwrite my database?
No. File restoration tools and database restoration tools are separate in cPanel. Restoring missing web files will not alter your MySQL database records.
7. What is the difference between a Home Directory backup and a Full Backup?
A Home Directory backup contains all your website files, emails, and configuration settings, whereas a Full Backup also packages your MySQL databases and server configurations (though full backups cannot always be restored directly via cPanel).
8. What should I do if my web host doesn’t offer automated backups?
If your host lacks automated backup tools, you should immediately install an external backup plugin (like UpdraftPlus) or configure manual weekly cPanel backup downloads to your local computer.
9. Can I use FTP to recover deleted cPanel files?
No. Standard FTP protocols do not feature a trash bin or file restoration utility. Once a file is deleted via standard FTP clients, it is removed immediately from the server disk.
10. When should I contact my web host for file recovery assistance?
If your files were permanently deleted, your trash is empty, and automated backups are missing or corrupted, open a support ticket immediately to check for off-site disaster recovery archives.
Conclusion
Accidentally deleting important files on your cPanel web hosting server can cause instant panic, but structured data recovery tools make restoration achievable. By mastering the hidden .trash directory, utilizing automated backup systems like JetBackup, and enforcing proactive off-site cloud backups, you safeguard your digital presence against permanent data loss.