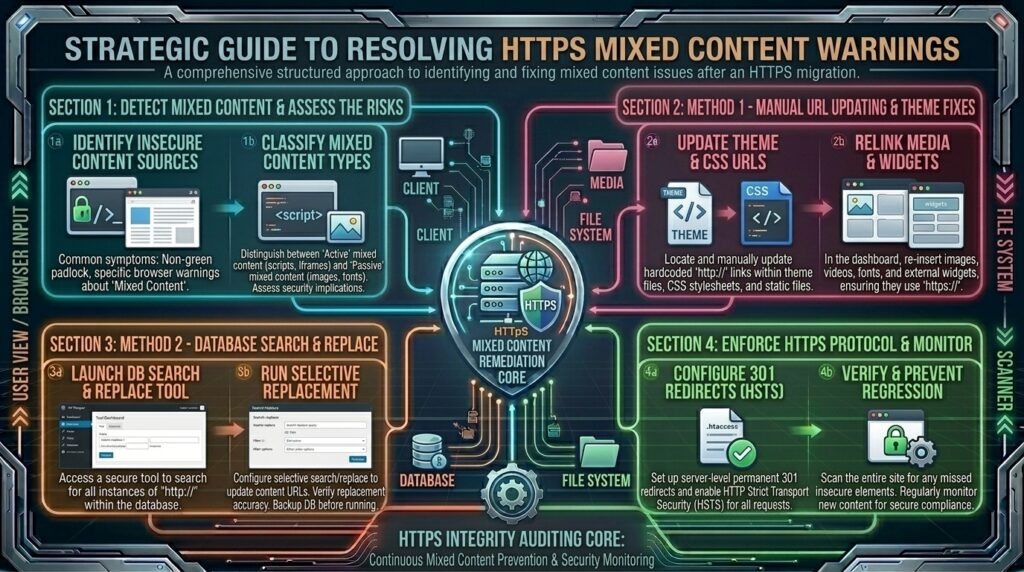
How to fix mixed content warnings after moving to https hosting? Welcome to thehostreviews.com—your premier authoritative destination for website security hardening, SSL migration troubleshooting, and web hosting performance audits spanning major technology hubs from New York and San Francisco to Texas, California, and Washington.
Introduction: The Broken Padlock Mystery
Migrating a website from unencrypted HTTP to a secure HTTPS hosting environment is a major milestone. You generate a fresh SSL certificate, activate it on your server, set up your 301 redirects, and eagerly load your homepage expecting a clean, reassuring green padlock in the browser address bar.
Instead, you are greeted by an unsettling sight: the padlock icon is missing, crossed out, or accompanied by a scary browser warning stating “Your connection is not fully secure”.
For business owners, e-commerce managers, and bloggers operating across competitive digital hubs from New York to San Francisco, this phenomenon is known as a Mixed Content Warning. It occurs when your web page is successfully requested over a secure HTTPS connection, but individual sub-resources—such as images, stylesheets, JavaScript files, or iframe embeds—are still being loaded via insecure http:// URLs.
Modern web browsers like Google Chrome, Mozilla Firefox, and Safari take mixed content very seriously. They will either quietly downgrade your page’s trust indicators or outright block insecure scripts from executing, breaking your site layouts and destroying customer trust.
This comprehensive, step-by-step masterclass breaks down the architecture of mixed content errors, outlines a rigorous diagnostic workflow, and provides a foolproof engineering playbook to eliminate every last HTTP reference on your website.
Part 1: Understanding the Anatomy of Mixed Content
Before diving into fixes, it is crucial to understand why browsers react so aggressively to mixed content and what types of insecure assets exist on your server.
1. Active vs. Passive Mixed Content
Browsers split mixed content issues into two distinct severity categories:
- Mixed Active Content (Scripts & Iframes): These are executable scripts, stylesheets, XHR requests, or embedded iframes loaded over HTTP on an HTTPS page. Because an attacker could intercept and tamper with these scripts to steal user data or hijack sessions, modern browsers completely block active mixed content. This results in broken functionality, missing styles, or non-functional widgets.
- Mixed Passive / Display Content (Images, Audio, Video): These are static media elements loaded over HTTP. While an attacker cannot rewrite your layout using an image, they can monitor user browsing habits or swap images out maliciously. Browsers usually allow passive content to load, but they strip away the green padlock, throwing a yellow warning label that labels your site as “Not Secure”.
2. Why Does Migration Leave Behind Mixed Content?
When you move to HTTPS hosting, your SSL certificate secures the domain container, but it does not automatically rewrite code inside your files or database. If your database contains thousands of old post contents, widgets, or theme templates hardcoded with [http://thehostreviews.com/image.jpg](http://thehostreviews.com/image.jpg), those links remain unencrypted.
Part 2: Step-by-Step Diagnostic Protocol—Locating Mixed Content
Never guess where insecure assets are hiding. Execute this diagnostic workflow to pinpoint exact errors across your website.
Step 1: Use the Browser Developer Console (F12)
The fastest way to inspect a single page for mixed content is right inside your web browser:
- Open your website in Google Chrome or Microsoft Edge.
- Press F12 (or right-click anywhere on the page and select Inspect).
- Click on the Console tab.
- Look for red or yellow error lines starting with:
Mixed Content: The page at 'https://...' was loaded over HTTPS, but requested an insecure resource 'http://...'.
- The console log will explicitly display the exact file URL causing the warning and the line number or element referencing it.
Step 2: Run Site-Wide Automated Crawlers
Checking pages one by one manually is impractical for large corporate sites or e-commerce stores. Utilize automated external scanners to audit your entire domain:
- Why No Padlock (
whynopadlock.com): Paste your specific URL to get a comprehensive breakdown of every insecure asset blocking your SSL seal. - Screaming Frog SEO Spider: Configure the crawler to scan your domain and check its dedicated Insecure Content report to map out every single HTTP URL remaining on your HTTPS site.
- JitBit SSL Checker: A free web crawler that scans your entire public sitemap and generates an itemized list of unencrypted assets.
Part 3: Step-by-Step Resolution Playbook
Depending on your website’s architecture (WordPress, custom PHP, static HTML), execute these technical solutions to clean out mixed content permanently.
Step 1: Force HTTPS and Catch-All Redirects at the Server Level
Before fixing individual links, ensure your web server catches any incoming unencrypted requests at the gateway level.
For Apache / LiteSpeed Servers (.htaccess):
- Open your hosting control panel File Manager, navigate to your document root (
public_html/), and edit your.htaccessfile. - Add the following standard 301 redirect block to force all traffic to HTTPS: Apache
RewriteEngine On RewriteCond %{HTTPS} off RewriteRule ^(.*)$ https://%{HTTP_HOST}/$1 [R=301,L]
For Nginx Servers:
- Open your Nginx server block configuration file.
- Add a permanent redirect rule to your port 80 server block:Nginx
server { listen 80; server_name thehostreviews.com www.thehostreviews.com; return 301 https://$host$request_uri; }
Step 2: Implement the Content Security Policy (CSP) Header
As an immediate safety net, you can instruct modern browsers to automatically upgrade any legacy http:// subresource requests to https:// on the fly before they are even fetched from the network.
Add this Content Security Policy (CSP) header to your web server configuration or .htaccess file:
Apache
Header always set Content-Security-Policy "upgrade-insecure-requests;"
Note: This is a powerful mitigation tool, but it relies on the third-party asset actually supporting HTTPS. If an external vendor does not support SSL, upgrading the request will cause the asset to fail to load entirely.
Step 3: Fix Hardcoded Database URLs (CMS / WordPress Example)
If your website runs on a Content Management System like WordPress, thousands of internal page links, media attachments, and widget text blocks are stored directly inside your MySQL database as absolute paths starting with http://.
- Update CMS Core Settings: Log into your WordPress dashboard, navigate to Settings > General, and verify that both the WordPress Address (URL) and Site Address (URL) explicitly begin with
https://. - Execute a Database Search-and-Replace:
- Backup your database completely via cPanel phpMyAdmin or JetBackup.
- Install a trusted database utility plugin like Better Search Replace.
- Enter
[http://thehostreviews.com](http://thehostreviews.com)in the Search for field and[https://thehostreviews.com](https://thehostreviews.com)in the Replace with field. - Select all database tables (e.g.,
wp_posts,wp_postmeta). - Always run a dry run first to preview changes. Once verified, uncheck the dry run box and execute the replacement.
Step 4: Audit Theme Templates, Plugins, and Source Files
If database replacements do not eliminate all warnings, static files inside your theme directory may contain hardcoded HTTP paths.
- Access your hosting File Manager and navigate to
wp-content/themes/your-active-theme/. - Inspect template files like
header.php,footer.php, andfunctions.php. Look for hardcoded script tags, stylesheets, or image links starting withhttp://. - Replace them with explicit
https://URLs or convert them to relative paths (e.g.,/images/logo.png). - Check custom CSS files for background images defined with insecure paths:
background-image: url('http://...'). Update these tohttps://.
Part 4: Advanced CDN and Edge Mitigation Strategies
If you utilize a Content Delivery Network (CDN) or reverse proxy such as Cloudflare or AWS CloudFront to distribute your web traffic globally, you can leverage edge rules to clean mixed content automatically.
- Cloudflare Automatic HTTPS Rewrites:
- Log into your Cloudflare dashboard.
- Navigate to the SSL/TLS tab and select Edge Certificates.
- Toggle Automatic HTTPS Rewrites to On. This automatically replaces insecure
http://links in your HTML body with securehttps://links right at Cloudflare’s edge servers before they reach visitor browsers.
- AWS CloudFront / Enterprise Proxies: Configure your origin response headers or viewer protocol policies to enforce strict redirection rules, ensuring no unencrypted traffic slips through your caching layers.
Part 5: Frequently Asked Questions (FAQ)
1. What exactly is a mixed content warning after moving to HTTPS?
A mixed content warning occurs when your website is loaded securely over HTTPS, but individual elements (images, scripts, stylesheets) are requested over an unsecure HTTP connection.
2. Why do modern browsers block mixed content?
Browsers block mixed content to protect users from man-in-the-middle attacks, where hackers could tamper with insecure scripts or track user interactions on an otherwise encrypted page.
3. What is the difference between active and passive mixed content?
Active mixed content includes executable scripts and iframes that can compromise site security (and are completely blocked by browsers), while passive content includes images and static media that trigger a “Not Secure” warning.
4. How can I quickly check my website for mixed content errors?
You can open your website, press F12 to open Developer Tools, click on the Console tab, and review any red or yellow security warning logs.
5. Does changing WordPress general settings to HTTPS fix mixed content?
Updating WordPress URLs to HTTPS fixes core application links, but it does not fix hardcoded URLs inside your database post content, custom widgets, or theme files.
6. How do I safely run a database search-and-replace for mixed content?
You can use plugins like Better Search Replace or command-line tools like WP-CLI, ensuring you always back up your database before executing changes.
7. What is the upgrade-insecure-requests CSP header?
It is a Content Security Policy directive that instructs browsers to automatically upgrade all incoming HTTP subresource requests to HTTPS before fetching them.
8. Can a CDN like Cloudflare fix mixed content automatically?
Yes. Enabling features like Cloudflare’s “Automatic HTTPS Rewrites” can rewrite insecure links on the fly at the edge network level.
9. Why is my green padlock still missing even after fixing all image URLs?
If images are clean, check your browser console again; you may have lingering insecure JavaScript files, tracking pixels, font stylesheets, or iframe embed widgets loading over HTTP.
10. Who should I contact if mixed content errors persist on my server?
If you have updated database records, cleared all caches, and audited your code without success, open a technical support ticket with your web hosting provider for advanced proxy or server configuration reviews.
Conclusion
Resolving mixed content warnings after moving to an HTTPS hosting environment is a vital step in securing your digital infrastructure, protecting user data, and maintaining pristine Google SEO rankings. By systematically diagnosing errors via browser consoles, updating database URLs, fixing hardcoded theme files, and implementing server-level CSP directives, you can achieve a fully encrypted, trustworthy browsing experience.