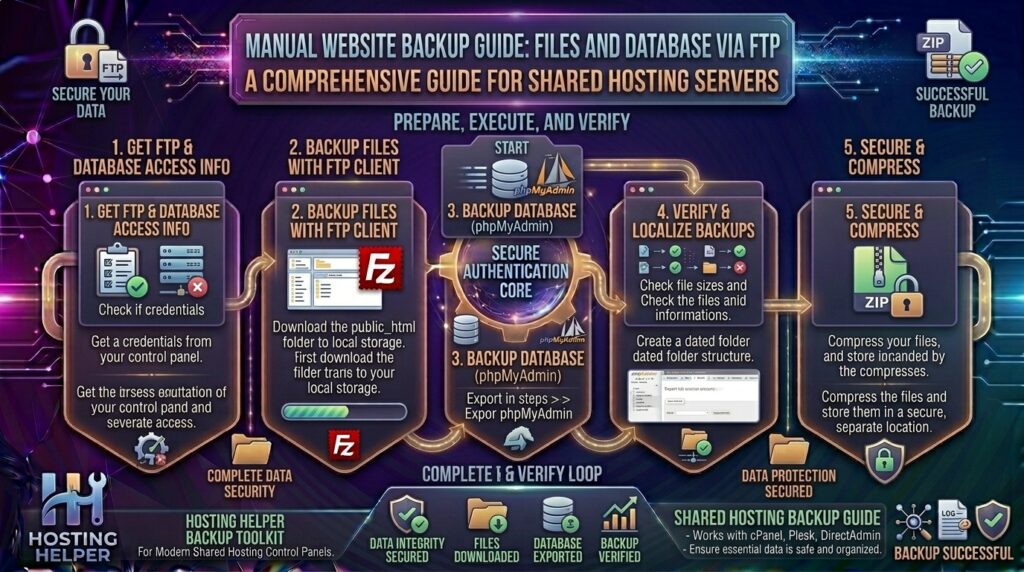
How to Backup Website Files and Database Manually via FTP and phpMyAdmin: The Ultimate Comprehensive Guide
Welcome to thehostreviews.com—your premier authoritative destination for web hosting evaluations, infrastructure management, and technical server administration guides spanning tech hubs across New York, San Francisco, Texas, California, and Washington.
Introduction: Why Manual Backups Are a Web Master’s Ultimate Safety Net
Whether you are managing a high-traffic e-commerce storefront in Texas, a dynamic digital publication in New York, or a custom SaaS web application hosted on cloud infrastructure in San Francisco, data loss is the single greatest existential threat to your online business.
While most modern web hosting control panels (such as cPanel, Plesk, or custom portals) offer automated one-click backup utilities, relying solely on automated platform tools can leave you vulnerable. Automated backups can fail silently due to storage quota limits, third-party plugin corruptions, or unexpected server updates. When catastrophe strikes—whether from a botched WordPress theme update, malicious malware injection, or accidental file deletion—knowing how to perform a complete, independent manual backup of your website files and database is an indispensable survival skill.
By combining an FTP (File Transfer Protocol) client with phpMyAdmin, you bypass third-party backup plugins entirely, giving you raw, uncompromised control over your digital assets.
This comprehensive, expert-level guide will walk you through the exact, step-by-step processes required to back up your website files via FTP and your database via phpMyAdmin safely and efficiently.
Part 1: Understanding the Anatomy of a Website Backup
Before executing any file transfers or database exports, it is crucial to understand that a complete website backup consists of two completely separate components:
- Website Files (The Source Code & Media): These reside on your hosting server directory (typically inside
public_html). They include your core CMS files, themes, plugins, custom PHP/HTML scripts, CSS/JavaScript assets, and uploaded media libraries (photos, videos, PDFs). These are retrieved via FTP/SFTP. - The Database (The Dynamic Data): Your website files do not store blog posts, user comments, e-commerce orders, user accounts, or configuration settings. All dynamic data lives inside a MySQL or MariaDB database. This is extracted via phpMyAdmin.
To restore a broken website from scratch, you must have fresh, synchronized copies of both your FTP files and your SQL database dump.
Part 2: Phase 1 — How to Back Up Website Files Manually via FTP/SFTP
To download your raw website files from your hosting server to your local computer, you will use an FTP client. Industry-standard tools include FileZilla (free and cross-platform), Cyberduck, or WinSCP.
Step 1: Gather Your FTP Credentials
Before opening your FTP software, you need your server connection credentials. You can find these inside your hosting control panel (cPanel under FTP Accounts or FTP Connection):
- FTP Host / Server Address: Usually
ftp.yourdomain.comor your server’s direct IP address. - Username: Your hosting FTP account username (e.g.,
username@yourdomain.com). - Password: Your FTP account password.
- Port: Standard FTP is
21, but secure SFTP (Secure File Transfer Protocol) typically runs on port22and is strongly recommended for encrypted data transfers.
Step 2: Establish a Secure Connection via FileZilla
- Open FileZilla (or your preferred FTP client).
- At the top quick-connect bar, enter your Host, Username, Password, and Port.
- Click Quickconnect (or Connect). If prompted with an unknown certificate warning for your server, check the box to trust the certificate permanently and click OK.
Step 3: Locate Your Root Web Directory (public_html)
Once connected, FileZilla’s interface splits into two main panes:
- Left Pane (Local Site): Displays the hard drive and folders on your personal computer.
- Right Pane (Remote Site): Displays the file directory structure on your web hosting server.
- In the right-hand remote pane, look for your primary domain folder or navigate to your user account root directory.
- Open the folder named
public_html(orwww). This is the master web root folder containing all accessible files for your live website.
Step 4: Download Your Website Files
- Create a dedicated, clearly labeled folder on your local computer (e.g.,
Backup_FTP_2026_08_18). - In FileZilla’s right-hand remote pane, select all files and folders inside
public_html(including critical hidden files starting with a dot, such as.htaccess). - Right-click the selection and click Download.
- FileZilla will begin transferring thousands of files from your remote server down to your local computer queue. Depending on the size of your media uploads folder, this can take anywhere from a few minutes to over an hour.
- Monitor the Transfer Queue at the bottom of FileZilla to ensure 0 failed transfers before closing the connection.
Part 3: Phase 2 — How to Export Your MySQL Database via phpMyAdmin
Once your website files are safely downloaded, you must back up your database to preserve all dynamic content.
Step 1: Access phpMyAdmin via Your Hosting Control Panel
- Log into your web hosting control panel (e.g., cPanel).
- Scroll down to the Databases module section.
- Click on phpMyAdmin. This will launch the web-based database management interface in a new browser tab, automatically authenticating your session.
Step 2: Identify and Select Your Website Database
- In the left-hand sidebar of phpMyAdmin, you will see a list of databases hosted on your server.
- If you manage multiple sites, check your website’s configuration file (e.g.,
wp-config.phpfor WordPress) via your FTP file manager to verify your exact database name (DB_NAME). - Click on the correct database name in the left sidebar. phpMyAdmin will load the Structure tab, displaying all tables (such as
wp_posts,wp_users, etc.).
Step 3: Navigate to the Export Tab
- In the top horizontal navigation menu of phpMyAdmin, click on the tab labeled Export.
Step 4: Configure Export Options
phpMyAdmin provides two export methods:
- Quick (Default): Instantly exports the database using default settings. Suitable for smaller databases.
- Custom (Recommended for Professionals): Gives you granular control over compression, metadata, and table structures.
- Select Custom – display all possible options.
- Tables: Ensure Select all is checked so every single table is included in your backup.
- Format: Keep the format dropdown set to SQL.
- Data Dump Options / Structure: Ensure Add DROP TABLE / VIEW / PROCEDURE / FUNCTION / EVENT / TRIGGER is checked. This ensures that when you restore the database later, it clears old tables before writing new ones, preventing duplicate entry errors.
- Compression: Select gzipped (or zip). Compressing your export file reduces a multi-gigabyte database down into a compact archive, speeding up download times.
Step 5: Execute and Save the SQL Dump File
- Scroll down to the very bottom of the export settings page and click the blue Go button.
- Your browser will prompt you to save the file. Save the
.sql.gzor.sqlfile inside your local backup folder alongside your downloaded FTP files.
Part 4: Phase 3 — Verifying and Storing Your Manual Backup
A backup that has never been tested is not a backup—it is merely a hope. Follow these professional verification protocols before wrapping up:
- Check File Counts: Open your local backup folder and verify that your FTP download completed with zero failed transfers.
- Verify SQL File Size: Check your exported database file size. If your database is large, ensure the file size matches expectations (e.g., 50MB+) and isn’t truncated.
- Store Off-Site: Never keep your manual backups solely on the same server or your local laptop. Upload a copy to secure cloud storage providers such as Google Workspace Drive, Microsoft OneDrive, Dropbox, or Amazon S3.
Part 5: Troubleshooting Common Manual Backup Errors
Even experienced web administrators occasionally encounter hiccups during manual transfers. Here is how to resolve common issues:
- Error: FTP Connection Timeout or Dropped Connection
- The Cause: Hosting firewalls frequently drop idle FTP connections, or thousands of tiny thumbnail images overwhelm the connection thread limit.
- The Fix: In FileZilla, go to Site Manager, click your site, open the Transfer Settings tab, check Limit number of simultaneous connections, and set it to a lower number (e.g.,
4or6).
- Error: phpMyAdmin Export Timeout (“Maximum execution time exceeded”)
- The Cause: If your database is massive (several gigabytes), exporting it through a web browser can hit PHP’s maximum script execution time limit.
- The Fix: Use the Custom export method and select gzipped compression to reduce data size, or use command-line tools like
mysqldumpvia SSH for massive enterprise databases.
Part 6: Frequently Asked Questions (FAQ)
1. What is the difference between an FTP backup and a control panel backup?
An FTP backup downloads raw files directly from your server directory using file transfer protocols, whereas a control panel backup (like cPanel Backup Wizard) packages your entire account (files, databases, email configurations, SSL certificates) into a single .tar.gz archive generated on the server.
2. Can I back up my website files without using an FTP client?
Yes. If your hosting account features a control panel file manager, you can compress your public_html folder into a .zip file directly on the server, and then download that single zip file via your browser. However, FTP is significantly more reliable for massive file trees.
3. Do I need to back up my database every single time I back up files?
Yes! Your database and your website files change continuously. If you only back up your files, any new e-commerce orders, user registrations, or blog comments posted since your last file backup will be lost during a restoration.
4. What should I do if my FTP download gets interrupted midway?
FileZilla features a robust resume/retry queue. If a transfer disconnects, simply reconnect to your server, select the remaining queued or failed files, right-click, and click Process queue. FileZilla will pick up right where it left off.
5. Is SFTP safer than standard FTP?
Yes. Standard FTP transmits your username, password, and file data in unencrypted plain text across the network, making it vulnerable to packet sniffing. SFTP encrypts the entire connection session using SSH keys.
6. How do I restore my website using these manual backups?
To restore, reverse the process: upload your backed-up files back into your server’s public_html directory via FTP, and import your .sql database file back into phpMyAdmin using the Import tab.
7. Why is my database export file extension .sql.gz?
When you select compressed output in phpMyAdmin, it packages the raw SQL text file into a Gzip archive (.sql.gz) to save disk space and accelerate downloading speeds.
8. How often should I perform manual website backups?
For high-traffic e-commerce stores or dynamic membership sites, daily backups are recommended. For static portfolio sites or blogs with infrequent updates, backing up weekly or immediately before major plugin/theme updates is sufficient.
9. Can I automate manual backups via FTP?
While manual FTP backups are typically executed by hand, you can script automated backups using command-line utilities like lftp, rsync, or scheduled cron jobs running on your local workstation or a secondary server.
10. What is the safest place to store my downloaded backup files?
The gold standard in disaster recovery is the 3-2-1 backup rule: Keep at least 3 copies of your data, across 2 different storage media types, with at least 1 copy stored securely off-site in cloud storage.
Conclusion
Knowing how to manually back up your website files via FTP and export your database via phpMyAdmin gives you absolute independence and security as a website owner. By bypassing fragile third-party plugins and mastering core server utilities, you ensure that your digital assets remain completely protected against any technical emergency.