Setting Up a Free Let’s Encrypt SSL Certificate in cPanel: The Ultimate Step-by-Step Guide
Welcome to thehostreviews.com—your ultimate authority for web hosting insights, performance optimization, and technical tutorials spanning major tech hubs from New York and San Francisco to Texas, California, and Washington.
Introduction: Why Your Website Desperately Needs an SSL Certificate
In today’s digital ecosystem, website security is no longer optional—it is an absolute fundamental requirement. Whether you are running a personal blog, a high-traffic portfolio, or an enterprise e-commerce store targeted at users across the United States and globally, visitor trust starts with encryption.
When a user lands on your website, browsers like Google Chrome, Mozilla Firefox, and Safari aggressively flag HTTP sites as “Not Secure.” This single warning label destroys conversion rates, plummets user trust, and hurts your search engine rankings. Google explicitly uses HTTPS as a positive ranking signal.
Historically, obtaining a Secure Sockets Layer (SSL) certificate was an expensive and cumbersome yearly administrative chore, costing anywhere from $50 to hundreds of dollars per domain. Fortunately, the landscape changed forever with the introduction of Let’s Encrypt—a free, automated, and open Certificate Authority (CA) backed by industry giants.
When combined with cPanel—the world’s most popular web hosting control panel—setting up a free Let’s Encrypt SSL certificate takes less than five minutes. This comprehensive, expert-level guide will walk you through everything you need to know to install, configure, troubleshoot, and automate a free Let’s Encrypt SSL certificate on your cPanel account.
Part 1: Understanding Let’s Encrypt and How SSL Works
Before diving into the technical execution, it helps to understand what happens under the hood.
What is an SSL Certificate?
An SSL certificate is a digital certificate that authenticates a website’s identity and enables an encrypted connection. It creates a secure, private tunnel between the user’s web browser and your web server. Any data transferred—such as credit card numbers, passwords, and personal details—is scrambled and protected from malicious interceptors (Man-in-the-Middle attacks).
What Makes Let’s Encrypt Different?
Let’s Encrypt is a non-profit Certificate Authority provided by the Internet Security Research Group (ISRG). Its core mission is to create a more secure and privacy-respecting Web by making encryption free and accessible to everyone.
- 100% Free: There are no hidden fees, trial expirations, or upsells.
- Automated: Protocols like ACME allow software to automatically request, validate, and renew certificates.
- Secured Trust: Let’s Encrypt certificates are trusted by virtually all modern web browsers and operating systems.
- The Catch: Standard Let’s Encrypt certificates are valid for 90 days. However, when integrated properly with cPanel or hosting automation tools, this short lifespan is completely managed behind the scenes via auto-renewals.
Part 2: Pre-Installation Checklist and Prerequisites
Before navigating to your cPanel dashboard to issue your certificate, ensure your domain environment meets the necessary criteria. Skipping these checks is the #1 reason SSL installations fail.
- DNS Propagation: Your domain name must point correctly to your web hosting server’s IP address via its A records (managed through your domain registrar or external DNS provider like Cloudflare).
- Remove Conflicting Rules: Ensure your
.htaccessfile does not block standard HTTP validation requests (specifically directory paths like/.well-known/acme-challenge/). - Active cPanel Access: You will need active login credentials to your web hosting account’s cPanel dashboard.
Part 3: Step-by-Step Guide to Installing Let’s Encrypt SSL in cPanel
Depending on your web hosting provider (whether you utilize budget shared hosting in Texas, enterprise cloud servers in New York, or developer instances in California and Washington), cPanel layouts may vary slightly by theme (usually Paper_Lantern or Jupiter). However, the underlying toolsets remain identical.
Method 1: Using the Native “Let’s Encrypt SSL” cPanel Plugin
Many modern, performance-driven web hosts natively include a dedicated Let’s Encrypt tool directly inside the cPanel interface.
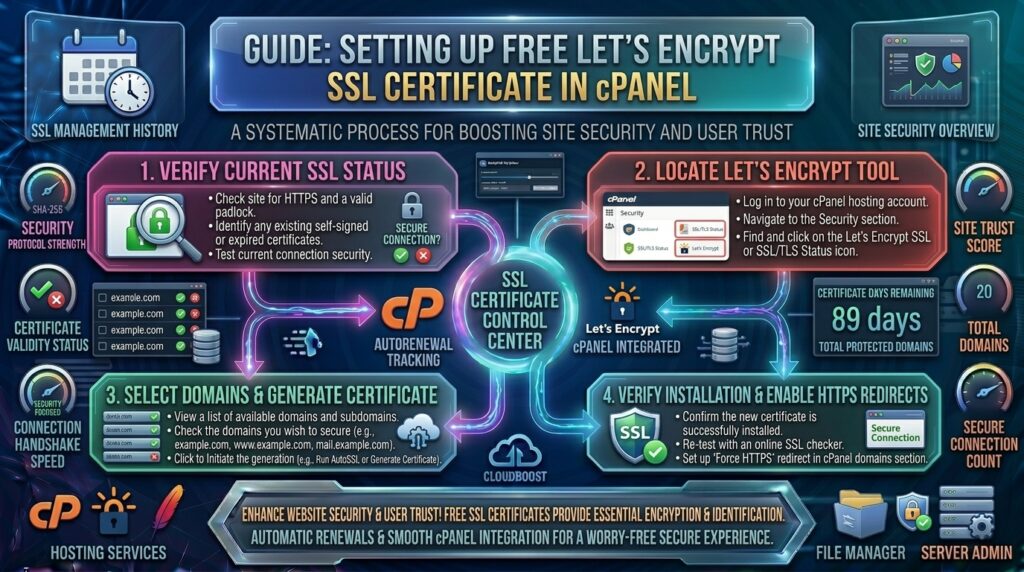
Step 1: Log Into Your cPanel Dashboard
Navigate to your hosting login URL (typically [yourdomain.com/cpanel](https://yourdomain.com/cpanel) or provided via your welcome email) and log in using your username and password.
Step 2: Locate the Security Section
Scroll down the cPanel dashboard until you find the Security block. Look for an icon labeled Let’s Encrypt SSL or SSL/TLS Status. Click on it.
Step 3: Select Your Domain
You will see a list of domains, subdomains, and alias pointers hosted under your account. Locate the specific domain you wish to secure.
Step 4: Click “Issue”
Next to your target domain, click the Issue button.
- Pro Tip: Check the boxes to include secondary aliases like
[www.yourdomain.com](https://www.yourdomain.com)and mail subdomains (mail.yourdomain.comorwebmail.yourdomain.com) to ensure complete coverage.
Step 5: Confirm and Complete
Leave the validation method set to HTTP (the default and easiest method) and click Issue at the bottom of the page.
- cPanel will communicate with the Let’s Encrypt servers, pass the domain challenge, download your certificate files, and install them automatically on your web server.
- Within a few seconds, you will see a success message indicating your certificate has been installed.
Method 2: Using cPanel’s Built-in “AutoSSL” Feature
If your cPanel interface does not feature a standalone “Let’s Encrypt” button, it almost certainly utilizes cPanel’s native AutoSSL system. Many hosts configure AutoSSL to leverage Let’s Encrypt backend provisions automatically.
- In your cPanel dashboard, look under the Security section and click on SSL/TLS Status.
- Here, you will see a color-coded table mapping out the security status of every domain and subdomain.
- If a domain is unsecure or uses an expiring certificate, simply click the blue Run AutoSSL button at the top right.
- cPanel will cycle through its validation routines and secure all eligible domains instantly.
Part 4: Forcing HTTPS Traffic (Crucial for SEO)
Installing an SSL certificate is only half the battle. If visitors can still access your site via [http://yourdomain.com](http://yourdomain.com), search engines may index both versions, resulting in duplicate content penalties and unencrypted traffic warnings. You must force all traffic to redirect automatically to the secure HTTPS protocol.
Option A: Using the cPanel “Domains” Tool
- Return to the main cPanel home screen and locate the Domains section. Click on Domains.
- Find your primary domain name in the list.
- Toggle the switch labeled Force HTTPS Redirect to the On position. This automatically updates your server configuration file behind the scenes.
Option B: Manual .htaccess Redirect
If your host does not offer the toggle switch, you can manually enforce HTTPS by editing your website’s .htaccess file via the cPanel File Manager (ensure “Show Hidden Files” is enabled):
Apache
RewriteEngine On
RewriteCond %{HTTPS} off
RewriteRule ^(.*)$ https://%{HTTP_HOST}%{REQUEST_URI} [L,R=301]
Save the file. Clear your browser cache and test your URL. Typing [http://yourdomain.com](http://yourdomain.com) should now seamlessly bounce your browser over to [https://yourdomain.com](https://yourdomain.com) with a secure green padlock.
Part 5: Advanced Optimization & Troubleshooting Common Errors
Even with seamless tools, technical hiccups can occur. Here is how to diagnose and fix the most common Let’s Encrypt generation errors in cPanel.
1. “DNS DCV: Domain control validation failed”
- The Cause: Let’s Encrypt cannot verify that you own the domain because the DNS records are pointing elsewhere or haven’t fully propagated.
- The Fix: Ensure your domain’s A record points precisely to your cPanel hosting server’s IP address. If you recently updated your nameservers, wait 1 to 24 hours for global DNS propagation to settle.
2. “Authorization Failed: Invalid Response”
- The Cause: The validation challenge file dropped into your public folder cannot be reached via the web browser due to strict firewall settings, Cloudflare proxy rules, or customized
.htaccessredirects blocking the/.well-known/directory. - The Fix: Temporarily disable aggressive web application firewalls (WAF), turn off Cloudflare “I’m Under Attack” or proxy mode (set DNS to gray-cloud/DNS-only temporarily during issuance), and ensure your public directory permissions are correct (usually
755).
3. Handling Wildcard Certificates (*.yourdomain.com)
If you manage multiple subdomains (blog.yourdomain.com, shop.yourdomain.com), generating individual certificates is tedious.
- Standard HTTP validation cannot easily issue wildcard certificates.
- To issue a wildcard Let’s Encrypt SSL inside cPanel, your hosting environment usually requires DNS-based validation (often managed through advanced API integrations or root-level server configurations like WHM plugins or command-line scripts like
acme.sh). If your shared host supports wildcard Let’s Encrypt natively through cPanel, select the wildcard option (*.yourdomain.com) directly inside the issuance dropdown menu.
Part 6: Frequently Asked Questions (FAQ)
1. Are Let’s Encrypt SSL certificates completely free forever?
Yes. Let’s Encrypt is a non-profit initiative funded by sponsors, foundations, and corporate members. There are zero licensing costs, hidden terms, or unexpected renewal charges.
2. How do I renew my Let’s Encrypt SSL certificate?
If your certificate was issued via cPanel’s native Let’s Encrypt plugin or AutoSSL, renewal is 100% automated. The system runs background cron jobs to renew the certificate well before its 90-day expiration window closes. You do not need to lift a finger.
3. Does a free Let’s Encrypt SSL affect SEO performance compared to paid EV/OV SSLs?
From a search engine optimization standpoint, Google treats Let’s Encrypt DV (Domain Validated) certificates identically to expensive paid certificates. Both provide full end-to-end HTTPS encryption, activate the green padlock, and fulfill Google’s security ranking requirements.
4. What happens if my auto-renewal fails?
If an automated renewal fails (usually due to temporary DNS outages or server blocks), your hosting provider or cPanel will typically send an automated email warning notification. You can easily fix the underlying issue and manually click “Run AutoSSL” or re-issue the certificate inside cPanel.
5. Can I use Let’s Encrypt on multiple subdomains?
Yes! When generating your certificate in cPanel, you can select multiple subdomains, addon domains, and parked domains to bundle them together into a single Multi-Domain (SAN) Certificate.
6. Why does my browser still show “Not Secure” after installation?
This is almost always caused by Mixed Content Warnings. Even though your primary URL uses HTTPS, your website’s source code may still reference old internal links, images, or scripts starting with http://. Use a plugin (like Really Simple SSL for WordPress) or update your database links to ensure all static assets load securely over HTTPS.
7. Do I need technical coding skills to set this up?
Not at all. The entire point of cPanel’s integration with Let’s Encrypt is to abstract away complex command-line certificate signing requests (CSR) and manual text file pasting, turning security into a simple point-and-click procedure.
8. Can I migrate my Let’s Encrypt certificate if I change web hosts?
SSL certificates are bound to your active server environment. If you migrate your website to a new web hosting provider, you simply log into the new host’s cPanel account and generate a fresh Let’s Encrypt SSL certificate using the exact same steps outlined in this guide.
9. What are the limitations of Let’s Encrypt certificates?
Let’s Encrypt enforces rate limits to ensure fair usage across the global internet. For instance, you can issue a maximum of 50 certificates per domain per week, and duplicate certificate limits apply. However, these limits are exceptionally high and regular website owners will never come close to hitting them.
10. Does Let’s Encrypt support Organization Validation (OV) or Extended Validation (EV)?
No. Let’s Encrypt exclusively issues Domain Validation (DV) certificates. If your enterprise requires legal business identity verification shown in the certificate details, you will need to purchase a paid OV or EV certificate from a traditional certificate authority.
Conclusion
Securing your website with an SSL certificate is a vital milestone for establishing credibility, protecting your users’ data, and achieving optimal search engine rankings. Thanks to the partnership between Let’s Encrypt and modern cPanel hosting architectures, robust website encryption is no longer locked behind expensive paywalls or complex terminal commands.