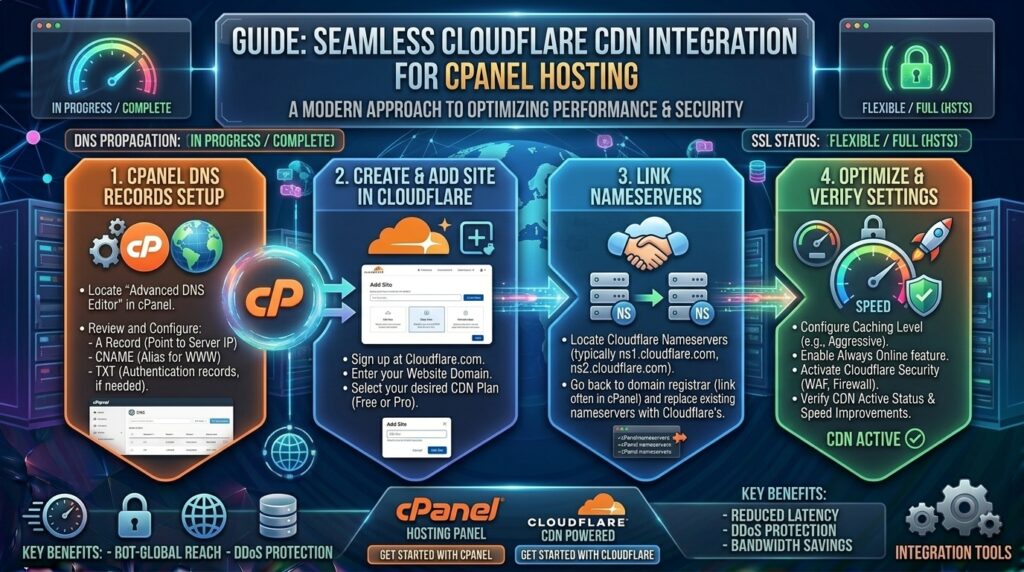
Setting Up Cloudflare CDN with cPanel Web Hosting: The Definitive Master Guide
Welcome to thehostreviews.com—your premier authoritative destination for web hosting evaluations, infrastructure performance tuning, and technical engineering workflows serving tech hubs across New York, San Francisco, Texas, California, and Washington.
Introduction: Why Pairing Cloudflare CDN with cPanel Hosting is a Game-Changer
In the modern digital landscape, website performance and security are non-negotiable. Whether you are running an e-commerce platform in Texas, a digital media outlet in New York, or a SaaS startup in San Francisco, milliseconds dictate your conversion rates, bounce rates, and overall search engine rankings.
While a high-performance web hosting account managed via cPanel gives you a solid foundation, your server is physically anchored to a single data center location. If a user in London tries to access a server hosted in Dallas, data has to travel thousands of miles across physical fiber-optic cables, introducing latency.
Enter Cloudflare CDN (Content Delivery Network).
By routing your website’s DNS through Cloudflare’s global Anycast network of data centers spanning over 300 cities worldwide, you cache static assets at the edge, close to your visitors. Combined with cPanel’s robust server management tools, integrating Cloudflare creates an impenetrable security perimeter and accelerates your website loading speeds dramatically.
This comprehensive, expert-level guide will walk you through the exact end-to-end process of setting up Cloudflare CDN with your cPanel web hosting account, complete with optimization tips, advanced security configurations, and troubleshooting strategies.
Part 1: Understanding How Cloudflare and cPanel Work Together
Before diving into the configuration steps, it helps to understand how these two powerful systems interact.
- Your cPanel Host: Acts as your origin server. This is where your actual website files, databases, PHP scripts, and email accounts live.
- Cloudflare: Acts as your reverse proxy and authoritative DNS provider. When a visitor requests your website, they hit Cloudflare’s nearest edge server first. Cloudflare serves cached static files instantly or securely queries your cPanel origin server for dynamic content.
Key Benefits of This Integration:
- Blazing-Fast Speed: Global caching reduces Time to First Byte (TTFB) and offloads traffic from your origin server.
- Enterprise-Grade Security: Built-in Web Application Firewall (WAF), DDoS mitigation, and bot management shield your cPanel server from malicious attacks.
- Free Universal SSL: Cloudflare provides robust SSL/TLS encryption certificates (including flexible, full, and strict modes) to secure traffic between users and edge servers.
Part 2: Step-by-Step Setup Guide
Follow this step-by-step framework to connect your cPanel-hosted domain to Cloudflare seamlessly.
Step 1: Create a Cloudflare Account and Add Your Site
- Go to Cloudflare’s official website and sign up for a free account.
- Once logged in, click the Add a Site button.
- Enter your exact domain name (e.g.,
yourdomain.com) and click Add Site. - Select the Free Plan tier (which is more than sufficient for most standard blogs, portfolios, and growing businesses) and click Continue.
Step 2: Audit and Review Your DNS Records
Cloudflare will automatically scan your domain’s existing DNS records from your current registrar or cPanel zone file.
- Crucial Tip: Carefully review the scanned list to ensure all critical records—such as your
Arecords pointing to your cPanel server IP,CNAMEentries, and MX records for your email—are accurately represented. - If any records are missing, you can manually add them later inside the Cloudflare DNS dashboard. Click Continue once verified.
Step 3: Update Your Domain Name Servers (NS)
Cloudflare will provide you with two assigned nameservers (e.g., ns1.cloudflare.com and ns2.cloudflare.com).
To delegate authority to Cloudflare, you must update your domain’s nameservers at your domain registrar (where you originally bought the domain, such as GoDaddy, Namecheap, Google Domains/Squarespace, etc.):
- Log into your domain registrar account.
- Locate the Name Servers settings for your domain.
- Replace your old nameservers (which often point to your web host like
ns1.yourwebhost.com) with the two Cloudflare nameservers provided. - Save your changes.
Note: Global DNS nameserver propagation can take anywhere from 1 to 24 hours, though it typically settles within 15–30 minutes.
Step 4: Configure SSL/TLS Settings in Cloudflare
Once your nameservers propagate, log back into your Cloudflare dashboard and secure your connection mode to prevent ERR_TOO_MANY_REDIRECTS errors.
- Navigate to the SSL/TLS app tab on the left sidebar.
- Choose your encryption mode:
- Flexible: Encrypts traffic between the browser and Cloudflare, but talks to your cPanel host via HTTP. (Not recommended if handling sensitive data).
- Full: Encrypts end-to-end between the browser, Cloudflare, and your cPanel host, even if your cPanel host uses a self-signed or Let’s Encrypt certificate. (This is the recommended setting for most shared hosting environments).
- Full (Strict): Requires a valid, trusted SSL certificate (like Let’s Encrypt) installed directly on your cPanel origin server.
- Go to the Edge Certificates sub-tab and toggle Always Use HTTPS to On.
Part 3: Essential Cloudflare Optimizations for cPanel Webmasters
To extract maximum performance and security from your new setup, enable these foundational Cloudflare features:
1. Enable Auto Minify
Minification strips out unnecessary characters, spaces, and comments from your HTML, CSS, and JavaScript files without altering their functionality.
- Go to Speed > Optimization.
- Check the boxes for JavaScript, CSS, and HTML under Auto Minify.
2. Configure Caching Rules (Cache Everything)
By default, Cloudflare only caches static asset extensions (like .jpg, .css, .png). To make Cloudflare cache dynamic HTML pages as well:
- Go to Caching > Cache Rules (or Page Rules depending on your dashboard version).
- Create a rule matching your domain (
[yourdomain.com/](https://yourdomain.com/)*) and set the cache level to Cache Everything. (Warning: Ensure you bypass caching for admin areas like/wp-admin/or user login pages).
3. Enable Brotli Compression
Brotli is a modern lossless compression algorithm developed by Google that compresses assets significantly faster and smaller than traditional Gzip, speeding up asset delivery times for mobile and desktop users.
- Navigate to Speed > Optimization and toggle Brotli to On.
Part 4: Managing cPanel Services Behind Cloudflare (Crucial Troubleshooting)
When you proxy your domain through Cloudflare (orange cloud icon enabled), all web traffic (A records for @ and www) flows through Cloudflare’s proxy network. However, certain cPanel backend ports and subdomains require special handling.
1. Protecting Your Mail Services (mail.yourdomain.com)
If your email is hosted on the same cPanel server, proxying your mail records through Cloudflare will break your incoming and outgoing email connections.
- Go to your Cloudflare DNS settings.
- Ensure that records like
mail.yourdomain.comorcpanel.yourdomain.comare set to DNS Only (grey cloud icon, not orange proxy). This ensures direct traffic routing to your origin server IP for mail and control panel access.
2. Handling Server IP Changes
If you ever migrate your cPanel web hosting account to a new server with a different IP address, remember to update the corresponding A records inside your Cloudflare DNS dashboard immediately to prevent downtime.
Part 5: Frequently Asked Questions (FAQ)
1. Is Cloudflare’s free tier really free forever?
Yes. Cloudflare’s free plan offers unlimited bandwidth, global CDN caching, basic DDoS mitigation, and universal SSL certificates with no time limits or hidden fees.
2. Will setting up Cloudflare break my cPanel email accounts?
It can if you proxy your mail records. To prevent email delivery failures, ensure your mail.yourdomain.com subdomain and MX records are set to DNS Only (Grey Cloud) inside the Cloudflare DNS dashboard.
3. How do I fix the “ERR_TOO_MANY_REDIRECTS” error after enabling Cloudflare?
This infinite loop occurs when your cPanel server forces HTTPS redirection, but Cloudflare’s SSL mode is set to Flexible, causing a bouncing loop between HTTP and HTTPS. To fix it, change your Cloudflare SSL/TLS encryption setting from Flexible to Full.
4. Do I still need an SSL certificate on my cPanel server if I use Cloudflare?
Yes. Even if you use Cloudflare’s edge SSL, maintaining an active SSL certificate (such as a free Let’s Encrypt certificate) on your cPanel origin server is necessary if you use Cloudflare’s Full or Full (Strict) encryption modes.
5. Can I use Cloudflare if my domain registrar is different from my web host?
Absolutely. Cloudflare acts independently of both your registrar and your web host. You simply point your domain registrar’s nameservers to Cloudflare, and Cloudflare points traffic to your cPanel hosting IP.
6. Will Cloudflare hide my actual cPanel server IP address?
Yes! When your DNS records are proxied through Cloudflare (orange cloud), public visitors and automated scrapers see Cloudflare’s global proxy IP addresses instead of your actual cPanel origin server IP, providing a strong layer of protection against direct DDoS attacks.
7. How long does it take for Cloudflare nameserver changes to update?
Nameserver propagation typically takes anywhere from 15 minutes to a few hours globally, depending on your domain registrar and internet service provider (ISP) caching schedules.
8. How do I bypass Cloudflare caching when testing website updates?
If you are actively developing or updating your website and want to view live changes instantly without browser cache interference, go to Cloudflare’s Caching > Configuration tab and click Purge Everything. You can also enable Development Mode in Cloudflare to temporarily bypass edge caching for 3 hours.
9. Does Cloudflare improve SEO performance?
Yes. Google heavily factors page loading speed, Time to First Byte (TTFB), and core Web Vitals into its search ranking algorithm. By accelerating asset delivery via Cloudflare’s global CDN, your website performance scores improve, positively impacting SEO rankings.
10. Can I manage my cPanel DNS records inside Cloudflare after integration?
Yes. Once you switch your domain nameservers to Cloudflare, Cloudflare becomes your primary authoritative DNS manager. Any future DNS records (TXT records for domain verification, custom CNAMEs, etc.) must be added directly inside your Cloudflare dashboard rather than your cPanel Zone Editor.
Conclusion
Integrating Cloudflare CDN with your cPanel web hosting account is one of the single most impactful architectural upgrades you can make for your website. By combining cPanel’s robust file management with Cloudflare’s global edge network, enterprise security, and lightning-fast caching, you protect your assets and deliver an exceptional experience to visitors worldwide.