How to Migrate a WordPress Website Without Downtime: The Ultimate Zero-Loss Guide for 2026
Migrating a WordPress website to a new web hosting provider is a critical rite of passage. Whether you are upgrading your infrastructure to a faster host to target competitive markets like Texas, New York, California, Washington, and San Francisco, or switching from an underperforming shared server to a high-speed cloud environment, the migration process can cause immense anxiety.
The primary fear for any site owner, developer, or digital agency is downtime. When a website goes offline during a migration, you lose live traffic, frustrate potential customers, and risk search engine crawlers encountering error codes (5xx) that can damage your Google SEO rankings.
The good news? Moving a WordPress site completely without downtime is entirely achievable when executed with precision. This comprehensive, expert-level guide walks you through every phase of a zero-downtime WordPress migration, offering actionable tips, DNS strategy optimizations, and troubleshooting workflows designed to rank at the top of Google search.
The Golden Rule of Zero-Downtime Migrations: Order of Operations
To achieve zero downtime, you must understand the fundamental architecture of web traffic routing. When a user or Googlebot enters your domain name (thehostreviews.com) into a browser, their device performs a DNS lookup to find the physical IP address of the server hosting your website files.
If you cancel your old hosting account before your new server is fully configured and tested, visitors will hit a dead end.
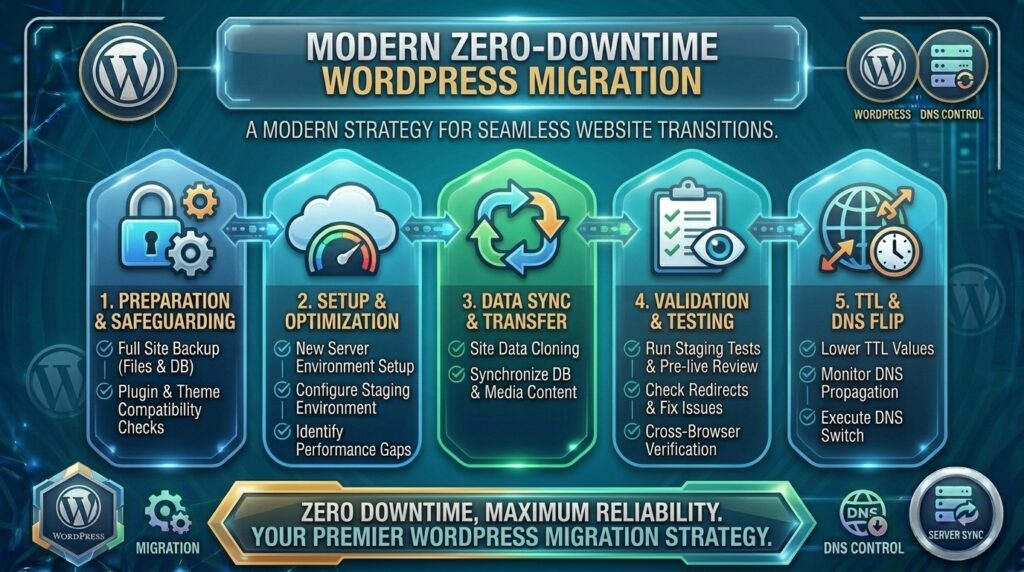
The Zero-Downtime Blueprint:
- Never cancel your old host first. Keep the old server active throughout the entire migration.
- Build and test an exact replica of your WordPress site on the new hosting server via a temporary URL.
- Update your DNS records (specifically the A record) to point your domain to the new server IP.
- Allow for DNS propagation, during which old traffic trickles into the old host while new traffic routes to the new server.
- Only terminate your old hosting account after DNS propagation is 100% complete and you have verified that zero data or email discrepancies exist.
Step 1: Pre-Migration Preparation and Auditing
Before touching any files or database exporters, perform a thorough audit of your existing WordPress installation to ensure a frictionless transition.
1. Clean Up Database Bloat
Over time, WordPress databases accumulate post revisions, orphaned plugin transients, spam comments, and auto-drafts. Cleaning this up reduces export file sizes and speeds up migration.
- Action: Use a optimization plugin (like WP-Optimize or Advanced Database Cleaner) to clean your database tables and optimize tables via phpMyAdmin.
2. Freeze Content Updates
To prevent database synchronization conflicts (where a user leaves a comment or publishes a post on the old site while you are migrating), put your old WordPress site into Maintenance Mode or temporarily freeze content publishing for the duration of the migration window.
3. Inventory Active Services
Make a checklist of all connected assets:
- Custom SSL certificates (Let’s Encrypt or paid wildcard certs).
- Professional webmail accounts and MX records.
- External API integrations, payment gateways (Stripe/PayPal webhooks), and CDN tokens.
Step 2: Setting Up the New Hosting Environment
While your old site remains live and operational, log into your new web hosting provider (such as a LiteSpeed or Nginx-powered host) and prepare the destination environment.
1. Match Your PHP Version and Extensions
Check your current PHP version (e.g., PHP 8.1, 8.2, or 8.3) via your old dashboard (Tools > Site Health > Info > Server), and ensure your new host is set to run the exact same PHP runtime version to avoid plugin compatibility errors.
2. Create an Empty WordPress Installation
Install a clean, fresh instance of WordPress on your new host. Ensure the database name, username, and table prefix match or can be overwritten easily by your migration archive.
Step 3: Performing the Migration (Files & Database)
You have two primary methods for migrating WordPress: using automated migration plugins or executing a manual file-and-database transfer.
Method A: Using Automated Migration Plugins (Easiest)
For most users, plugins like All-in-One WP Migration, Duplicator, or Migrate Guru handle complex serialization and database URL replacement automatically.
- Install the migration plugin on your old site, create a full backup archive package, and download it to your local computer.
- Install a fresh WordPress site on your new host, install the exact same migration plugin, and upload/import your backup package.
- The plugin will automatically overwrite the database, update site URLs, and flush rewrite rules.
Method B: Manual File and Database Transfer (Best for Advanced Users)
- Export the Database: Open phpMyAdmin on your old host, select your WordPress database, click Export, and save the
.sqlfile. - Transfer Files via SFTP or File Manager: Use an FTP client (like FileZilla) or your old host’s File Manager to download your entire
public_htmldirectory (or specificallywp-content/) to your local machine. Then, upload those files into thepublic_htmldirectory of your new host. - Import the Database: Log into phpMyAdmin on your new host, select your new database, and import your
.sqlfile. - Update
wp-config.php: Open your newwp-config.phpfile via your file manager and update your database credentials (DB_NAME,DB_USER,DB_PASSWORD, andDB_HOST) to match your new server configurations.
Step 4: Testing Your Site via Temporary URLs (Crucial Step)
Before altering any public DNS records, you must verify that your migrated WordPress site works perfectly on the new server. Because your domain still points to the old host, you cannot load thehostreviews.com normally. Instead, use a hosts file override or a temporary URL.
How to Bypass DNS Locally Using Your Computer’s Hosts File:
You can force your personal computer to look at the new server’s IP address while leaving the rest of the world pointing to the old server:
- Find the public IP address of your new hosting server in your welcome email or control panel.
- Open your computer’s local hosts file:
- Windows:
C:\Windows\System32\drivers\etc\hosts(open Notepad as Administrator). - Mac / Linux:
/etc/hosts(edit via Terminal usingsudo nano /etc/hosts).
- Windows:
- Add a new line at the bottom of the file in this format:Plaintext
NEW_SERVER_IP_ADDRESS thehostreviews.com www.thehostreviews.com - Save the file and open
thehostreviews.comin your browser. Your browser will now load the site directly from the new server. - Thoroughly test your admin dashboard, permalinks, internal links, forms, and images. Once verified, delete that line from your hosts file.
Step 5: Updating DNS Records and Managing Propagation
Once you have tested the new site and confirmed 100% functionality, it is time to shift public traffic.
1. Lower Your DNS TTL (Time to Live)
24 to 48 hours before migration, log into your DNS registrar (e.g., Cloudflare, Namecheap, GoDaddy) and lower the TTL on your domain’s A records from the default (usually 3600 seconds or 86400 seconds) down to 300 seconds (5 minutes). This tells global internet service providers (ISPs) to check for server updates much more frequently.
2. Update the A Record
Log into your DNS provider and change the main A Record (@ and www) from your old server’s IP address to your new server’s IP address.
3. Understanding DNS Propagation
Because different global ISPs cache DNS lookups differently, “propagation” takes anywhere from a few minutes to a few hours (or up to 24 hours if TTL was high). During this window:
- Traffic coming from networks that have updated will route to your new server.
- Traffic coming from networks still waiting to update will route to your old server.
- Why keeping your old server active matters: Because old requests still hit your old server during propagation, having both servers running simultaneously guarantees zero downtime for any user worldwide.
Step 6: Post-Migration Verification and Final Cleanup
Once DNS propagation has completed globally (you can verify this using tools like dnschecker.org), perform these final verification steps:
- Verify SSL/TLS Certificates: Ensure your new server has successfully generated and installed a valid SSL certificate (HTTPS active, no browser security warnings).
- Check for Broken Links and Mixed Content: Run an internal crawl check to ensure all image URLs and asset paths correctly reflect your domain without lingering temporary staging URLs.
- Monitor Error Logs: Check your new host’s error logs and Google Search Console performance dashboard to ensure Googlebot is successfully crawling the site with
200 OKHTTP status codes. - Safely Terminate Old Hosting: Wait at least 72 hours after updating your DNS records to ensure all global traffic has fully shifted. Once confirmed, you can cancel and terminate your old hosting account.
Frequently Asked Questions (FAQ)
1. Can I really migrate a WordPress site with zero downtime?
Yes. By keeping your old hosting account active while configuring the new server, testing via a local hosts file override, and updating your DNS records with a low TTL, you achieve a seamless transition without any offline window.
2. What happens to incoming website traffic during DNS propagation?
During propagation, incoming visitors are split. Some users whose ISPs have updated will land on your new server, while others will temporarily hit your old server. As long as both servers contain identical data, neither user experiences downtime.
3. Should I cancel my old web hosting account before changing DNS?
Never. Canceling your old host before updating your DNS records will instantly throw a server error to any user or search engine crawler trying to access your site, resulting in painful downtime and SEO penalties.
4. What is a TTL in DNS and why should I lower it before migration?
TTL (Time to Live) dictates how long external DNS resolvers cache your site’s IP address. Lowering TTL to 5 minutes a day before migrating ensures ISPs update to your new server IP almost instantly.
5. How do I test my new website before updating DNS records?
You can edit your local computer’s hosts file to map your domain name directly to your new server’s IP address, allowing only you to view and test the new server environment in your browser.
6. Will migrating my hosting change my WordPress database URLs?
If you use automated migration plugins (like All-in-One WP Migration or Duplicator), they automatically update serialized database strings and URLs. If you do manual database imports, you may need to run a search-and-replace script for domain changes.
7. Do I need to migrate my professional email accounts when changing hosts?
If your email is hosted externally (e.g., Google Workspace or Microsoft 365), changing web hosts only affects your website files, not your email. If your email was hosted on your old cPanel server, you must recreate those email boxes and migrate mail folders on the new host.
8. How long does DNS propagation take?
With a lowered TTL, DNS propagation typically takes between 15 minutes and 2 hours globally, though rare ISP networks can take up to 24 hours to fully flush their caches.
9. Will my Google SEO rankings drop after a website migration?
If executed with zero downtime, proper 301 redirects, and identical URL structures, search engine rankings will remain stable. Temporary drops only occur if the site goes offline or structural URLs break.
10. What is the best tool for migrating WordPress without downtime?
For beginners, automated plugins like All-in-One WP Migration or Migrate Guru offer the smoothest, most error-free transition experience. For advanced users, manual SFTP and phpMyAdmin exports offer precise control.
Conclusion
Migrating a WordPress website without downtime is a meticulous technical procedure, but it is entirely manageable when you follow a structured blueprint. By keeping your legacy server active, building an exact replica on your new high-performance host, testing via local host overrides, and managing your DNS TTL strategically, you can transition your digital assets smoothly.