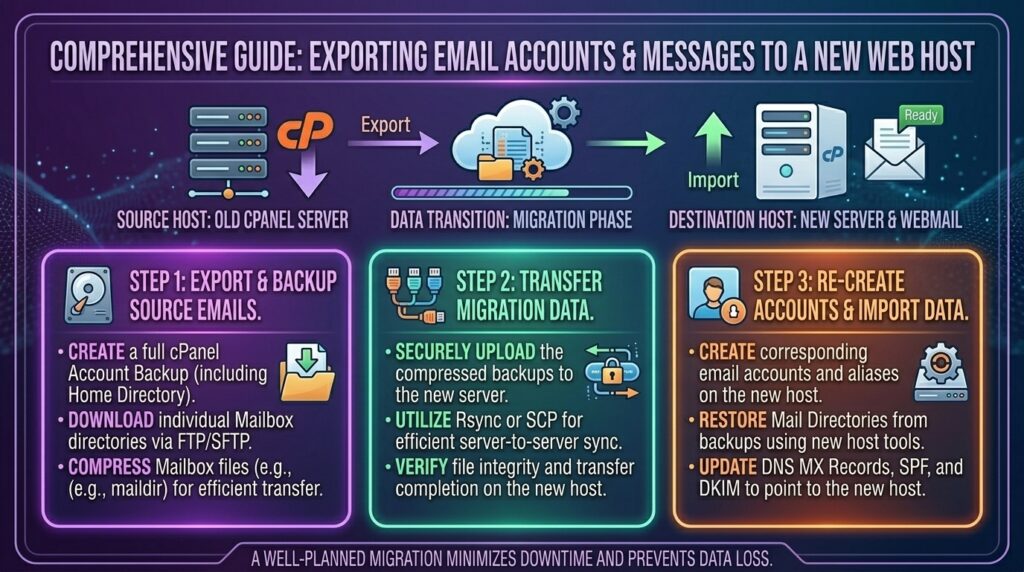
How to Export Email Accounts and Messages to a New Web Host
Migrating a website to a new hosting provider—whether you operate out of Texas, New York, California, Washington, or San Francisco—is a major milestone. However, while most business owners meticulously plan the transfer of their website files, databases, and domain DNS settings, email migration is frequently treated as an afterthought.
When you switch web hosts without a proper email migration strategy, you risk losing critical client history, breaking active communications, and leaving your business blind during the transition window. Whether you are moving between standard cPanel servers, transitioning to enterprise mail solutions, or consolidating multiple mailboxes, knowing how to securely export your email accounts and messages is essential.
This definitive, highly comprehensive guide will walk you through the exact strategies, tools, and best practices required to migrate your email accounts and messages to a new web host safely, with zero data loss.
Understanding the Challenges of Email Migration
Moving website files is simple because files are static. Email, on the other hand, is dynamic. Emails live inside active databases, folder structures, and mailbox hierarchies (INBOX, Sent, Archive, Custom Folders).
When migrating email between hosts, you face three primary challenges:
- Account Provisioning: Recreating exact email addresses, forwarding rules, autoresponders, and password hashes on the new server.
- Message Transfer: Moving gigabytes of historical message data from the old IMAP server to the new IMAP server without timing out or missing attachments.
- DNS & Propagation Downtime: Ensuring that incoming mail isn’t sent to your old server after you delete the old hosting account.
Phase 1: Preparation and Pre-Migration Audit
Before touching any migration tools or changing server configurations, you must map out your existing email ecosystem.
1. Audit Your Existing Mailboxes
- Log into your current cPanel or mail administration dashboard.
- Make a complete list of all active email addresses, aliases, and forwarders.
- Check the storage consumption of each mailbox (via cPanel > Email Accounts). Knowing your data size helps you choose the right migration method. Large mailboxes (over 10GB) require automated IMAP sync tools, whereas smaller ones can sometimes be handled manually.
2. Back Up Existing Data Locally
As a safety net, ensure you have a fallback. If you use a desktop mail client like Microsoft Outlook, Apple Mail, or Thunderbird via IMAP or POP3, ensure your client has a local offline archive (such as an .pst or .mbox file) of your past messages.
Phase 2: Method 1 – The Easiest Way (Full cPanel-to-cPanel Account Transfer)
If your old host and your new host both use cPanel, you can bypass manual email setups entirely. A full cPanel account transfer moves everything—website files, databases, and all email accounts, passwords, filters, and historical messages—automatically.
Step-by-Step cPanel Transfer Process:
- Generate a Full Backup on the Old Host:
- Log into your old cPanel account.
- Navigate to Files > Backup Wizard (or Backup).
- Select Full Account Backup and choose a destination (Home Directory or remote server).
- Download the resulting
.tar.gzarchive to your local computer or provide the transfer token to your new host.
- Restore on the New Host:
- Log into your new WHM (Web Host Manager) if you have reseller/root access, or ask your new hosting provider’s support team to restore the full backup package for you.
- The restoration process automatically rebuilds every cPanel email account, restores all mailbox directories, and maintains existing passwords.
Phase 3: Method 2 – Manual Email Recreation and IMAP Sync (For Different Hosting Environments)
If you are moving between different control panel ecosystems (e.g., from custom VPS to cPanel, or cPanel to Google Workspace / Microsoft 365), you must recreate the accounts manually and use an automated IMAP synchronization tool to move the messages.
Step 1: Recreate Email Accounts on the New Host
- Log into your new cPanel dashboard.
- Navigate to Email Accounts > Create.
- Recreate every email address using the exact same naming convention (e.g.,
support@yourdomain.com). - Pro Tip: For the migration phase, it is recommended to use temporary passwords or match your old passwords so migration sync tools can authenticate successfully.
Step 2: Use Automated IMAP Sync Tools (IMAPCopy / imapsync)
Moving thousands of messages manually via drag-and-drop in a webmail client will result in timeouts and missing attachments. Instead, system administrators use imapsync—a specialized command-line tool designed to mirror mailboxes between two servers.
If you have SSH access to your server, you can run an imapsync command like this:
Bash
imapsync --host1 old.yourdomain.com --user1 user@yourdomain.com --pass1 "OldPassword" \
         --host2 new.yourdomain.com --user2 user@yourdomain.com --pass2 "NewPassword" \
         --ssl1 --ssl2
This command connects to both your old and new mail servers concurrently, syncing your Inbox, Sent, Drafts, and custom folders while avoiding duplicate message downloads.
Phase 4: Method 3 – Desktop Client Export/Import (For Small Mailboxes)
If you have a small mailbox (under 1GB) and do not have command-line or SSH access, you can use a desktop email client like Mozilla Thunderbird as an intermediary bridge.
Step-by-Step Thunderbird Migration:
- Configure Old Account: Add your old email account to Thunderbird via IMAP. Let it fully synchronize and download your message headers and bodies.
- Export Local Archive: Create a local folder structure within Thunderbird and drag your old server folders into a local “Archive” folder stored on your computer.
- Configure New Account: Add your new email account (configured on the new host) to Thunderbird alongside the old one.
- Upload Messages: Drag and drop your local archive folders directly into the new IMAP account folder structure. Thunderbird will automatically upload the historical messages up to your new hosting server.
Phase 5: Updating DNS and Avoiding Email Blackouts
The most critical part of an email migration is timing your DNS switch to prevent emails from being sent to your old server after you’ve closed it down.
| DNS Record Type | Old Host Value | New Host Value | Action Required |
| MX Records | mail.olddomain.com | mail.newdomain.com | Update priority and target destination |
| SPF Record | v=spf1 include:oldhost ... | v=spf1 include:newhost ... | Update provider include statement |
| DKIM / DMARC | Old cryptographic keys | New cryptographic keys | Regenerate in new cPanel Email Deliverability |
Step-by-Step Cutover Checklist:
- Lower TTL (Time to Live): 24–48 hours before you begin your migration, lower your DNS TTL settings to 300 seconds (5 minutes) at your domain registrar. This ensures global DNS servers pick up your future changes instantly.
- Complete the Data Sync: Run your final
imapsyncor manual folder sync right before switching your DNS records to capture any last-minute incoming emails. - Update MX Records: Change your domain’s MX records to point to your new hosting provider’s mail server or external provider (Google/Microsoft).
- Keep the Old Host Active: Do not cancel your old hosting plan immediately. Keep the old server active for at least 7 to 14 days post-migration in case a slow-updating ISP still routes a sender’s email to your old mailbox.
Preventative Best Practices for Seamless Email Migrations
- Test Before Switching DNS: Always log into webmail on your new host using a temporary host URL (
http://new-server-ip:2096ormail.newdomain.comprior to DNS change) to verify that your inbox is fully populated and operational. - Notify Your Team: If you manage emails for multiple users or employees, provide them with clear instructions on updating their mobile devices and desktop clients (Outlook/Apple Mail) to use the new incoming/outgoing mail server hostnames.
- Audit Spam Authentication: After migration, check your new cPanel Email Deliverability tab to verify that SPF, DKIM, and DMARC records are fully green.
Frequently Asked Questions (FAQ)
1. Will I lose incoming emails during a web hosting migration?
You will not lose incoming emails as long as you keep your old mail server active during the DNS propagation window and perform a final synchronization right before updating your MX records.
2. Can I migrate emails without knowing my old email passwords?
If you have root/WHM or cPanel admin access on the old server, you can reset the email account passwords or access the underlying mail directory files directly on the server storage via SSH/SFTP without needing the user’s explicit password.
3. What happens to my email forwarders and autoresponders?
Forwarders, filters, and autoresponders are not automatically migrated by basic IMAP sync tools. You must manually recreate your email forwarders and vacation autoresponders inside your new cPanel dashboard.
4. How long does an IMAP email migration take?
The duration depends entirely on the size of your mailboxes. A small 500MB mailbox can sync in under 2 minutes, while massive 50GB business mailboxes can take several hours depending on network bandwidth and server throttling.
5. Why are my sent messages missing after migration?
Many mail clients or migration scripts only target the core INBOX. If your sent messages were stored locally on your computer rather than the server’s Sent folder, they won’t transfer automatically unless explicitly copied.
6. Do I need to reconfigure my phone and desktop email apps?
Yes. Once your new server is active and DNS records have propagated, your mobile devices (iPhone/Android) and desktop apps (Outlook/Mail) will need their incoming and outgoing SMTP/IMAP server hostnames updated to match your new host.
7. What is the difference between IMAP and POP3 during a migration?
IMAP syncs folders and messages across the server and all devices, making it ideal for migrations. POP3 downloads messages locally and often deletes them from the server, which makes historical synchronization much harder.
8. Can I migrate emails from cPanel to Google Workspace?
Yes. When migrating from cPanel to Google Workspace or Microsoft 365, you can use automated migration tools provided by Google/Microsoft (such as the Google Workspace Data Migration Service) by providing your old cPanel IMAP connection credentials.
9. Why am I getting authentication errors when running imapsync?
Authentication errors usually happen due to special characters in your password, incorrect server ports, or security firewalls blocking external IMAP connections. Try temporarily changing the password to a simpler alphanumeric string during the migration.
10. When is the safest time to cancel my old hosting account?
It is recommended to wait at least 14 days after updating your MX records and completing your email migration before canceling your old hosting plan, ensuring that all global DNS caches have fully expired and no legacy traffic is missed.
Conclusion
Migrating your email accounts and historical messages to a new web host doesn’t have to be a stressful ordeal. By auditing your mailboxes beforehand, choosing the right migration strategy (whether a full cPanel account restore, an automated imapsync script, or a desktop client export), and carefully managing your DNS cutover window, you can transition your entire digital communication infrastructure with zero data loss and absolute peace of mind.