Steps to cancel hostgator subscription without hidden renewal charges: Welcome to thehostreviews.com—your premier authoritative destination for hosting provider evaluations, cancellation guides, and subscription management walkthroughs spanning major technology hubs from New York and San Francisco to Texas, California, and Washington.
Introduction: Why Canceling HostGator Can Be Tricky
HostGator is one of the most widely used web hosting providers on the planet, powering millions of websites worldwide. However, when the time comes to migrate to a new platform, scale down operations, or close a project, webmasters frequently run into a frustrating hurdle: unexpected post-cancellation charges and recurring invoices.
Many users log into their customer dashboard, click a few buttons to cancel, and assume their financial obligation is over. Weeks later, they notice credit card bills, automatic PayPal deductions, or surprise domain renewal charges hitting their accounts. Why does this happen? Web hosting platforms operate on aggressive automated renewal billing cycles, and standalone add-ons—such as domain names, privacy protection, CodeGuard backups, or SiteLock security—are often billed independently from your main hosting plan.
If you want to walk away cleanly without leaving automated billing loops behind, you need a precise, strategic execution plan. This comprehensive, step-by-step masterclass outlines the exact safeguards, cancellation workflows, and financial checkpoints required to terminate your HostGator subscription securely and completely.
Part 1: Pre-Cancellation Audit (Protecting Your Data and Money)
Before you pull the plug on your HostGator account, you must perform a mandatory structural check to prevent permanent data loss or accidental billing penalties.
1. Back Up Your Website Completely
Once a HostGator account is fully canceled and terminated, your server files, databases, and emails are permanently purged from their servers.
- Log into your HostGator cPanel or Customer Portal.
- Use the Backup Wizard or file manager to download a full backup archive of your website files and export your MySQL databases via phpMyAdmin.
- Store these backups locally on your computer or cloud drive before taking any steps to cancel.
2. Understand HostGator’s Refund Policy Windows
Timing matters heavily when canceling a hosting account:
- The 30-Day Money-Back Guarantee: If you purchased your shared, WordPress, VPS, or dedicated hosting plan within the last 30 days, you are eligible for a full refund of the base hosting fee.
- Cancellations After 30 Days: HostGator does not offer refunds for unused months on standard prepaid shared hosting terms once the initial 30-day window passes. Your account will remain active until the end of your current prepaid billing cycle, after which it will close.
- Non-Refundable Add-ons: Domain registrations, custom software setup fees, administrative fees, and third-party security add-ons (like SiteLock or CodeGuard) are strictly non-refundable.
Part 2: Step-by-Step Guide—Canceling HostGator Without Hidden Charges
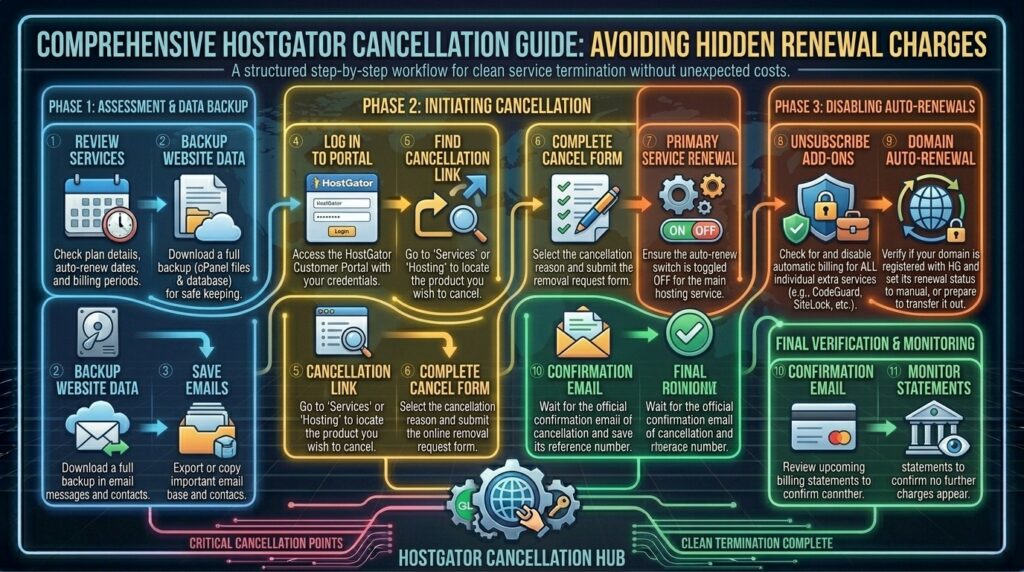
To guarantee that no hidden renewal charges sneak through after your departure, follow this rigorous 5-step cancellation sequence.
Step 1: Handle Your Domain Names Separately
This is the #1 trap that catches users off guard. Canceling your web hosting plan does NOT automatically cancel your domain name registration.
- Domain names are registered on an annual billing cycle and are often set to auto-renew 30 days prior to expiration.
- If you registered your domain through HostGator and want to keep it, you must transfer it away to a new registrar (like Cloudflare or Namecheap) or ensure its auto-renew is explicitly disabled if you intend to let it expire.
- To manage your domain renewals, navigate to the Renewal Center inside your HostGator Customer Portal and uncheck auto-renewals for any domains you do not wish to keep.
Step 2: Disable Auto-Renewal for All Add-Ons and Plans
Before submitting your final cancellation request, turn off auto-renewal to prevent automated gateway charges:
- Log into the HostGator Customer Portal.
- Navigate to the Hosting or Billing tab from the left-hand navigation menu.
- Locate your primary hosting plan and any additional services (such as automated backups or SSL add-ons).
- Turn off the Auto-Renew toggle for every single individual line item.
Step 3: Initiate the Formal Cancellation Request
Now you can safely submit your cancellation request through the official dashboard:
- In your Customer Portal, go to the Hosting section and click the Manage link next to your primary domain.
- Navigate to the Billing tab on the Hosting Details page.
- Scroll to the bottom and click the Cancel Package button.
- HostGator will open a cancellation questionnaire page. Select your reason for leaving from the checklist or type it into the text box, then click Continue.
- Review the final confirmation prompt and click Finish Canceling.
Step 4: Watch for the Mandatory Confirmation Email
HostGator’s system requires manual or automated verification to process account closures:
- After completing the cancellation steps, you should receive an email confirmation from HostGator stating that your cancellation request has been received.
- Crucial Rule: If you do not receive a confirmation email within 1 to 2 hours, your cancellation was not successfully registered, and you will remain financially liable for future renewals. If the email does not arrive, immediately open a Live Chat session or call their support line to complete the cancellation verbally.
Step 5: Sever External Payment Agreements (PayPal & Credit Cards)
Even after canceling inside HostGator, automated merchant agreements can occasionally attempt recurring draws if payment tokens remain active:
- If you paid via PayPal: Log into your PayPal account, navigate to Settings > Payments > Manage Automatic Payments, locate any active billing agreements or subscriptions tied to Endurance International Group (EIG) or HostGator, and cancel them immediately.
- If you paid via Credit Card: Keep an eye on your banking statements over the next billing cycle. If you notice any unauthorized pending charges after receiving your official HostGator cancellation confirmation, contact your bank immediately to flag the merchant token.
Part 3: Troubleshooting Common HostGator Billing Disputed Charges
Even with careful planning, unexpected bills can occasionally surface. Here is how to handle them:
- The “30 Days Before Expiration” Domain Rule: HostGator bills domain renewals 30 days before the actual expiration date. If you try to cancel a domain renewal 10 days before expiration, you may already be locked into the renewal invoice. Always manage domain changes at least 45 to 60 days in advance.
- Unnoticed Multi-Year Invoices: When users sign up for HostGator under heavily discounted 3-year promotional terms, they often forget the billing frequency. Ensure you review your initial signup receipt to verify whether your plan was set to renew annually, biennially, or triennially.
- Escalating Unresolved Billing Issues: If you followed all cancellation steps, saved your confirmation email, but still experienced an unauthorized charge, contact HostGator billing support via phone at
(866) 964-2867or initiate a chargeback dispute directly with your credit card issuer by presenting your written HostGator cancellation confirmation timestamp.
Part 4: Frequently Asked Questions (FAQ)
1. How do I completely cancel my HostGator subscription?
You can cancel your subscription by logging into the HostGator Customer Portal, navigating to your hosting management tab, selecting the Billing section, clicking “Cancel Package,” and completing the exit questionnaire.
2. Will canceling my hosting plan automatically cancel my domain name?
No. Domain names are billed and managed independently. If you do not disable auto-renew or transfer your domain away, your domain registration will automatically renew and bill you.
3. How do I stop HostGator from charging my PayPal account automatically?
In addition to canceling inside HostGator, you must log into your PayPal account, go to your Automatic Payments dashboard, and cancel any active billing agreements tied to HostGator.
4. Can I get a refund if I cancel my HostGator plan after 30 days?
No. HostGator’s money-back guarantee strictly applies only to the first 30 days of your initial purchase. Cancellations after 30 days do not qualify for prorated refunds on shared hosting plans.
5. What happens to my website data after I cancel HostGator?
Once your cancellation is processed and your billing period expires, all website files, databases, emails, and backups stored on your server are permanently deleted. Always back up your data beforehand.
6. Why am I still receiving HostGator invoices after canceling?
This usually happens because you canceled only the hosting plan while leaving a domain registration or separate add-on service active, or because your cancellation request failed to generate a confirmation email.
7. How do I know if my HostGator cancellation was successful?
You will receive an official confirmation email from HostGator acknowledging the cancellation request. If you do not receive this email within a couple of hours, your account is still active.
8. Are add-on services like SiteLock or CodeGuard refundable?
No. Third-party add-ons such as SiteLock security, CodeGuard backups, and specialized SSL certificates are completely non-refundable upon purchase.
9. What phone number can I call to cancel HostGator over the phone?
You can reach HostGator’s billing and cancellation support department directly by calling (866) 964-2867.
10. Can I transfer my domain away from HostGator before canceling?
Yes, and it is highly recommended. Transferring your domain to a new registrar first ensures you maintain complete control over your domain name before terminating your hosting services.
Conclusion
Canceling a HostGator subscription without incurring hidden renewal charges requires looking beyond the basic hosting dashboard. By backing up your data, separating your domain name management, disabling auto-renewals for all add-ons, submitting the official cancellation request, and severing external PayPal billing agreements, you can close your account securely and cleanly.