Troubleshooting DNS Propagation Delay After Changing Nameservers: The Ultimate Masterclass
Welcome to thehostreviews.com—your premier authoritative destination for domain name architecture tutorials, DNS routing guides, and web hosting platform evaluations spanning major technology hubs from New York and San Francisco to Texas, California, and Washington.
Introduction: The Waiting Game of Domain Migration
You have meticulously selected a new high-performance web hosting provider, migrated your website files, imported your database, and secured your SSL certificate. The final step in your website migration journey is pointing your domain to your new host by updating your Nameservers (NS) at your domain registrar (such as GoDaddy, Namecheap, or Cloudflare).
You eagerly type your website address into your web browser, press Enter, and… nothing happens. Or worse, you encounter a weird hybrid state where your old website loads on your laptop, a 404 error appears on your mobile phone, and your business email stops working entirely.
You panic, wondering if you broke your domain. Relax—you are likely experiencing DNS Propagation Delay.
For business owners, e-commerce managers, and digital agencies managing web infrastructure across competitive tech hubs from New York to San Francisco, waiting for DNS changes to take effect can be an anxiety-inducing experience. Understanding how the Domain Name System works, why propagation takes time, and how to troubleshoot routing discrepancies is essential for a seamless migration.
This comprehensive, step-by-step masterclass breaks down the mechanics of DNS propagation, explains why delays happen, and provides an actionable engineering playbook to verify, speed up, and troubleshoot your domain routing.
Part 1: Demystifying DNS Propagation (How the Global Internet Finds Your Site)
To troubleshoot DNS delays effectively, you must understand what actually happens behind the scenes when you update your nameservers.
1. The Global Phonebook of the Internet
The Domain Name System (DNS) functions as the global directory of the internet. It translates human-friendly domain names (like thehostreviews.com) into computer-friendly numeric IP addresses (like 192.0.2.1) so browsers know which physical server to connect to.
When you update your nameservers at your registrar, you are essentially telling the master domain registry: “My domain’s authoritative routing instructions have changed. Here is where the new name servers live.”
2. Why Doesn’t the Change Happen Instantly? (Caching)
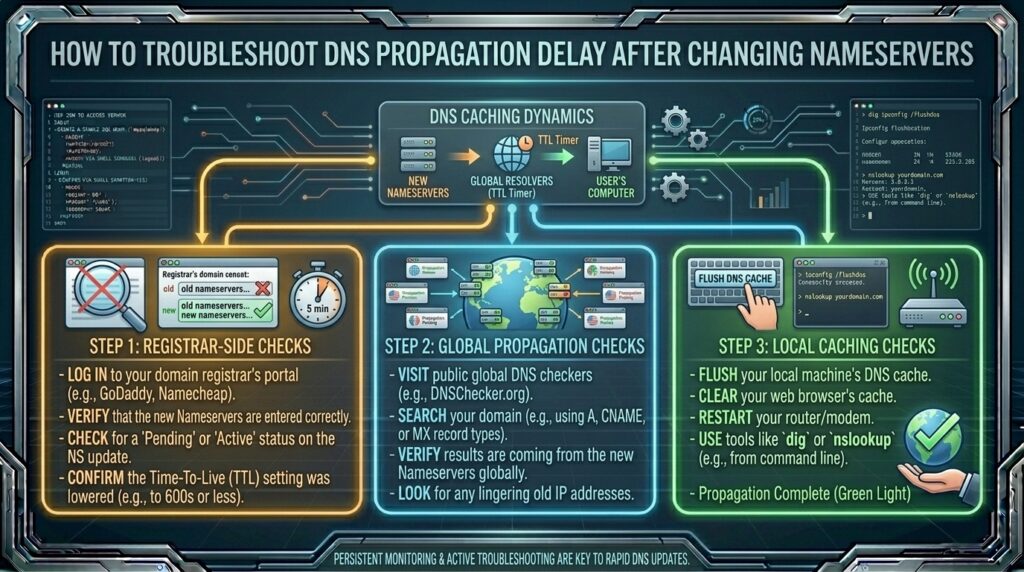
If DNS updates are sent to the master registry immediately, why does it take anywhere from 2 to 48 hours for the change to reflect globally? The answer is Caching.
To prevent the global DNS infrastructure from collapsing under billions of continuous lookup requests every second, internet service providers (ISPs), public DNS resolvers (like Google 8.8.8.8 or Cloudflare 1.1.1.1), operating systems, and web browsers aggressively cache DNS records.
- Time to Live (TTL): Every DNS record has a designated TTL value (measured in seconds). If your old nameservers had a TTL of 86,400 seconds (24 hours), recursive DNS resolvers around the world will continue serving your old cached IP address for up to a full day before checking the master registry for updates.
- The Global Rollout: As millions of ISP resolvers worldwide gradually let their cache expire, they send fresh requests to the root servers, slowly discovering your new nameservers. This uneven expiration schedule is what creates “DNS propagation delay”—where your site loads for a user in New York but shows the old server for a user in Texas.
Part 2: Step-by-Step Diagnostic Protocol—Checking Propagation Status
Never rely on your local web browser to check whether DNS propagation is complete. Browsers use aggressive local caching that can trick you into thinking a site is down when it is already fully resolved elsewhere. Execute this professional diagnostic workflow instead:
Step 1: Use Global DNS Propagation Checkers
Instead of guessing, use automated global lookup tools to query DNS servers located in dozens of cities worldwide simultaneously:
- DNS Checker (
dnschecker.org) - What’s My DNS (
whatsmydns.net)
How to use them:
- Navigate to DNS Checker or What’s My DNS.
- Enter your domain name (
thehostreviews.com). - Select NS (Nameservers) or A (IP Address) from the record type dropdown.
- Click Search. The tool will query global DNS nodes from Tokyo to London and New York, giving you an instant visual map showing which regions have updated to your new nameservers (indicated by green checkmarks) and which regions are still caching old records (red crosses).
Step 2: Query Nameservers Directly via Command-Line Tools
If you want to bypass third-party web tools and check records directly from your local workstation, use command-line networking utilities.
Using dig (Mac / Linux / Windows WSL):
Open your terminal and run a query pointing directly to a specific public DNS resolver:
Bash
dig @8.8.8.8 thehostreviews.com NS
This command asks Google’s public DNS server (8.8.8.8) for the active nameservers of your domain right now, ignoring your local computer cache.
Using nslookup (Windows / Mac / Linux):
Bash
nslookup -type=ns thehostreviews.com
Part 3: Actionable Tips to Accelerate and Manage DNS Propagation
While you cannot force every single ISP worldwide to instantly flush its cache, you can take proactive engineering steps to minimize downtime and speed up propagation times.
Tip 1: Lower Your TTL Before Changing Nameservers (Pre-Propagation)
The single best practice for a smooth migration is planning ahead.
- 24 to 48 hours before you plan to change your nameservers, log into your current DNS provider and lower the TTL (Time to Live) on all your DNS records from the standard 86,400 seconds (24 hours) down to 300 seconds (5 minutes).
- When you finally update your nameservers, resolvers will only cache your old records for 5 minutes instead of a full day, accelerating global propagation dramatically. Remember to raise your TTL back up after the migration is stable.
Tip 2: Manually Flush Your Local DNS Cache
If propagation is complete globally, but your personal computer or office network still refuses to load the new site, your local machine is clinging to old cached records. Flush your cache manually:
- For Windows (Command Prompt as Administrator):DOS
ipconfig /flushdns - For macOS (Terminal):Bash
sudo dscacheutil -flushcache; sudo killall -HUP mDNSResponder - For Google Chrome Users: Open a new tab, navigate to
chrome://net-internals/#dns, and click Clear host cache.
Tip 3: Temporarily Bypass DNS via Your hosts File
If you need to test your new website on your new hosting server immediately—even while global DNS is still propagating—you can trick your local computer into routing the domain directly to your new server IP.
- Open your local machine’s
hostsfile with administrator privileges:- Windows:
C:\Windows\System32\drivers\etc\hosts - Mac / Linux:
/etc/hosts
- Windows:
- Add a new line at the bottom containing your new server’s IP address followed by your domain name:Plaintext
192.0.2.123 thehostreviews.com www.thehostreviews.com - Save the file. Your computer will now bypass public DNS entirely and connect directly to your new host for testing. Don’t forget to remove this line later!
Part 4: Common Pitfalls and Why DNS Propagation Fails
If your DNS propagation seems stuck for days and refuses to complete, you are likely encountering one of these common configuration traps:
- Typos in Nameserver Entries: The number one cause of failed propagation is a simple spelling error when entering custom nameservers at your registrar (e.g., typing
ns1.whosting.cominstead ofns1.webhosting.com). Double-check every character against the welcome email provided by your host. - Glue Record Discrepancies: If you are using custom nameservers (like
ns1.yourdomain.com) tied to your own domain, you must create matching Glue Records (Child Nameservers) at your registrar containing your server’s IP address. Without glue records, recursive resolvers enter an infinite loop trying to resolve the nameserver address through the domain itself. - Registrar Lock vs. Transfer Locks: Ensure your domain is not locked due to an active transfer status or domain expiration, which prevents registry-level updates from processing.
- Conflicting DNS Management Panels: If you left Cloudflare (or another external DNS manager) active while changing nameservers at your domain registrar, routing rules will conflict, breaking your site access. Ensure your DNS records are fully consolidated in your target hosting provider’s zone editor before switching nameservers.
Part 5: Frequently Asked Questions (FAQ)
1. What is DNS propagation delay?
DNS propagation delay is the time it takes for recursive DNS servers and ISPs worldwide to recognize and update their cached records after you change your domain’s nameservers.
2. How long does DNS propagation usually take?
DNS propagation typically takes anywhere from 2 to 24 hours, though in rare cases involving high TTL values, it can take up to 48 hours to complete globally.
3. Can I make DNS propagation instant?
You cannot make propagation truly instant worldwide, but you can dramatically accelerate it by lowering your TTL values to 300 seconds a day before changing your nameservers.
4. Why does my website load on my phone, but show a 404 error on my laptop?
This occurs because your mobile carrier network and your home office internet service provider (ISP) use different DNS servers with varying cache expiration times.
5. What tool can I use to check global DNS propagation?
You can use free online propagation checkers like DNS Checker (dnschecker.org) or What’s My DNS (whatsmydns.net) to view real-time lookup status across global cities.
6. How do I flush my local computer’s DNS cache?
You can flush your local DNS cache by running ipconfig /flushdns in Windows Command Prompt or sudo dscacheutil -flushcache in macOS Terminal.
7. What is a DNS Time to Live (TTL) setting?
TTL is a numeric value (in seconds) that tells recursive DNS resolvers how long they should cache a specific DNS record before requesting a fresh update from the master server.
8. Why is my email failing after changing nameservers?
Email routing depends heavily on MX (Mail Exchange) and TXT (SPF/DKIM) records. When you change nameservers, if you forget to recreate your email DNS records on your new host, your mail service breaks.
9. What is a Glue Record and when do I need one?
A Glue Record is a mapping of a custom nameserver hostname (like ns1.yourdomain.com) to an IP address, required when your nameservers use the same domain name you are actively migrating.
10. Who should I contact if my DNS propagation fails after 48 hours?
If nameservers refuse to propagate after two full days, first check for typos at your registrar, and then open a support ticket with both your domain registrar and your web hosting provider to inspect registry error logs.
Conclusion
Troubleshooting DNS propagation delay after changing nameservers requires patience, structured verification tools, and an understanding of global caching behavior. By pre-planning your TTL reductions, utilizing real-time global checkers like DNS Checker, flushing local caches, and avoiding common spelling typos, you can navigate domain migrations smoothly and keep your website accessible.