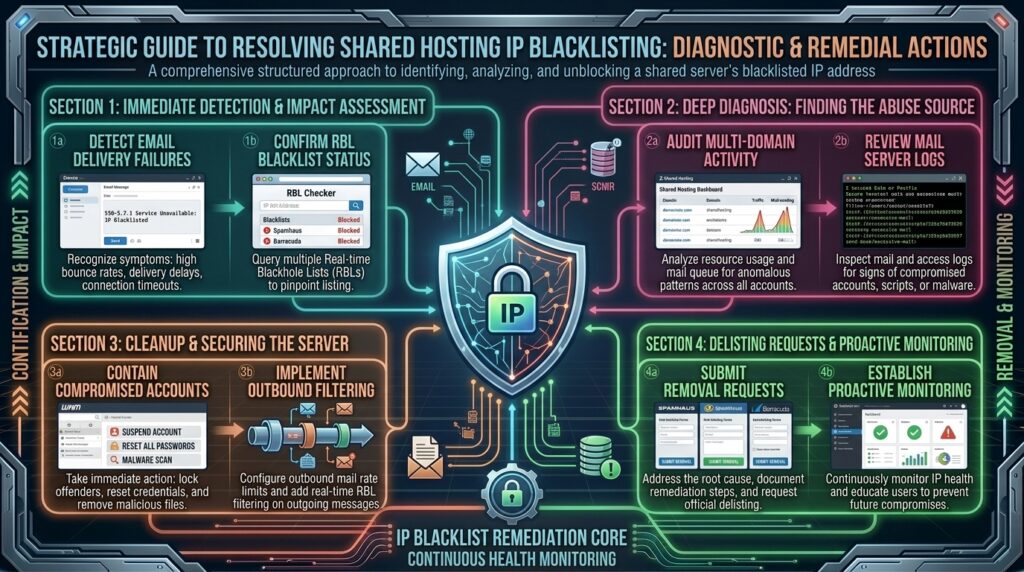
What to do when shared hosting IP address gets blacklisted? Welcome to thehostreviews.com—your premier authoritative destination for server IP reputation audits, email deliverability guides, and shared hosting security recovery walkthroughs spanning major technology hubs from New York and San Francisco to Texas, California, and Washington.
Introduction: The Invisible Wall of the Shared Hosting Blacklist
Imagine checking your business email inbox or monitoring your website’s organic traffic, only to realize that every single email you send is bouncing back with a stern delivery failure notice, or your website visitors are suddenly greeted by aggressive spam firewall blocks. You check your password, review your site files, and find everything appears operational. Then, you run a diagnostic lookup and discover the terrifying truth: Your shared hosting server’s IP address has been blacklisted.
For digital entrepreneurs, online store owners, and growing companies sharing space on budget-friendly web hosting infrastructure, an IP blacklist incident is an absolute operational emergency. Because shared hosting means your website shares a single physical server—and a single public IPv4 address—with dozens or hundreds of other tenant accounts, the actions of a negligent neighbor can jeopardize your entire digital reputation. If an unsecure neighboring account starts spamming mailing lists or hosting malicious scripts, the global email and security screening networks punish the entire IP block, catching your legitimate business in the crossfire.
This comprehensive, step-by-step masterclass dives deep into how IP blacklists operate on shared hosting, provides an advanced diagnostic protocol to check your status, outlines emergency remediation steps, and covers proactive hardening strategies to protect your communication channels.
Part 1: Anatomy of a Shared Hosting IP Blacklist
Before fixing a blocked IP address, you must understand what an IP blacklist is and why shared environments are uniquely vulnerable to reputation drops.
1. How Email and Security Blacklists Work
Major mailbox providers (such as Google Gmail, Microsoft Outlook/Office 365, and Yahoo) alongside global security firms (such as Spamhaus, Barracuda, and SORBS) maintain real-time databases of server IP addresses known to transmit spam, malware, or phishing packets.
- When your mail server attempts to deliver a message, the receiving server queries these blacklists (known as DNSBLs or Real-time Blackhole Lists).
- If your shared hosting server’s IP address is listed in even one major database, your emails are instantly rejected, sent directly to spam folders, or blocked at the network firewall layer.
2. The Shared Hosting Vulnerability Dilemma
On a Virtual Private Server (VPS) or Dedicated Server, you own your IP address; if you get blacklisted, it is because of your own actions. On shared hosting, however:
- Up to 500 websites may share the exact same outbound mail server IP address.
- If a spammer signs up for a neighboring hosting account, bypasses basic signup filters, and begins dispatching thousands of unsolicited emails, the server IP gets flagged within hours.
- Consequently, your legitimate transactional emails, password reset alerts, and client invoices fail to deliver through no fault of your own.
Part 2: Step-by-Step Diagnostic Protocol—Are You Really Blacklisted?
Never guess your IP reputation status. Execute this rigorous diagnostic workflow to pinpoint whether your shared hosting IP is genuinely listed.
Step 1: Identify Your Server’s Outbound IP Address
Because shared hosting accounts often display multiple internal server names or proxy addresses, you need your exact public outbound IP address:
- Log into your shared hosting control panel (cPanel, hPanel, or Plesk).
- Locate the Server Information or Account Details panel on the sidebar.
- Note your server’s Dedicated IP or shared outbound mail IP address. (Alternatively, send a test email from your domain to an external Gmail account, open the email headers, and check the
Received: fromIP address).
Step 2: Run a Global Blacklist Check
- Open a reputable multi-blacklist auditing tool like MXToolbox (
[mxtoolbox.com/blacklists.aspx](https://mxtoolbox.com/blacklists.aspx)) or DNSChecker (dnschecker.org/ip-blacklist-checker.php). - Type or paste your shared server’s IP address into the search query box.
- Click Blacklist Check.
- The tool will simultaneously query over 100 global DNSBL databases (including Spamhaus, Barracuda, SpamCop, and Invalnum).
- If green checkmarks appear across the board: Your IP is clean. The delivery failure is likely due to SPF, DKIM, or DMARC authentication misconfigurations rather than an IP blacklist.
- If red warning markers appear: Your shared hosting IP address is officially listed on one or more blacklists.
Part 3: Step-by-Step Emergency Resolution Playbook
When you confirm your shared hosting IP address is blacklisted, you cannot simply log into a blacklist provider and delist the IP yourself. Because you are on shared hosting, administrative control over the server belongs to your hosting provider. Follow this action plan to resolve the issue:
Step 1: Open an Urgent Ticket with Your Web Host
This is the single most critical step. Since you do not possess root server privileges on shared hosting, only your web hosting provider can investigate the offending neighbor account, patch server vulnerabilities, and request delisting from blacklists.
- Log into your hosting support portal.
- Open a high-priority technical support ticket.
- Include the exact results from your MXToolbox scan, listing the specific blacklists where your server IP appeared (e.g., Spamhaus SBL or Barracuda Reputation Block List).
- Demand that their sysadmin team investigate outbound mail queues, identify the compromised account sending spam, lock it down, and initiate a delisting request for the shared mail server IP.
Step 2: Implement External SMTP Relay (The Immediate Workaround)
If your business relies heavily on email deliverability and you cannot afford to wait 24 to 48 hours for your shared host to clear the IP blacklist, you must bypass the shared server’s mail daemon entirely.
- Sign up for a dedicated transactional email service or external SMTP relay provider (such as SendGrid, Mailgun, Brevo, or Amazon SES).
- These services use heavily monitored, premium IP pools specifically optimized for high deliverability.
- Install a WordPress SMTP plugin (such as WP Mail SMTP or Fluent SMTP) on your website, enter your external SMTP API credentials, and route all outgoing WordPress emails away from your shared hosting server and through the secure external relay.
Step 3: Audit Your Own DNS Authentication Records
While a shared IP blacklist is often caused by neighbors, ensure your own domain isn’t compounding the issue by lacking proper email authentication protocols:
- SPF (Sender Policy Framework): Ensure your DNS manager has a valid SPF TXT record authorizing your mail servers (e.g.,
v=spf1 include:spf.yourhost.com ~all). - DKIM (DomainKeys Identified Mail): Enable DKIM signing inside your hosting control panel so receiving servers can cryptographically verify that your emails genuinely originated from your domain.
- DMARC (Domain-based Message Authentication, Reporting, and Conformance): Implement a baseline DMARC record to instruct mailbox providers on how to handle unauthenticated messages claiming to be from your domain.
Part 4: Advanced Hardening Strategies for Shared Hosting Users
While you cannot control your hosting neighbors, you can bulletproof your individual account against secondary reputation penalties.
- Secure Your WordPress Installation: If a hacker breaches your specific website via an outdated plugin and injects a spam script into your
public_html/directory, your domain name itself can be flagged for sending spam. Maintain strict updates, strong passwords, and active security firewalls. - Monitor Mail Logs Regularly: Periodically check the Track Delivery or Email Trace tool in your cPanel dashboard to verify that no unauthorized scripts are dispatching mass emails from your account directory.
- Migrate to Cloud Hosting or VPS (If Blacklists Persist): If your shared hosting provider is slow to respond, or if your server’s IP address gets blacklisted repeatedly due to unruly neighbors, it is a clear sign to upgrade your infrastructure. Moving to a dedicated Virtual Private Server (VPS) or cloud instance gives you an exclusive, dedicated IP address where you maintain 100% control over your digital reputation.
Part 5: Frequently Asked Questions (FAQ)
1. Why is my shared hosting IP address blacklisted if I didn’t send spam?
Because you are on shared hosting, your website shares a single IP address with hundreds of other accounts. If a neighboring account gets hacked or sends spam, the entire server IP gets blacklisted.
2. Can I delist a shared hosting IP address myself?
No. Most blacklists (like Spamhaus) require the designated network administrator or Internet Service Provider (ISP) owning the IP block to request delisting after resolving the root security breach.
3. How do I check if my server IP is on a blacklist?
You can use free online diagnostic tools like MXToolbox or DNSChecker by entering your server’s public IP address to scan over 100 global blacklists simultaneously.
4. Will an IP blacklist affect my website’s loading speed?
No. An IP blacklist affects network mail routing and email deliverability, as well as external security firewalls. It does not impact your website’s HTTP loading speed or frontend browsing performance.
5. How long does it take for a hosting provider to fix a blacklisted IP?
Reputable hosting providers usually investigate and submit delisting requests within 24 to 48 hours once notified via a support ticket.
6. What is the fastest workaround if my shared emails are bouncing?
The fastest workaround is routing your outgoing emails through a third-party transactional email provider (like SendGrid, Mailgun, or Brevo) using an SMTP plugin.
7. Does switching web hosts guarantee I will never get blacklisted again?
Switching to shared hosting with a better provider helps, but shared environments always carry inherent risks. Upgrading to a dedicated VPS or cloud server guarantees an exclusive IP address.
8. What are SPF, DKIM, and DMARC, and do they prevent blacklists?
They are email authentication protocols that verify your domain ownership. While they don’t prevent an IP blacklist entirely, they ensure your emails pass security checks and protect your domain reputation.
9. Can Google or Outlook permanently ban my domain?
If your domain is repeatedly associated with spam or phishing, mailbox providers can flag your specific domain name, making it crucial to isolate and secure compromised accounts immediately.
10. Who should I contact if my shared host refuses to fix a blacklisted IP?
If your host ignores blacklist complaints or fails to secure their server IP blocks, it is time to migrate your website to a more reliable, security-focused hosting provider.
Conclusion
Discovering that your shared hosting IP address has been blacklisted can feel frustrating and disruptive, but managing the crisis methodically ensures minimal downtime for your business operations. By executing comprehensive blacklist checks, partnering with your hosting provider’s support team for server-level delisting, routing critical mail through external SMTP relays, and securing your individual account configurations, you can restore full deliverability and protect your digital brand.