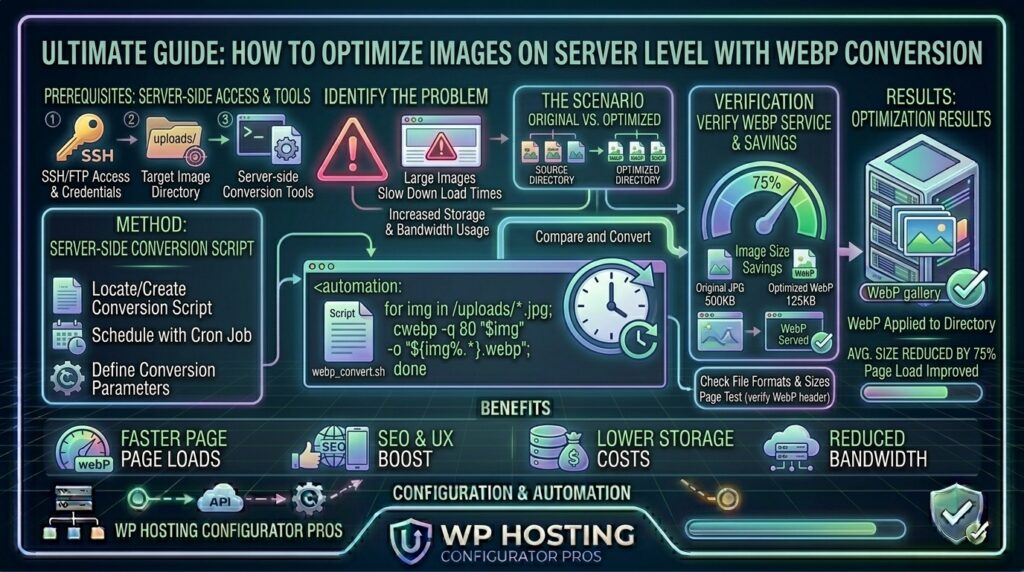
Optimizing Images on a Server Level with WebP Conversion: The Ultimate Performance Engineering Guide
Welcome to thehostreviews.com—your premier authoritative destination for web performance optimization, server-side image compression tutorials, and cloud hosting architecture reviews spanning major tech hubs from New York and San Francisco to Texas, California, and Washington.
Introduction: The Unseen Weight of Web Media
When analyzing website performance bottlenecks, developers frequently obsess over minifying JavaScript bundles, leveraging browser caching, and implementing lightning-fast database queries. Yet, the single largest contributor to sluggish page load speeds and bloated bandwidth consumption remains unchanged: Unoptimized Images.
High-resolution JPEGs and PNGs downloaded straight from cameras, stock photo sites, or design tools routinely weigh in between 1MB and 5MB each. When multiplied across a modern e-commerce product catalog, a real estate portal, or a content-rich media blog, page payloads quickly skyrocket past 10MB. This results in agonizingly slow Core Web Vitals scores, poor mobile experiences, and depressed Google search rankings.
While WordPress plugins and content management system (CMS) extensions exist to compress images, they rely heavily on PHP processing overhead, consuming valuable CPU cycles and database resources every time an image is uploaded.
Enter Server-Level Image Optimization and WebP Conversion. By automating compression directly at the Linux operating system or web server layer using native binaries like cwebp, ImageMagick, or libvips, you can systematically convert your entire media library to next-generation WebP formats instantly, transparently, and with zero ongoing software plugin bloat.
This comprehensive, expert-level guide will walk you through the architecture of WebP, step-by-step installation guides for server tools, automated shell scripts for bulk conversion, Nginx dynamic delivery rules, and advanced caching configurations.
Part 1: Understanding WebP and Server-Level Architecture
Before writing scripts or configuring web servers, it is essential to understand why WebP outperforms traditional image formats and how server-level processing works.
1. What Makes WebP Superior?
Developed by Google, the WebP image format provides superior lossless and lossy compression for images on the web.
- Lossy WebP Images: Typically 25% to 34% smaller in file size compared to comparable JPEG images at equivalent structural quality metrics.
- Lossless WebP Images: Up to 26% smaller than PNG images while supporting full alpha-channel transparency.
- Transparency and Animation: Unlike traditional JPEG, WebP supports both 24-bit RGB color with transparency (alpha channel) and animated frames, making it a true universal replacement for JPEG, PNG, and GIF.
2. The Server-Level Pipeline vs. CMS Plugins
Relying on WordPress plugins (like Imagify or ShortPixel) to compress images introduces dependency bottlenecks:
- PHP memory limits can cause large image conversions to timeout with a 500 Internal Server Error.
- Background cron jobs can stall or fail during high-traffic surges.
- Proprietary third-party SaaS APIs can become expensive or throttle bulk operations.
By contrast, server-level conversion utilizes native command-line binaries (cwebp, find, bash) running directly on your Linux VPS. It processes thousands of images in seconds, completely bypassing PHP and freeing your application to focus on serving users.
Part 2: Step 1 — Installing WebP Conversion Tools on Your Server
To convert images on your server, you must first install Google’s official WebP command-line utility package (webp) and image processing libraries (ImageMagick or libvips) on your Linux VPS.
Step 1: Connect via SSH and Update Repositories
Log into your server as root or a sudo-privileged user:
Bash
ssh root@your_server_ip
apt update
Step 2: Install the WebP Package
On Ubuntu or Debian-based Linux distributions, install the webp package directly from the official repositories:
Bash
apt install webp -y
For RedHat, AlmaLinux, or Rocky Linux systems:
Bash
dnf install libwebp-tools -y
Step 3: Verify the Installation
Verify that the cwebp (encoder) and dwebp (decoder) binaries are successfully installed and accessible from your terminal:
Bash
cwebp -version
Expected Output: You should see version details (e.g., v1.3.2 or similar).
Part 3: Step-by-Step Guide — Bulk Converting Existing Images
If your web directory already contains thousands of legacy JPEG and PNG files (e.g., inside /var/www/html/wp-content/uploads/), you can write a recursive shell script using find and cwebp to convert every image in place.
1. A Simple Single-Image Conversion Test
Before running bulk operations, test the encoder on a single sample image:
Bash
cwebp -q 80 /var/www/html/sample.jpg -o /var/www/html/sample.webp
-q 80: Sets the compression quality to 80% (the industry standard sweet spot balancing visual fidelity and file size reduction).-o: Specifies the output path for the new.webpfile.
2. Writing an Automated Bulk Conversion Shell Script
Create a bash script named convert_to_webp.sh inside your server’s root directory:
Bash
nano convert_to_webp.sh
Paste the following robust shell script, updating the target directory to match your website’s media folder:
Bash
#!/bin/bash

# Target web media directory
TARGET_DIR="/var/www/html/wp-content/uploads"

echo "Starting recursive WebP conversion in $TARGET_DIR..."

# Find all JPG and PNG files and convert them to WebP if the .webp version doesn't exist
find "$TARGET_DIR" -type f \( -name "*.jpg" -o -name "*.jpeg" -o -name "*.png" \) | while read -r img; do
    # Define output path
    webp_path="${img%.*}.webp"

    # Check if WebP version already exists to avoid redundant processing
    if [ ! -f "$webp_path" ]; then
        echo "Converting: $img -> $webp_path"
        cwebp -q 80 "$img" -o "$webp_path" > /dev/null 2>&1
    fi
done

echo "WebP batch conversion completed successfully!"
3. Executing the Script
Make the script executable and run it in the background using nohup (to prevent interruption if your SSH session drops):
Bash
chmod +x convert_to_webp.sh
nohup ./convert_to_webp.sh > conversion.log 2>&1 &
You can monitor the progress of your batch conversion in real-time by inspecting the log file:
Bash
tail -f conversion.log
Part 4: Step-by-Step Guide — Configuring Nginx to Serve WebP Dynamically
Having .webp files sitting on your server alongside your original JPEGs is only half the battle. You must configure your web server (Nginx) to intelligently serve the .webp version to supporting browsers while seamlessly falling back to JPEG/PNG for older browsers (like legacy Safari or Internet Explorer).
1. Open Your Nginx Server Block Configuration
Bash
nano /etc/nginx/sites-available/thehostreviews.conf
2. Add Content Negotiation Rules
Insert the following conditional logic inside your server block. This configuration checks if the incoming browser request includes image/webp in its Accept header and verifies whether the matching .webp file exists on disk:
Nginx
# Map browser support for WebP
map $http_accept $webp_suffix {
    default "";
    "~*webp" ".webp";
}

server {
    listen 80;
    server_name thehostreviews.com www.thehostreviews.com;
    root /var/www/html;

    # Intercept image requests and serve WebP dynamically if supported
    location ~* ^.+\.(png$|jpg$) {
        add_header Vary Accept;
        try_files $uri$webp_suffix $uri =404;

        # Aggressive caching for static media assets
        expires 30d;
        add_header Cache-Control "public, no-transform";
    }
}
3. Test and Reload Nginx
Check your Nginx configuration for syntax errors and reload the service:
Bash
nginx -t
systemctl reload nginx
Part 5: Automating Future Uploads via Server Hooks or Cron
Converting existing media is helpful, but what about new images uploaded by administrators tomorrow? You can automate future conversions using one of two methods:
Method 1: Setting Up a Cron Job for Incremental Conversion
Instead of running manual conversions every time an image is uploaded, configure a Linux Cron job to execute your convert_to_webp.sh script automatically every night during low-traffic hours (e.g., 3:00 AM).
- Open the root crontab file:Bash
crontab -e - Add the following cron schedule rule:Code snippet
0 3 * * * /bin/bash /root/convert_to_webp.sh > /dev/null 2>&1 - Save and exit. Your server will now automatically convert new images to WebP every single night.
Part 6: Best Practices for Server-Level Image Optimization
- Set Optimal Quality Thresholds: Never set your WebP compression quality below
75unless dealing with massive bulk thumbnails. A quality setting between80and85provides the optimal balance where visual degradation is completely imperceptible to the human eye. - Keep Original Backups: Never delete your original JPEG and PNG files after generating WebP versions. Always maintain original backups in case you need to regenerate images or migrate to newer next-gen formats like AVIF in the future.
- Monitor Disk Space Inodes: Converting thousands of images into WebP format duplicates your file count on disk. Ensure your hosting disk storage and inode limits have sufficient headroom.
Part 7: Frequently Asked Questions (FAQ)
1. What is the WebP image format and why is it better than JPEG?
WebP is an advanced image format developed by Google that provides superior lossy and lossless compression, resulting in file sizes 25% to 35% smaller than JPEGs at equivalent visual quality.
2. Why should I optimize images at the server level instead of using a WordPress plugin?
Server-level optimization uses native Linux binaries (cwebp) running directly on the operating system, bypassing PHP memory limits, eliminating plugin overhead, and speeding up bulk conversions.
3. Do all web browsers support the WebP image format?
Yes. Modern versions of Chrome, Firefox, Edge, Safari, and Opera all feature native, out-of-the-box support for the WebP image format.
4. What happens if an older web browser does not support WebP?
By configuring Nginx conditional map rules with try_files, the server checks browser support headers and transparently falls back to serving the original JPEG or PNG file if WebP is unsupported.
5. Will converting images to WebP affect their visual quality?
When configured with an optimal quality setting (between 80 and 85), the compression loss is mathematically imperceptible to human eyes while achieving massive file size reductions.
6. Can I delete my original JPEG files after generating WebP versions?
No. You should always retain your original JPEG and PNG source files as backups in case you need to re-encode images, adjust compression parameters, or migrate formats later.
7. How do I automate WebP conversion for newly uploaded images?
You can automate future conversions by scheduling a nightly Linux Cron job to run a bash script that checks your upload directory and encodes any newly added uncompressed images.
8. What is the command to convert a single image to WebP in Linux?
You can convert a single image using the Google encoder utility command: cwebp -q 80 input.jpg -o output.webp.
9. Does server-level image optimization improve Google SEO rankings?
Yes! Shrinking image file sizes drastically improves page load speeds and core web vitals metrics (like Largest Contentful Paint), both of which are confirmed Google ranking factors.
10. How do I check if my Nginx server is successfully serving WebP images?
You can verify WebP delivery by opening your website in Google Chrome, opening the Developer Tools (F12) under the Network > Img tab, and inspecting the Content-Type header of images to confirm it displays image/webp.
Conclusion
Optimizing images on a server level with WebP conversion represents the pinnacle of modern web performance engineering. By moving away from sluggish PHP plugins and harnessing native Linux binaries and Nginx content negotiation, you slash your page payloads, accelerate Core Web Vitals, and deliver lightning-fast experiences to users globally.